
29 Cozy Ways To Decorate Your Porch For Winter 2026
Your front porch sits empty all winter while every neighbor drives past it daily. That bare, undecorated entrance silently tells every visitor that the season passed you by. The good news? The right ways to decorate your porch for winter cost less than a single dinner out and take under one afternoon to complete. I remember standing on my own plain porch last December feeling genuinely embarrassed by how cold and unwelcoming it looked compared to houses further down the street. Two hours and $45 later, the entire space felt transformed. Furthermore, you do not need professional design skills, a large outdoor space, or an expensive budget to create a porch that looks luxurious and intentional.
Experienced home stylists and exterior decorators consistently confirm that layering just 3 to 4 well-chosen porch elements — greenery, lighting, texture, and a focal point — creates a display that looks far more elaborate than it actually is. Additionally, this article covers 29 specific winter porch decorating ideas ranging from evergreen garland railings and lantern clusters to DIY snow globe lanterns and hay bale seating. Moreover, every idea in this guide suits renters, homeowners, beginners, and anyone working with a tight seasonal decorating budget. You will finish reading this article knowing exactly which porch ideas to try this weekend.
Evergreen Garland Railing Wrap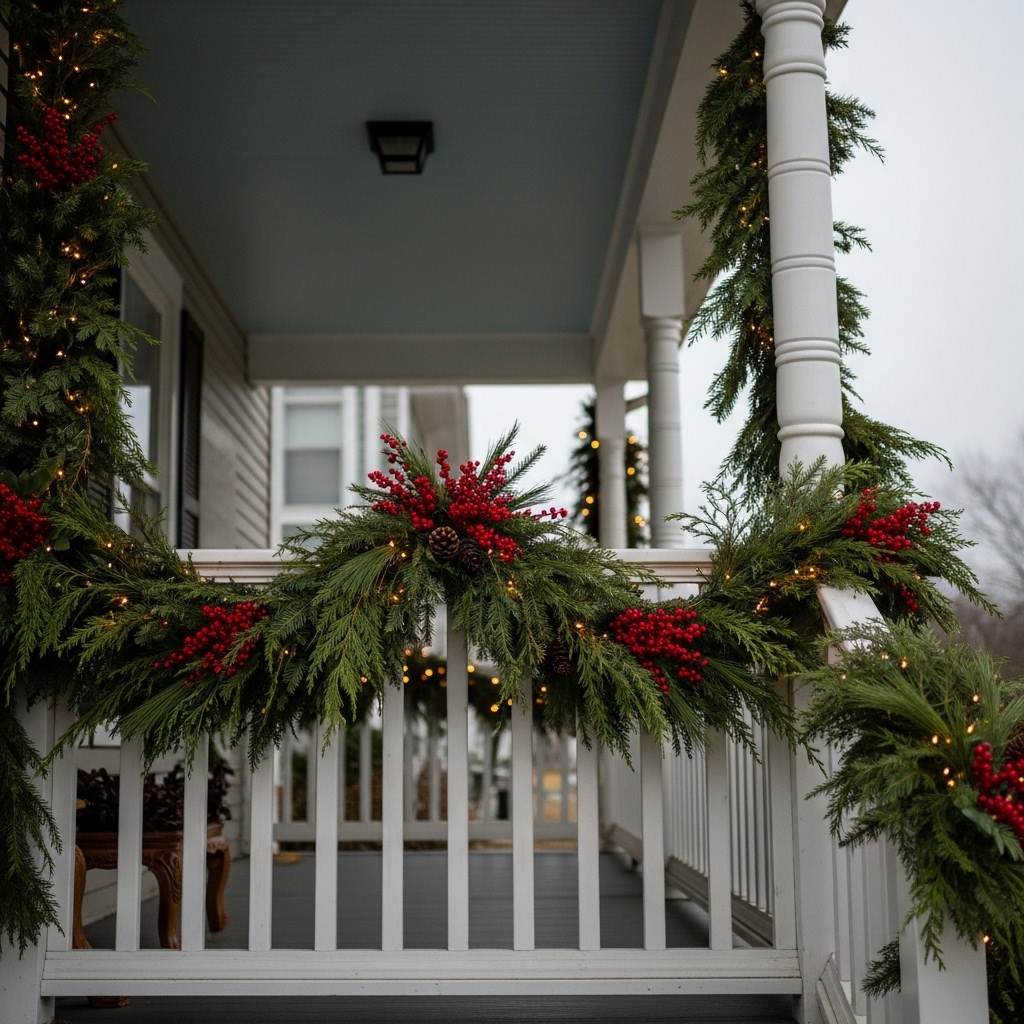
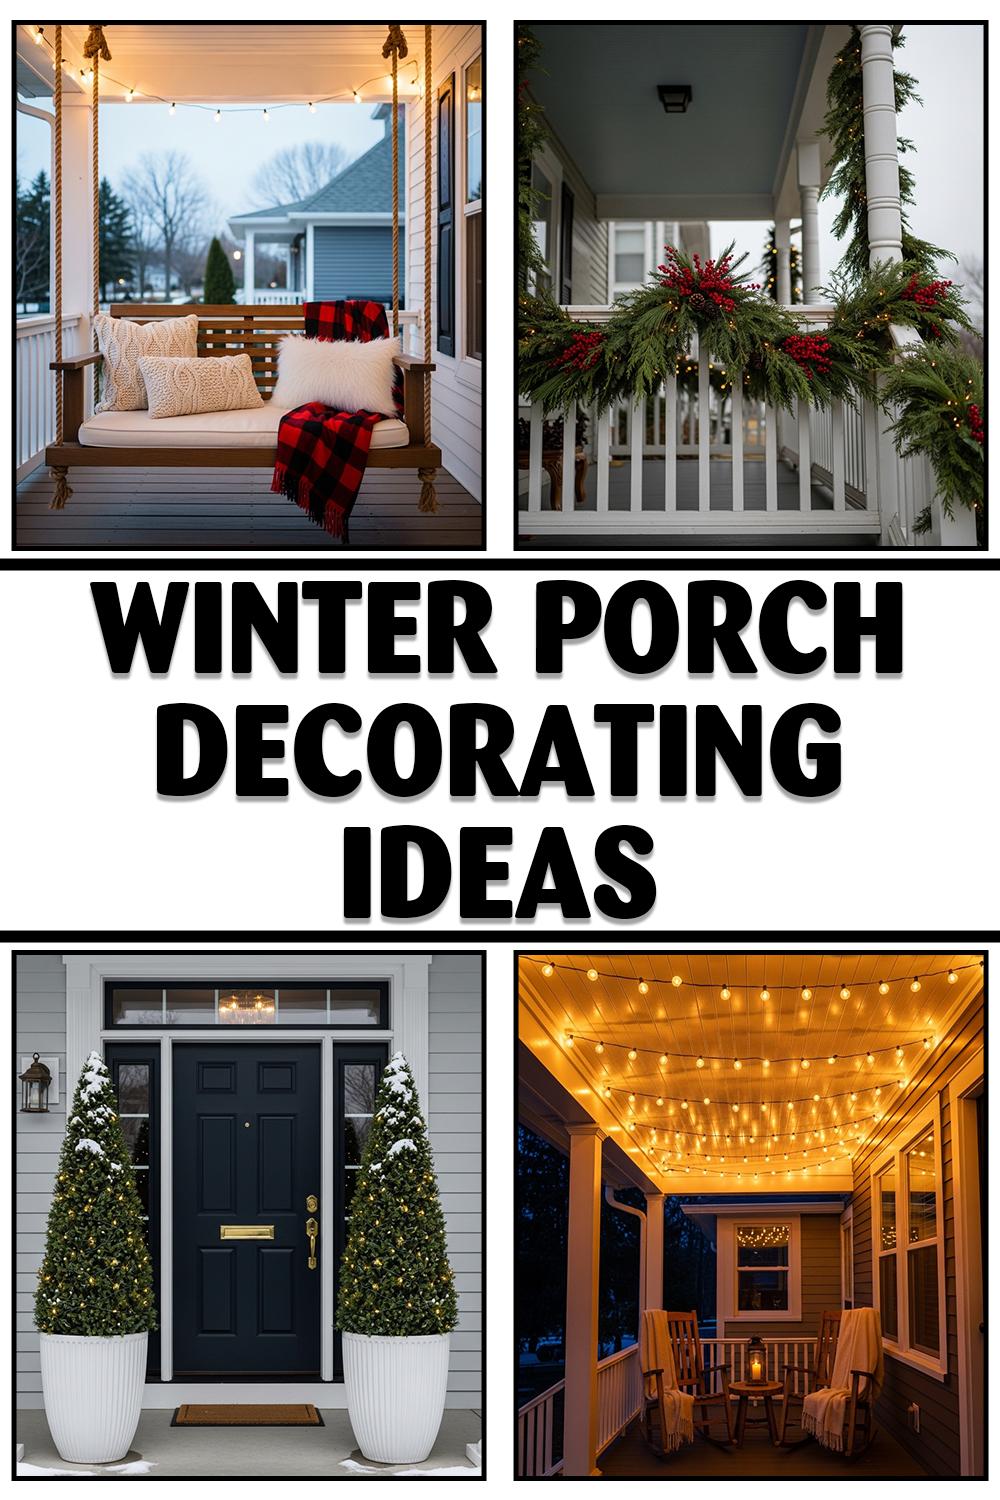
Nothing signals the arrival of winter quite like lush evergreen garland draped along a front porch railing. Fresh pine, cedar, and eucalyptus garland brings rich natural texture and deep green color to any exterior instantly. Furthermore, railing garland creates a full, layered frame that makes your entire front entry look intentional and professionally styled. You can add pinecones, red berries, and small warm white lights along the garland for extra visual depth. Additionally, this winter porch styling idea works beautifully on wood, iron, and vinyl railings across every home style. The transformation happens in under 20 minutes total.
- Pine garland drapes beautifully over railings
- Add pinecones for rich natural texture
- Warm white lights boost evening curb appeal
- Works on wood, iron, and vinyl railings
- Real cedar stays fresh for 3–4 weeks
Choosing the right garland length prevents gaps and keeps your railing display looking full and generous throughout the season. Measure your railing’s total length and add 15% extra to allow natural draping between each post. Moreover, real evergreen garland stays fresh for 3 to 4 weeks in cold winter temperatures without any water source. Additionally, wiring the garland to the railing every 18 inches prevents wind from pulling it loose during stormy weather. You can refresh the display midway through the season by tucking in fresh cedar or pine sprigs. I’ve noticed that real garland always outperforms artificial versions in outdoor winter settings.
Lantern Cluster Entryway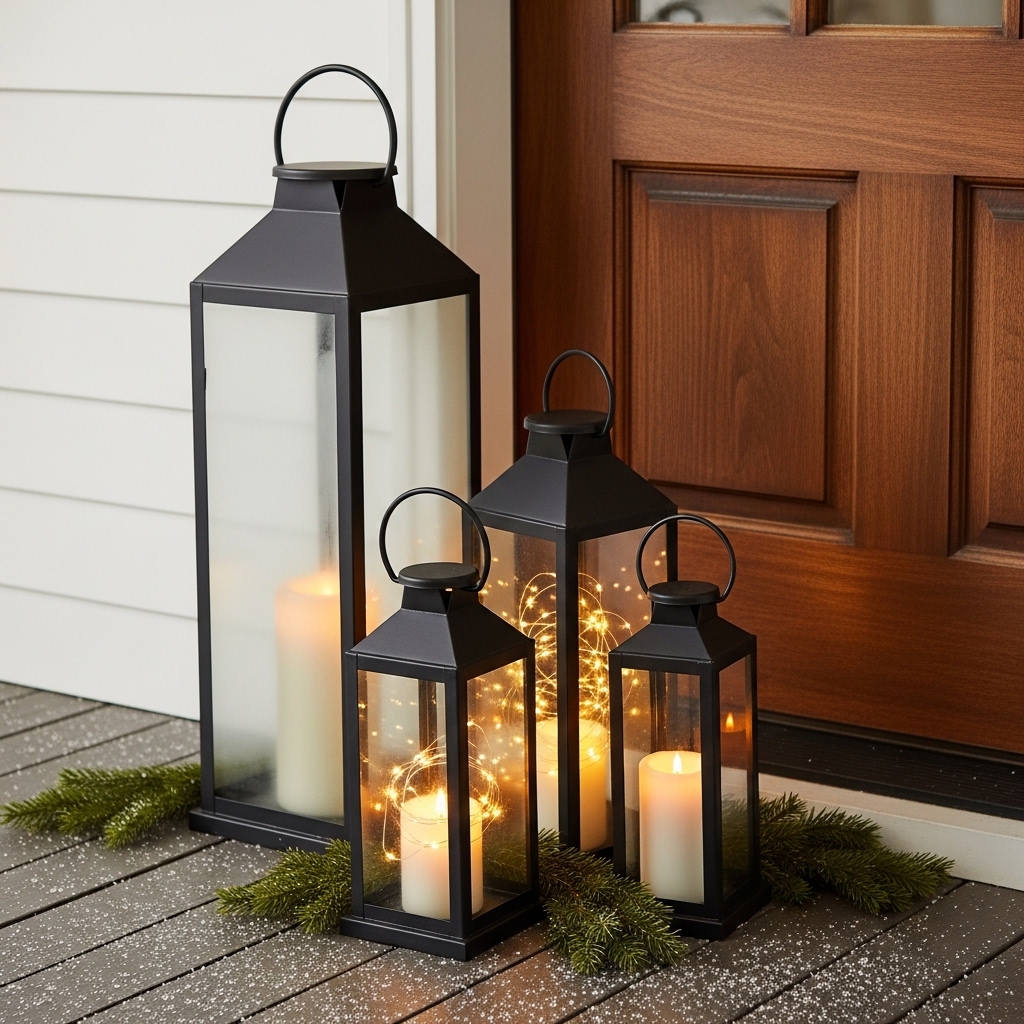
A grouped lantern cluster beside your front door creates one of the most striking and effortless winter porch displays you can build today. The layered height of 3 lanterns — tall, medium, and small — creates a dynamic silhouette that draws every visitor’s eye directly toward your entryway. Furthermore, battery-operated candles inside each lantern eliminate fire risk entirely while delivering the same warm, flickering amber glow as real candles outdoors. Additionally, black metal lanterns suit farmhouse, traditional, and modern exterior styles equally well without any modification. This front porch decorating idea costs under $60 total and requires zero installation or tools whatsoever.
- Cluster 3 lanterns at different heights
- Battery candles eliminate outdoor fire risk
- Black metal suits every home exterior style
- Evergreen sprigs add natural base texture
- Costs under $60 for full cluster display
Styling your lantern cluster with seasonal accessories at the base completes the display and adds visual grounding below the lanterns. You can arrange 3 to 5 pinecones, a small bundle of dried eucalyptus, and a dusting of artificial snow flocking around the base of the largest lantern. Moreover, placing a simple red or plaid ribbon bow on the handle of the tallest lantern adds a festive holiday detail without overwhelming the minimal styling. Additionally, repositioning the cluster slightly off-center from the door creates a more organic, natural arrangement. That’s why many front porch decorators recommend the lantern cluster as the single fastest way to decorate your porch for winter with maximum visual impact.
Plaid Blanket Porch Chair
A single plaid throw blanket draped over a porch chair instantly transforms any ordinary front porch into a cozy, magazine-worthy winter retreat. The rich contrast of bold plaid against a natural rattan or wood chair creates a visual warmth that makes your porch feel genuinely inviting from the street. Furthermore, buffalo plaid in red, black, or navy coordinates beautifully with evergreen garland and lanterns already decorating your winter porch space. Additionally, a thick wool or fleece blanket draped casually — not folded perfectly — looks more authentic and welcoming than a neatly arranged display. This winter porch idea costs under $30 and takes under 2 minutes to style.
- Buffalo plaid adds instant cozy winter warmth
- Drape casually for authentic welcoming look
- Red plaid pops against green evergreen decor
- Pairs perfectly with a rattan armchair
- Under $30 at most home goods stores
Layering a small coordinating throw pillow behind the blanket on your porch chair creates a complete, styled seating vignette that looks professionally decorated. You want a pillow in a solid cream, deep red, or forest green color that picks up 1 tone directly from the plaid blanket pattern. Moreover, placing a small enamel mug prop on the side table beside the chair adds a storytelling detail that makes the scene feel lived-in and warm. Additionally, this winter porch chair display photographs beautifully at golden hour when the late afternoon light catches the plaid texture. I’ve seen this simple blanket-and-chair combination become the most photographed spot on an entire block during the holiday season.
Birch Log Bundle Display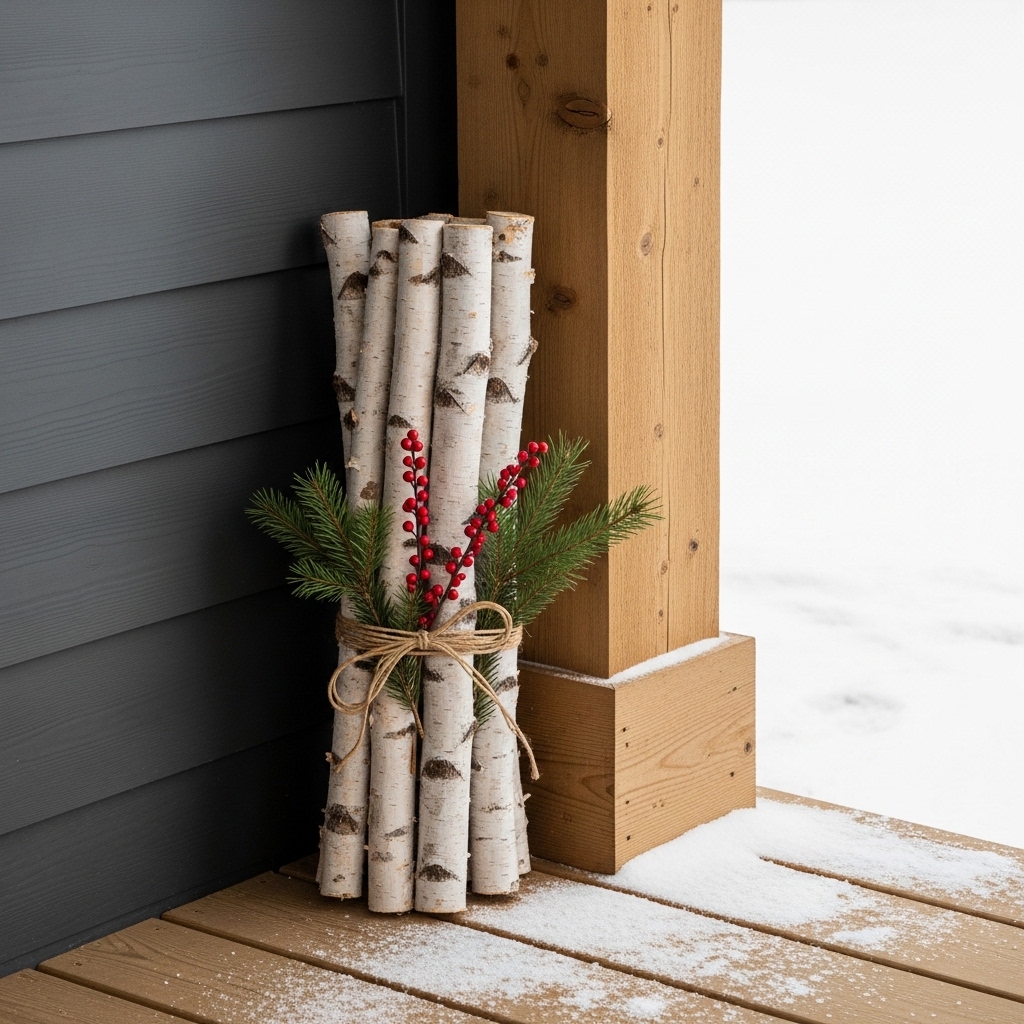
Birch log bundles bring an effortlessly rustic and organic element to winter porch decor that no manufactured product can fully replicate. The white-and-black bark of birch logs adds a stunning natural contrast against a dark exterior wall or a painted porch column. Furthermore, grouping 5 logs of slightly varying heights together and binding them with natural jute twine creates a sculptural, three-dimensional display that looks expensive without requiring any significant budget. Additionally, tucking pine boughs and red berry clusters between the logs at the base completes the arrangement beautifully. This outdoor winter decorating idea suits farmhouse, rustic, and modern exterior home styles with equal elegance.
- Birch bark adds beautiful black-and-white texture
- Tie 5 logs with natural jute twine
- Tuck pine boughs at the base
- Works against dark or light exterior walls
- Free if you source from natural surroundings
Sourcing birch logs for your porch display does not require a large budget or a special store order. You can purchase bundles of 5 to 7 birch logs at most craft stores like Hobby Lobby or Michaels for under $20 during the winter season. Moreover, natural birch logs found on your own property or sourced from a local tree trimmer cost absolutely nothing and look even more authentic outdoors. Additionally, propping the bundle in a large galvanized bucket filled with decorative pebbles creates extra stability and prevents the logs from tipping in strong winter winds. That’s why many outdoor decor stylists recommend birch bundles as one of the most versatile winter porch accent pieces available.
Winter Front Door Wreath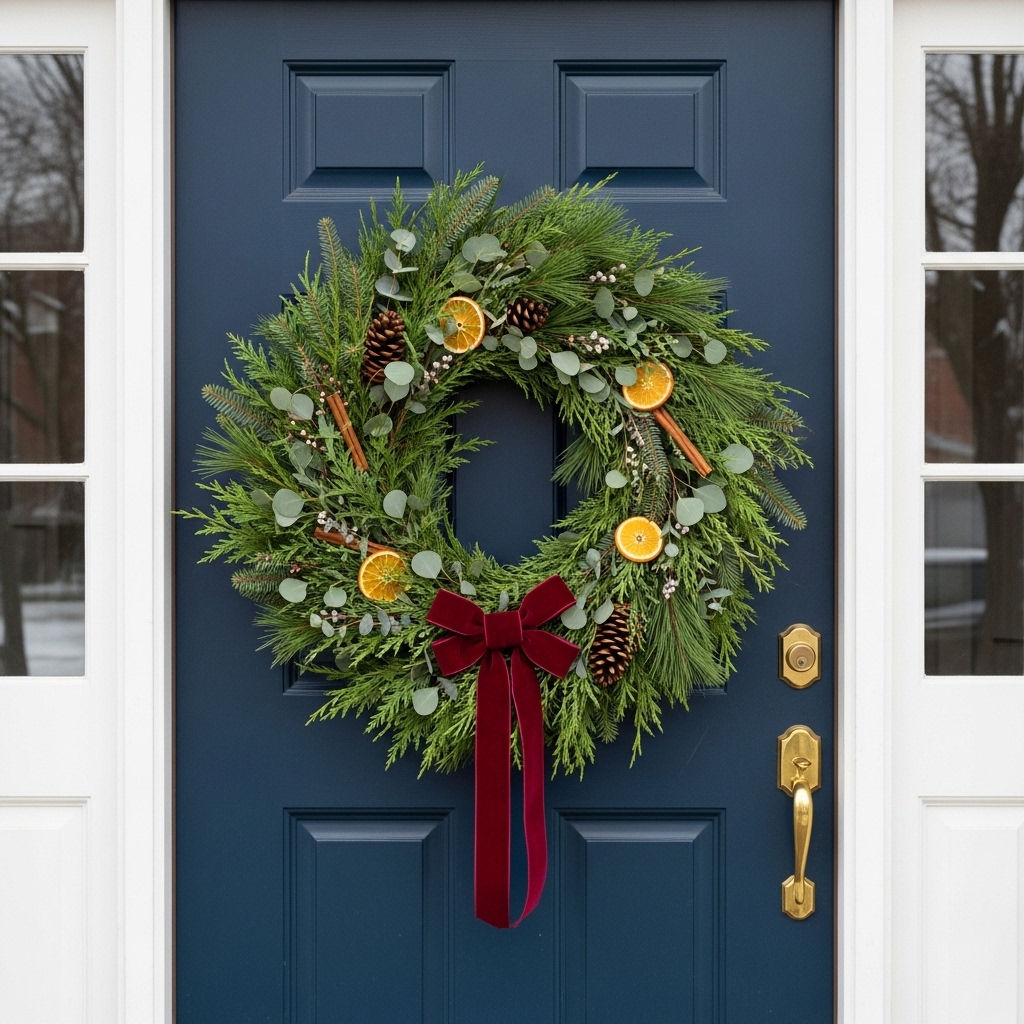
A beautifully styled front door wreath serves as the single most powerful focal point in any winter porch decorating scheme. The right wreath immediately sets the tone for your entire exterior and creates a lasting first impression that visitors notice from the street. Furthermore, a mixed evergreen wreath layered with dried orange slices, cinnamon sticks, and pinecones delivers incredible texture variety and a natural, organic beauty that simple tinsel wreaths cannot match. Additionally, a wide velvet ribbon bow in burgundy or deep red adds a luxurious finishing detail that elevates the entire display. This winter front porch upgrade costs between $25 and $60 depending on whether you purchase or DIY the wreath.
- Mixed evergreen wreaths look rich and luxurious
- Add dried orange slices for natural texture
- Velvet ribbon elevates the entire wreath display
- Deep navy or black doors make wreaths pop
- Hangs in under 5 minutes using a wreath hanger
Choosing the right wreath size for your front door prevents the most common mistake beginners make — selecting a wreath that looks visually too small on a standard exterior door. Your wreath diameter should equal approximately 50 to 75% of your door’s total width for the best visual proportion. Moreover, a 24-inch wreath suits a standard 36-inch door beautifully, while a 30-inch wreath works best on a wider double-door entryway. Additionally, using a no-damage adhesive wreath hanger preserves your door finish and avoids nail holes entirely. I’ve noticed that homeowners who size their wreath correctly always achieve a far more polished and luxurious porch look than those who simply grab the nearest option available.
Galvanized Tub Arrangement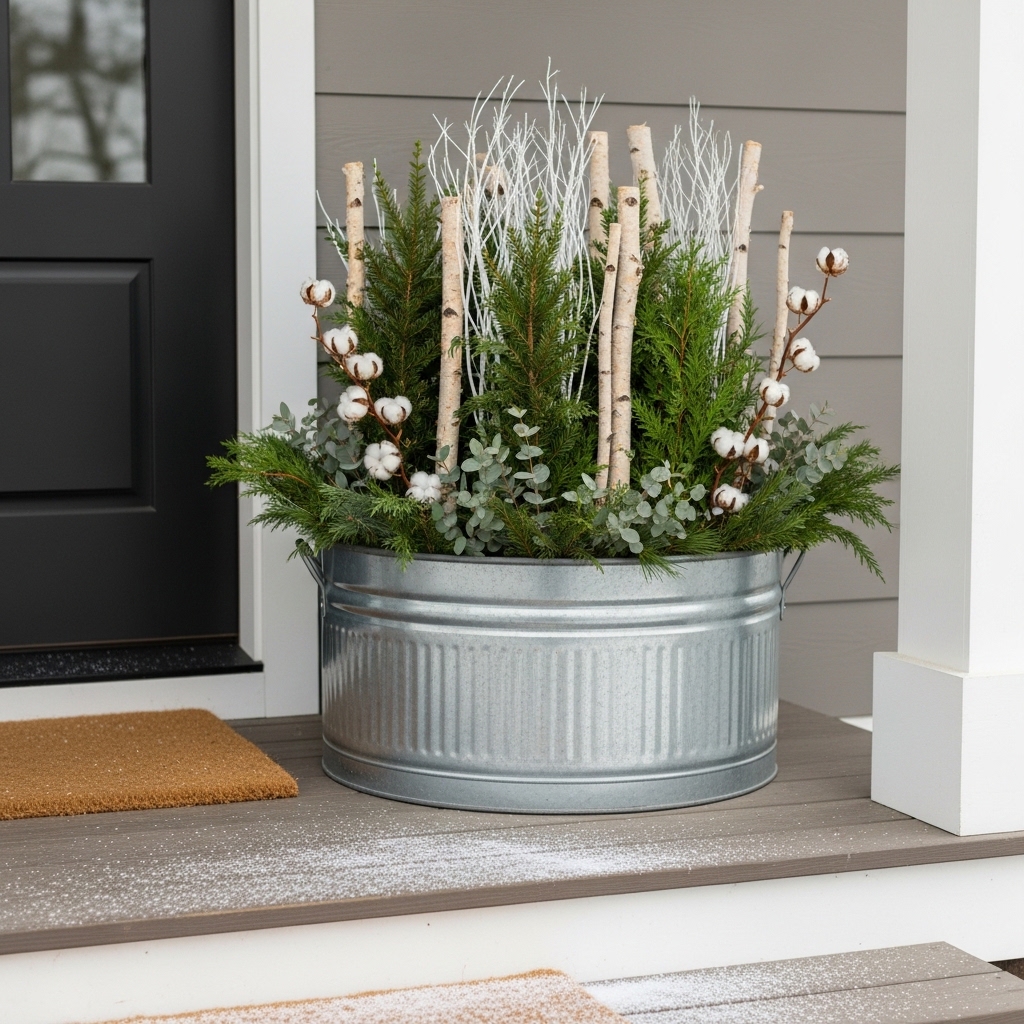
A large galvanized metal tub overflowing with mixed winter greenery creates a bold, statement-making porch accent that costs almost nothing to fill. The industrial texture of galvanized metal contrasts beautifully with the softness of pine branches, cotton stems, and white birch twigs arranged inside. Furthermore, this winter porch decorating idea allows you to use clippings directly from your own yard — pine, cedar, holly, and boxwood all work perfectly as filler branches. Additionally, the height of upright branches creates a dramatic vertical display that adds significant visual presence to an otherwise flat porch corner. This arrangement suits farmhouse, cottage, and contemporary home exteriors equally well.
- Fill galvanized tubs with yard clippings free
- Mixed greenery heights create dramatic vertical display
- Cotton stems add soft white winter texture
- Industrial metal contrasts beautifully with natural branches
- Works beside steps, doors, and porch columns
Styling your galvanized tub arrangement with a layered approach creates a far richer and more intentional display than simply jamming branches upright into the container. Start by placing the tallest branches — pine or birch twigs — at the center back of the tub first. Moreover, fill the middle layer with medium-height cedar or boxwood sprigs that radiate outward in all directions. Additionally, tuck soft cotton stems and dried neutral grasses along the front edge at the lowest level to complete the layered, full silhouette. You finish the look by adding a simple tartan or burlap ribbon bow at the tub handle. The total cost for this arrangement sits under $35 when you source yard clippings freely.
Cedar Swag Porch Post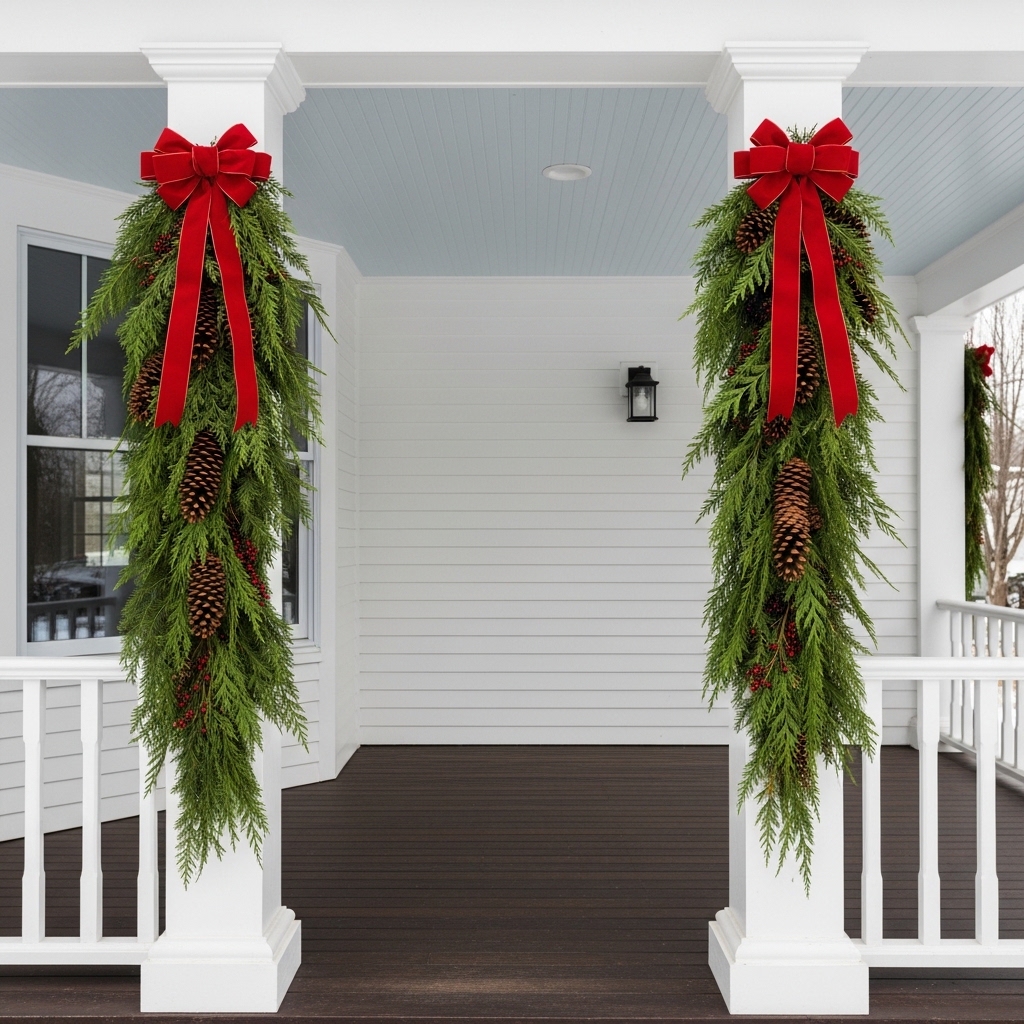
Decorating your porch columns with matching cedar swags creates instant symmetry and a polished, grand entryway that looks professionally designed. A swag differs from a wreath because it hangs vertically down the column face rather than forming a round shape, which suits tall architectural columns beautifully. Furthermore, pairing 2 identical swags on both front porch columns frames your door symmetrically and creates a formal, welcoming focal point that elevates your entire home’s curb appeal dramatically. Additionally, fresh cedar swags emit a natural pine scent that guests notice the moment they approach your front steps. This elegant winter porch display idea costs under $40 for both columns total.
- Cedar swags frame porch columns beautifully
- Symmetrical placement creates formal grand entryway
- Fresh cedar fills porch with natural pine scent
- Red velvet bow adds luxurious festive detail
- Under $40 for both columns combined
Hanging cedar swags on porch columns requires only a simple loop of thin floral wire attached at the top back of each swag. You wrap the wire around the column once and twist it tight against the back side where it stays completely hidden from view. Moreover, positioning each swag at the same height on both columns — approximately 6 feet from the porch floor — maintains the clean symmetry that makes this display so visually powerful. Additionally, refreshing the swag midway through the winter season by misting it lightly with water extends its freshness by an additional 1 to 2 weeks. That’s why many exterior decorators consider cedar column swags one of the most impactful ways to decorate your porch for winter with minimal effort.
Warm String Light Canopy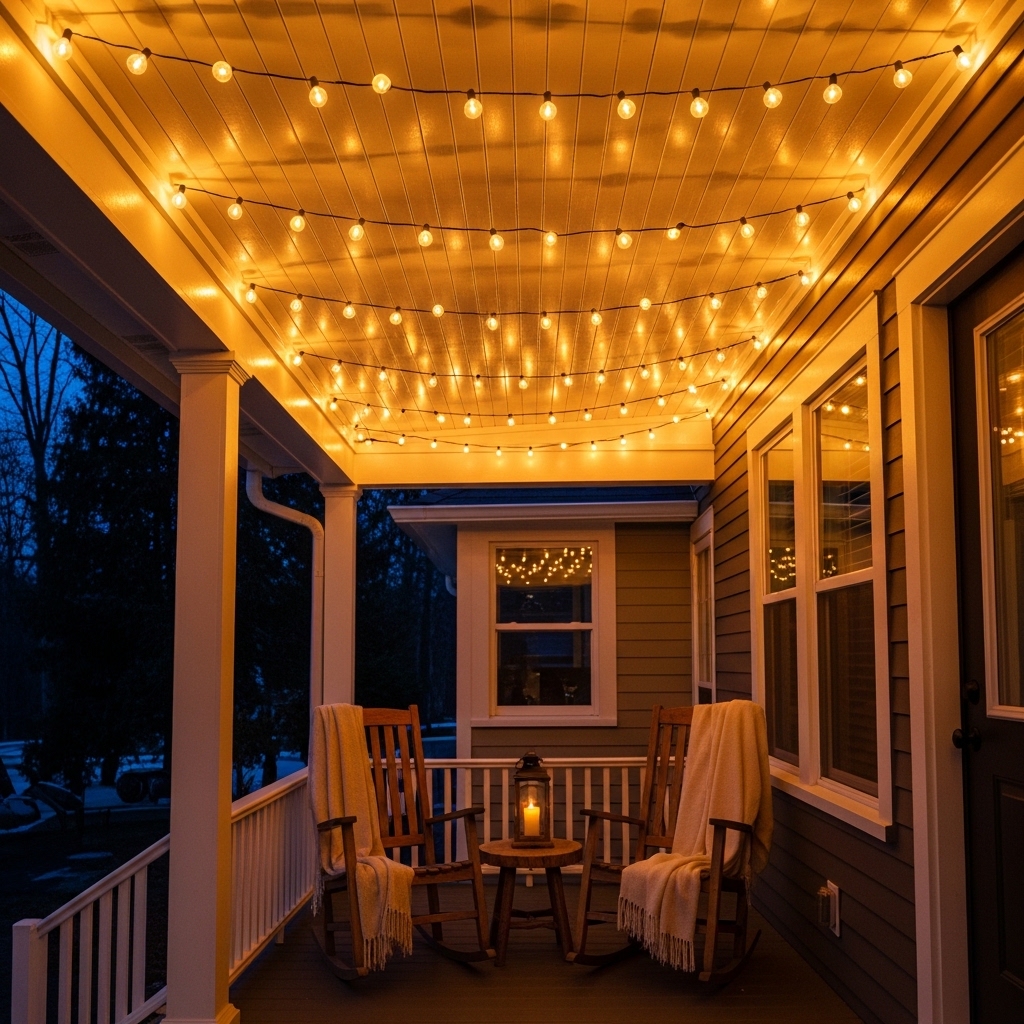
String lights strung across a covered porch ceiling create one of the most magical and transformative winter porch atmospheres possible for any home. The warm amber glow of Edison-style string lights casts a soft, golden light across every surface below — rocking chairs, floor boards, and railing garlands all come alive after dark. Furthermore, parallel rows of string lights hung 12 inches apart across the ceiling create a canopy effect that makes the entire porch feel like an outdoor living room. Additionally, this winter porch lighting idea works year-round and costs between $15 and $40 for a standard porch length. You install the entire display in under 45 minutes using simple screw-in hooks.
- Edison string lights create magical porch glow
- Parallel rows form a stunning ceiling canopy
- Warm amber light flatters every surface below
- Works year-round beyond winter season
- Full display costs only $15–$40
Choosing the right string light bulb temperature makes an enormous difference in the overall warmth and mood of your porch display. Bulbs rated at 2200K to 2700K produce the richest, warmest amber glow that makes winter evenings on a covered porch feel genuinely cozy and inviting. Moreover, avoiding cool white or daylight-spectrum bulbs prevents the harsh, clinical look that completely destroys the warm winter atmosphere you want to create. Additionally, plugging your string lights into a simple outdoor timer set for dusk-to-10pm means your porch glows beautifully every evening without any manual switching. I’ve noticed that porches with warm string light canopies consistently attract more neighborhood compliments than any other single winter porch upgrade available.
Winter Planter Box Styling
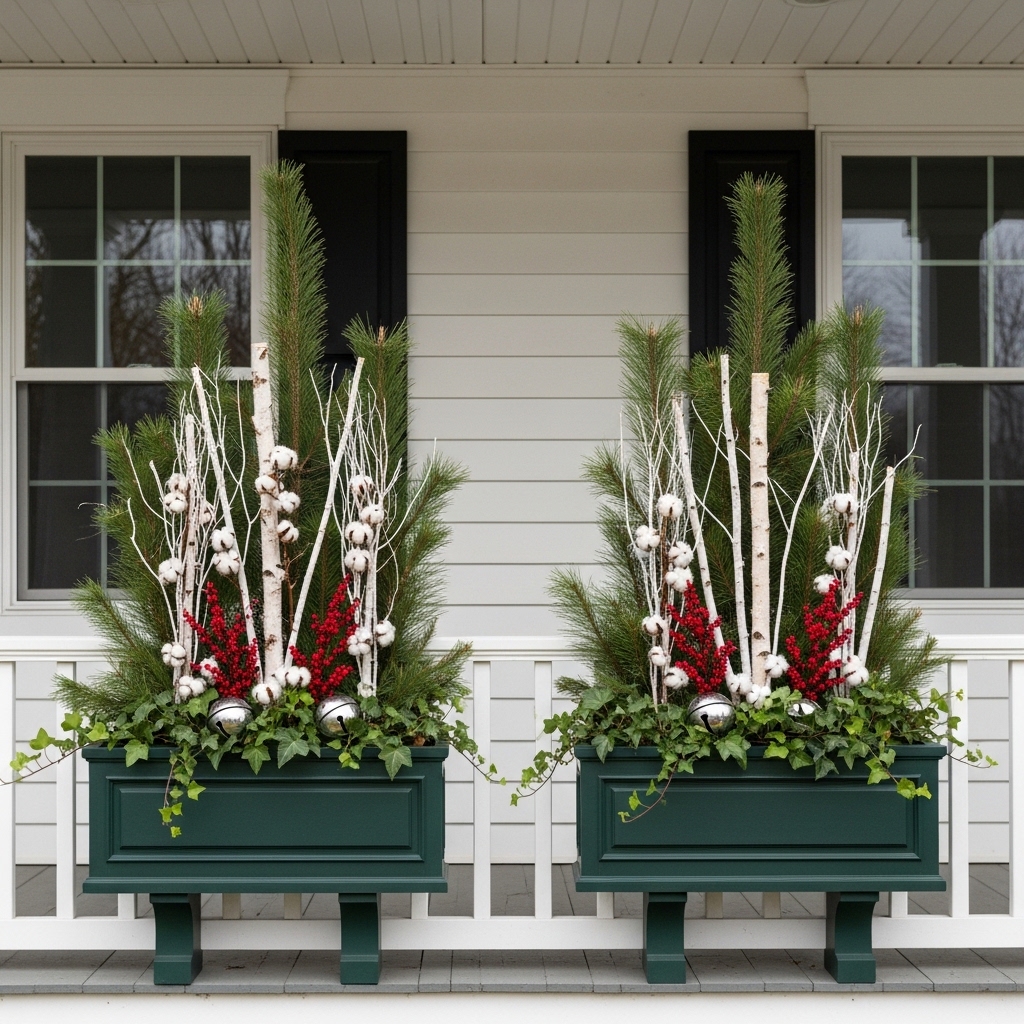
Window planter boxes filled with seasonal winter branches and greenery create a layered, lush display that adds incredible visual fullness to any porch railing. The vertical height of upright pine branches combined with trailing ivy cascading over the planter edges creates a dynamic, multi-directional arrangement that looks professionally styled. Furthermore, styling 2 matching planter boxes symmetrically on either side of your railing ties the entire winter porch display together into a cohesive, intentional composition. Additionally, planter boxes remain in place year-round and you simply swap the fillings seasonally — making this one of the most practical and cost-efficient porch decorating investments you can make for your home.
- Fill planter boxes with upright pine branches
- Trailing ivy cascades beautifully over planter edges
- Symmetrical pairs create cohesive porch framing
- Swap fillings seasonally for year-round use
- Red berries add festive holiday color detail
Filling your winter planter boxes with a mix of 3 to 4 different branch and stem types creates the rich, layered look that distinguishes a high-end porch display from a flat, one-dimensional arrangement. Start with tall pine or cedar branches as the anchor element at the back of each box. Moreover, add medium-height boxwood or holly sprigs in the middle layer for dense green fullness. Additionally, tuck dried cotton stems, silver-painted pinecones, and trailing English ivy along the front edge to complete the cascading layered silhouette. You finish each box with a simple velvet ribbon bow at one corner for a polished, intentional detail. The entire planter box fill costs under $25 per box at most garden centers.
Snowy Pinecone Basket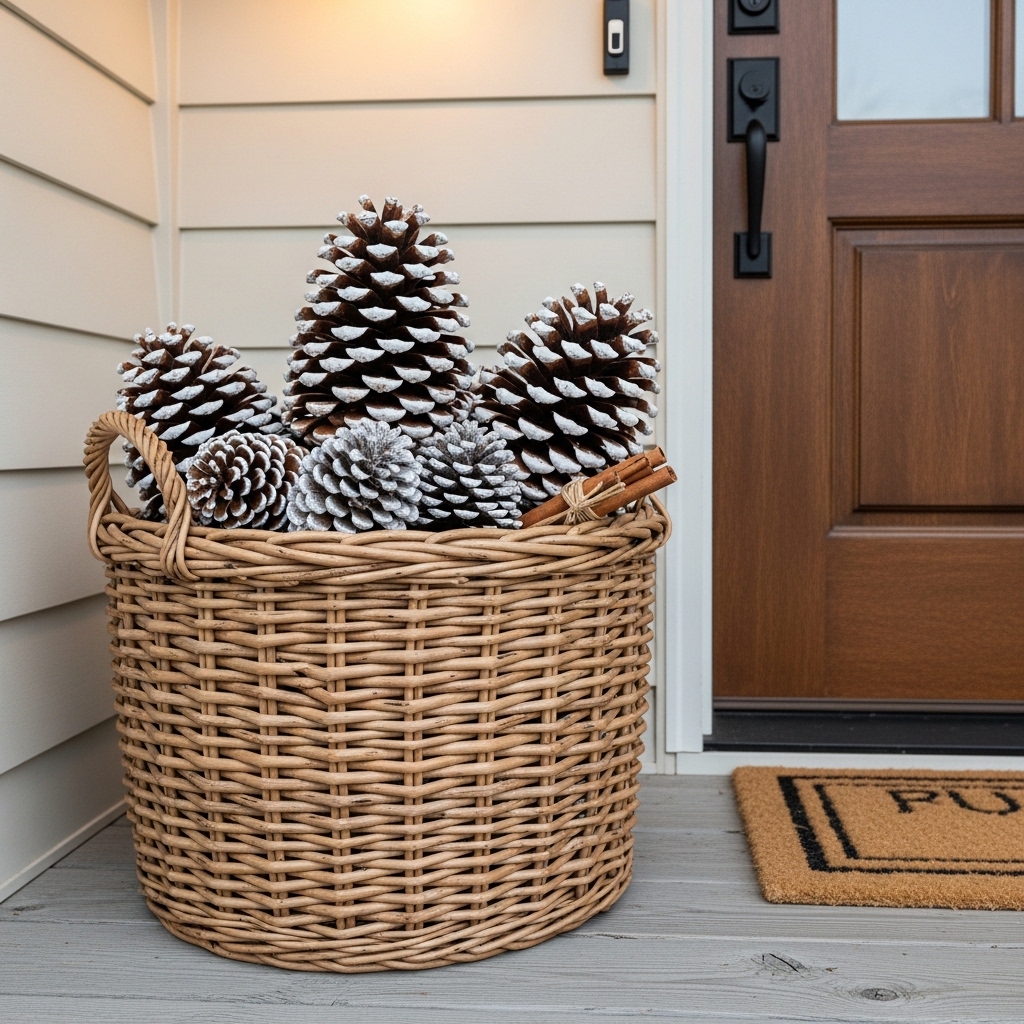
A large wicker basket overflowing with frosted pinecones and cinnamon sticks creates one of the richest and most effortless winter porch accents you can build in under 15 minutes. The combination of natural textures — rough wicker, bumpy pinecone scales, and smooth cinnamon bark — creates a deeply tactile display that looks artisanal and expensive without any significant investment. Furthermore, dusting pinecones lightly with white faux snow spray from a craft store adds a magical wintery quality that photographs beautifully in natural daylight. Additionally, mixing natural pinecones with silver or gold glitter-dipped pinecones creates contrast that makes the entire basket sparkle. This winter porch basket idea costs under $20 total.
- Faux snow spray transforms plain pinecones instantly
- Mix natural and glitter pinecones for contrast
- Wicker basket adds beautiful rustic farmhouse texture
- Cinnamon sticks fill porch with warm holiday scent
- Full display costs under $20 total
Collecting pinecones for your basket display does not require any budget at all if you live near pine or spruce trees. A 30-minute walk through a nearby park or wooded area typically yields more than enough pinecones to overflow a standard large basket generously. Moreover, drying freshly collected pinecones in a 200-degree oven for 30 minutes kills any insects and removes residual moisture before you bring them onto your porch. Additionally, placing a small piece of floral foam at the bottom of your basket before filling it with pinecones raises the display height and reduces the total number of pinecones you actually need. I’ve seen this simple basket trick completely transform a bare porch corner for free.
Porch Staircase Potted Greenery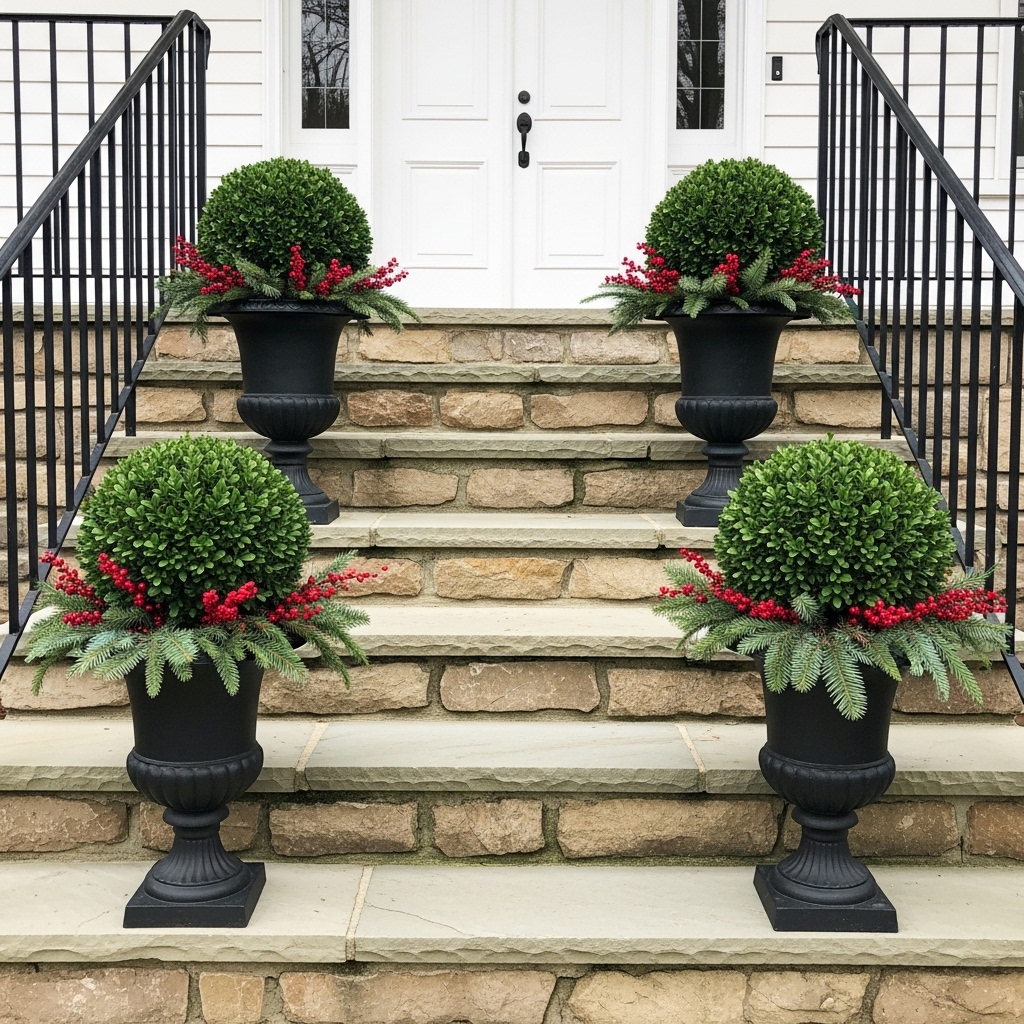
Lining each porch step with a matching potted topiary or greenery arrangement creates a grand, formal staircase display that makes even a modest home look like a luxury property from the street. Round boxwood topiaries trimmed tightly and placed in identical black metal urns deliver a classic symmetry that works beautifully on colonial, craftsman, and traditional home exteriors. Furthermore, tucking fresh pine boughs and red berry sprigs around the base of each topiary adds seasonal winter color without disturbing the clean topiary silhouette. Additionally, using the same pot style on every step creates a visual rhythm that guides the eye smoothly from the street to the front door. This staircase display costs between $60 and $120 depending on topiary size.
- Matching urns on each step create formal symmetry
- Boxwood topiaries survive cold winter temperatures well
- Red berry sprigs add festive seasonal color
- Creates a grand luxurious staircase display
- Works on colonial and traditional home styles
Choosing frost-resistant containers for porch staircase planters prevents cracking and breaking during hard winter freezes. Galvanized metal urns, heavy resin planters, and thick fiberglass pots all withstand freezing temperatures without damage throughout the entire season. Moreover, genuine terra cotta pots crack in freezing conditions and should be avoided for any outdoor winter planting arrangement. Additionally, placing a layer of gravel at the bottom of each urn before adding soil improves drainage and prevents waterlogged roots during winter rain and snowfall. That’s why many landscape designers recommend boxwood topiaries specifically for winter porch staircase styling — they maintain their tight round shape and deep green color even in the coldest outdoor conditions.
Cozy Porch Swing Styling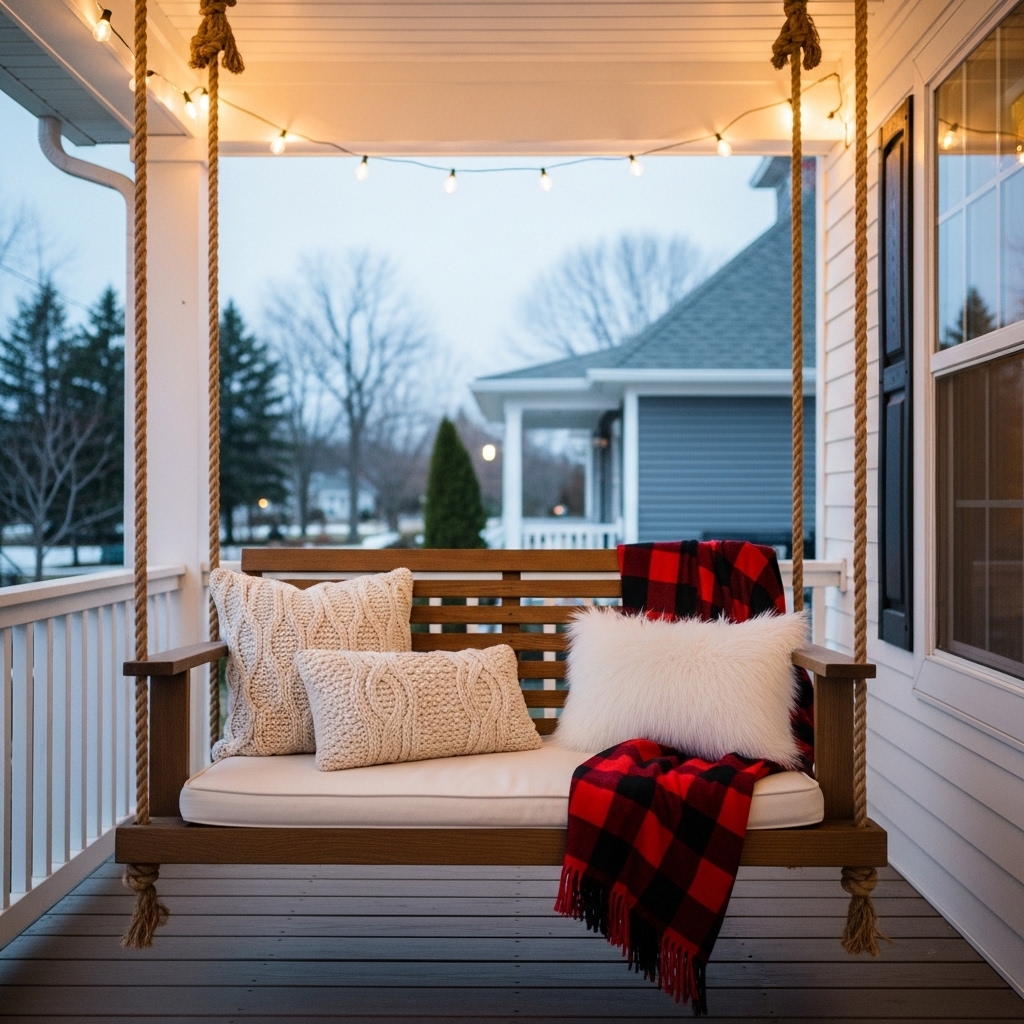
A styled porch swing draped with knit pillows and a plaid blanket creates the most inviting and Pinterest-perfect winter porch seating moment imaginable. The combination of soft cream knit textures, bold buffalo plaid, and warm string light glow above creates a layered, cozy visual that stops scrollers mid-feed every single time. Furthermore, porch swing styling costs under $40 because you likely already own the throw blankets and pillows needed to complete the display. Additionally, a small white faux-fur pillow tucked against one arm of the swing adds a luxurious textural contrast that elevates the entire seating vignette instantly. This winter porch decorating idea works on any covered porch with an existing swing installation.
- Layer cream knit and plaid blanket together
- White faux-fur pillow adds luxurious texture contrast
- String lights above complete the cozy atmosphere
- Use pillows and blankets you already own
- Works on any covered porch with a swing
Refreshing your porch swing styling for different winter occasions keeps the display feeling current and intentional throughout the full season. You swap the red plaid blanket for a deep navy or forest green version in January when the Christmas season ends. Moreover, adding a small tray with 2 enamel mugs as a prop beside the swing creates an inviting lifestyle detail that makes the entire porch scene feel genuinely lived-in. Additionally, protecting your throw pillows from rain and moisture by storing them inside during bad weather and returning them outdoors on clear days extends their life significantly. In my experience, a styled porch swing attracts more seasonal compliments from neighbors than almost any other single porch upgrade.
Woven Doormat Layering
Layering 2 doormats at your front door creates a styled, intentional entryway detail that sets a welcoming tone before any guest even rings the bell. A large natural jute mat placed beneath a smaller stamped rubber welcome mat creates a textural contrast that looks purposefully designed rather than accidentally assembled. Furthermore, this winter porch entryway detail costs under $25 for both mats combined and requires zero installation or tools. Additionally, tucking a small bundle of fresh pine needles and 3 pinecones in the upper corner of the top mat adds a seasonal botanical detail that completes the full porch entryway display. This layered doormat idea suits every home style from farmhouse to modern minimalist equally well.
- Layer jute mat under a stamped welcome mat
- Pine needle bundle adds free natural detail
- Total cost under $25 for both mats
- Creates an intentional styled entryway instantly
- Works for every home style and exterior
Choosing the right size combination for your layered doormat display ensures both mats look balanced and proportionate in front of your door. Your bottom jute mat should extend at least 6 inches beyond each side of the top mat to create a clear visible border all the way around. Moreover, a standard 24×36-inch bottom mat pairs best with an 18×30-inch top mat for a classic layered proportion that suits most single front doors beautifully. Additionally, both mats must sit completely flat on the porch floor with no curling edges that could trip visitors stepping onto the layered surface. That’s why many exterior decorators consider the layered doormat one of the most underestimated but consistently effective ways to decorate your porch for winter on a tight budget.
Faux Snow Spray Vignette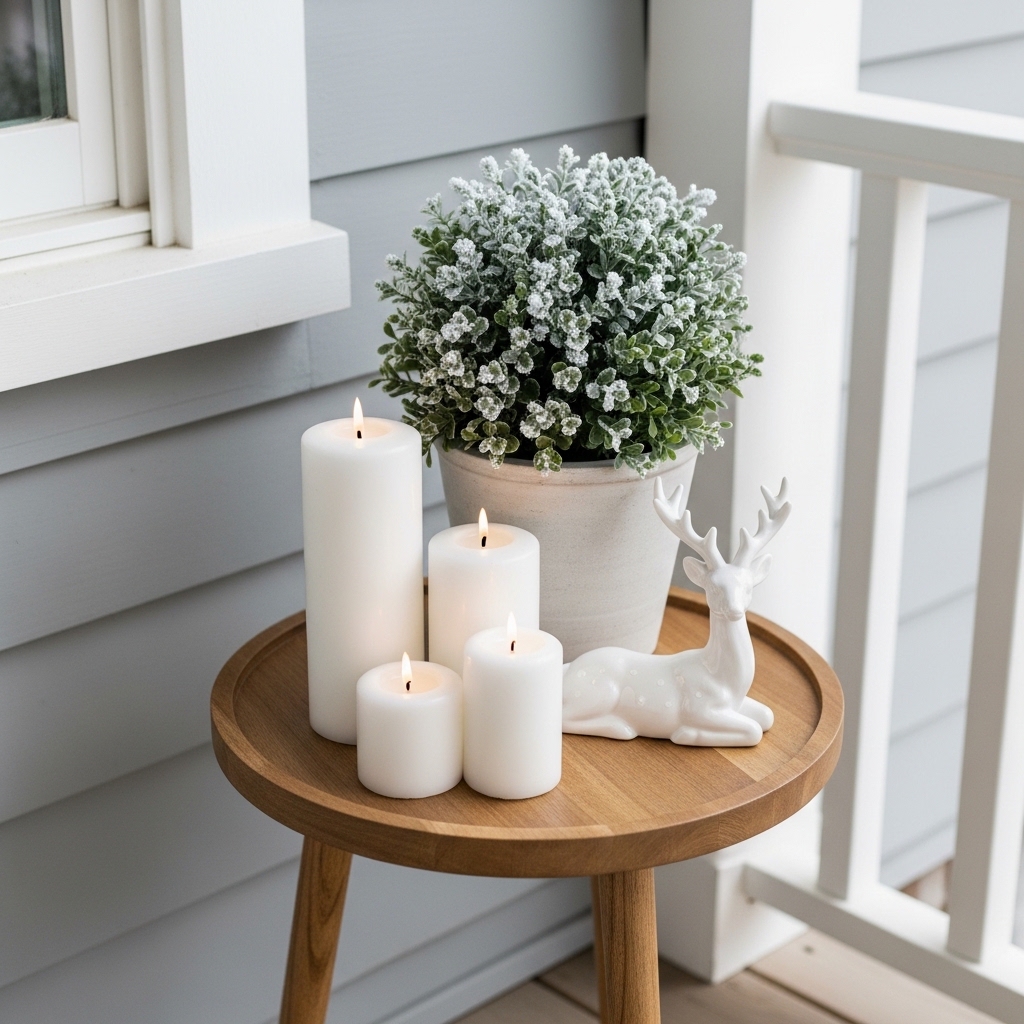
A carefully composed faux snow vignette on a small porch side table creates a delicate, wintery display that looks like a scene from a holiday storybook. White taper candles in varying heights combined with a faux-snow-dusted miniature boxwood and a ceramic deer figurine create a cohesive winter white color palette that feels magical and refined. Furthermore, faux snow spray from any craft store costs under $8 and transforms plain green boxwood, pinecones, and dried branches into winter-ready decor pieces in seconds. Additionally, grouping objects in sets of 3 at varying heights — following the classic design rule of odd numbers — creates the most visually balanced and appealing small-scale vignette arrangement. This idea costs under $30 total.
- Group objects in odd numbers for visual balance
- Faux snow spray costs under $8 at craft stores
- White taper candles add elegant height variation
- Ceramic deer figurine adds storybook winter charm
- Clean white palette suits every porch style
Building a winter porch vignette with a unified color palette creates a far more sophisticated display than mixing multiple competing accent colors together. Restricting your vignette to white, cream, soft gray, and natural wood tones creates a clean, frost-inspired aesthetic that photographs exceptionally well in natural winter daylight. Moreover, choosing 3 objects that differ in height, shape, and texture — a tall candle, a round topiary, and a low figurine — prevents the vignette from looking flat or repetitive from any viewing angle. Additionally, placing the tallest object at the back and the lowest object at the front follows the natural visual layering principle that professional stylists use in every styled composition. I’ve tried this exact vignette formula and the results consistently look far more expensive than the actual cost suggests.
Porch Column Ribbon Wrap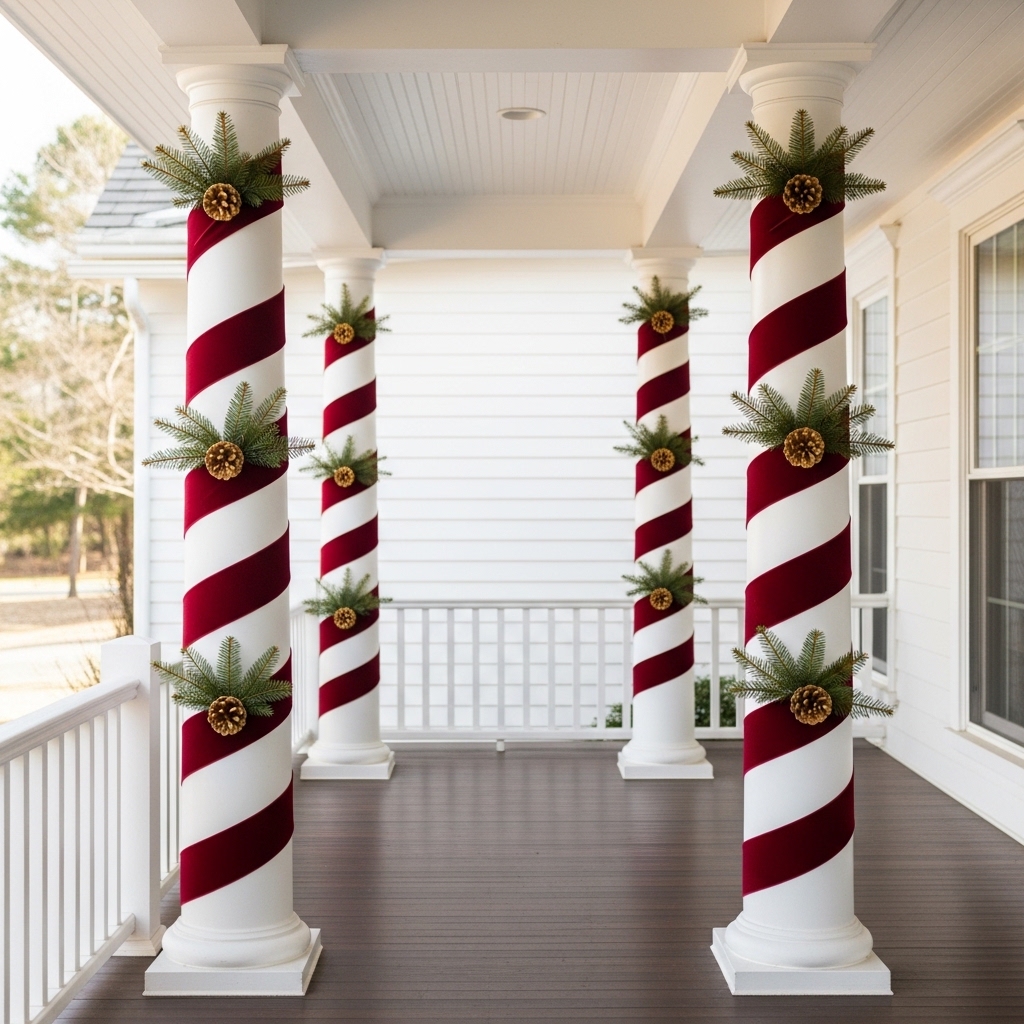
Wrapping porch columns in wide velvet ribbon creates a grand, festive elegance that instantly elevates your entire home’s winter curb appeal beyond what garland or wreaths achieve alone. A diagonal candy-cane spiral wrap using a 4-inch wide burgundy velvet ribbon transforms plain white columns into a statement architectural feature that draws every eye upward along the full column height. Furthermore, tucking fresh pine sprigs and gold pinecones behind the ribbon at evenly spaced intervals adds botanical texture that makes the ribbon wrap look lush and dimensional. Additionally, this winter porch styling idea requires only ribbon, floral pins, and fresh greenery — all available at any craft store for under $30 total per column.
- Wide velvet ribbon creates grand column elegance
- Diagonal spiral wrap maximizes visual column height
- Tuck pine sprigs behind ribbon for dimension
- Gold pinecones add luxurious metallic accent detail
- Under $30 per column in total materials
Selecting the right ribbon width ensures your column wrap looks bold and proportionate rather than thin and underwhelming on a full-height porch column. A ribbon width of 4 to 6 inches works best on standard 6-inch diameter porch columns because it creates a clearly visible spiral stripe from the street. Moreover, wiring the ribbon at the top and bottom of each column before spiraling it downward prevents sagging and wind displacement throughout the entire winter season. Additionally, finishing each column wrap with a large coordinating bow tied at the base or capital creates a polished ending detail that completes the full display. That’s why ribbon-wrapped columns consistently rank among the most shared and saved winter porch decorating ideas across Pinterest every single year.
Outdoor Candle Lantern Row
A row of 5 varied lanterns lined along the top of your porch railing creates a stunning illuminated border that transforms your front porch into a glowing, welcoming beacon after dark. Staggering the lantern heights — placing tall, medium, and small lanterns in an alternating pattern — creates visual rhythm and movement along the railing edge that a uniform single-size row cannot deliver. Furthermore, warm white pillar candles inside each lantern cast overlapping pools of amber light that illuminate the porch floor and railing garland below simultaneously. Additionally, laying fresh pine sprigs between each lantern connects all 5 into a unified botanical display. This winter railing lantern idea costs between $40 and $70 for the full display.
- Stagger 5 lanterns in alternating height pattern
- Pine sprigs between lanterns unify the full row
- Amber candlelight glows beautifully against winter darkness
- Creates a welcoming illuminated porch border
- Full display costs $40–$70 total
Maintaining your outdoor lantern row through wind, rain, and snow requires choosing lanterns with secure glass pane closures that prevent candle flames from extinguishing in bad weather. Lanterns with a latch-close door and full glass surround on all 4 sides protect candle flames from wind gusts up to 20 miles per hour reliably. Moreover, switching to battery-operated LED pillar candles eliminates all weather-related flame maintenance entirely while delivering an identical warm amber visual effect. Additionally, securing each lantern to the railing surface with a small dab of removable mounting putty prevents them from tipping in strong winter winds overnight. That’s why exterior decorators recommend battery candles specifically for any outdoor winter lantern display exposed to the elements.
Dried Orange Slice Garland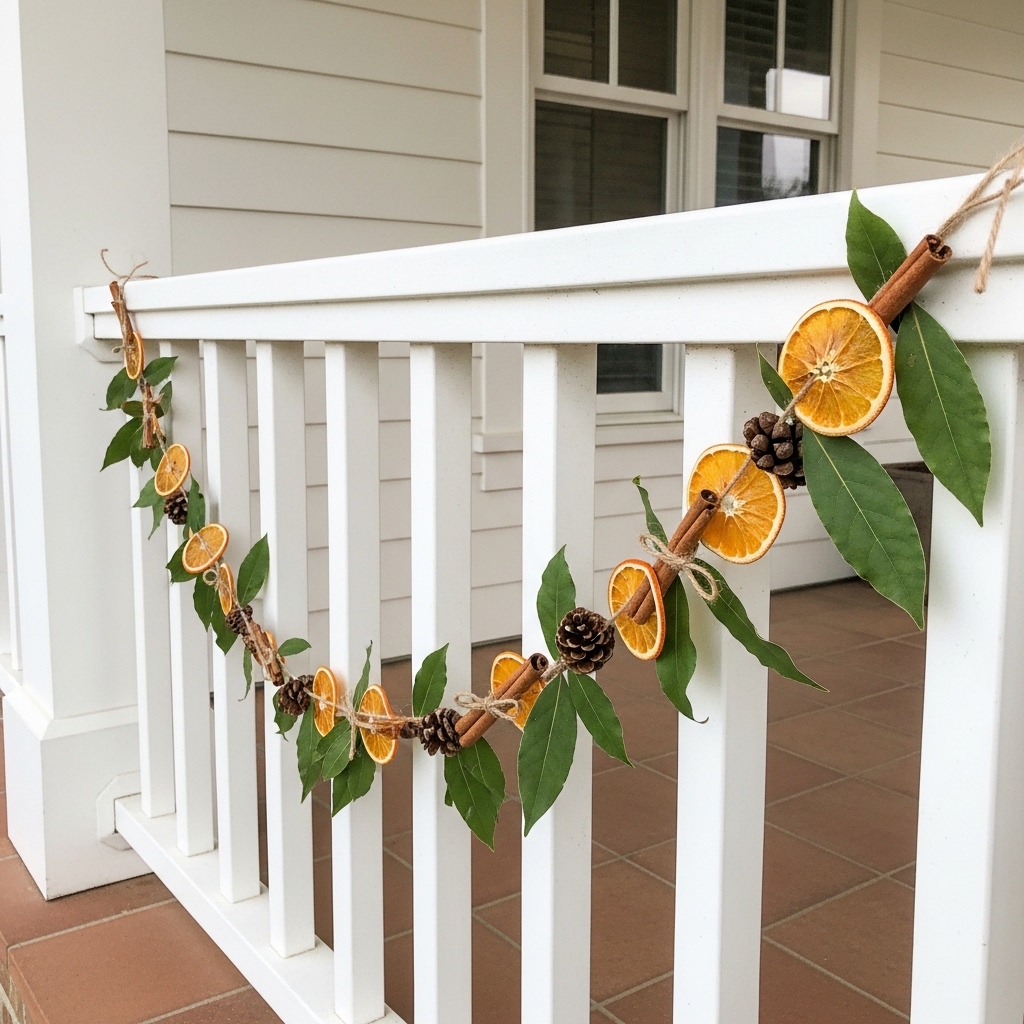
A hand-crafted dried orange slice garland brings a warm, artisanal, and deeply fragrant quality to winter porch decor that no store-bought product can fully replicate. The rich amber and rust tones of dried orange slices perfectly complement the deep greens of evergreen garland and the warm red of berry clusters already adorning your porch. Furthermore, alternating dried orange rounds with cinnamon sticks, pinecones, and fresh bay leaves on natural jute twine creates a visually complex garland that looks handmade and intentional. Additionally, dried oranges emit a subtle warm citrus and spice scent outdoors that guests notice as they approach your front entry steps. This DIY garland project costs under $15 to make entirely from scratch.
- Dried oranges add warm amber porch color
- Natural citrus scent fills the front entry
- Alternating textures create handmade artisanal look
- Under $15 to make completely from scratch
- Pairs beautifully with evergreen railing garland
Drying orange slices for your porch garland takes 4 to 6 hours in a standard kitchen oven set to its lowest temperature — typically 200 degrees Fahrenheit. You slice naval oranges into 1/4-inch rounds, pat them dry with a paper towel, and arrange them on a parchment-lined baking sheet before placing them in the oven. Moreover, flipping each slice once at the halfway point ensures even drying on both sides and prevents any browning or burning around the outer peel edge. Additionally, dried orange slices last 3 to 4 weeks outdoors in cold winter temperatures before showing any signs of deterioration. That’s why many DIY decorators make a double batch of dried orange slices at the beginning of the season — using half for garlands and half for potpourri displays throughout the home.
Monogram Porch Sign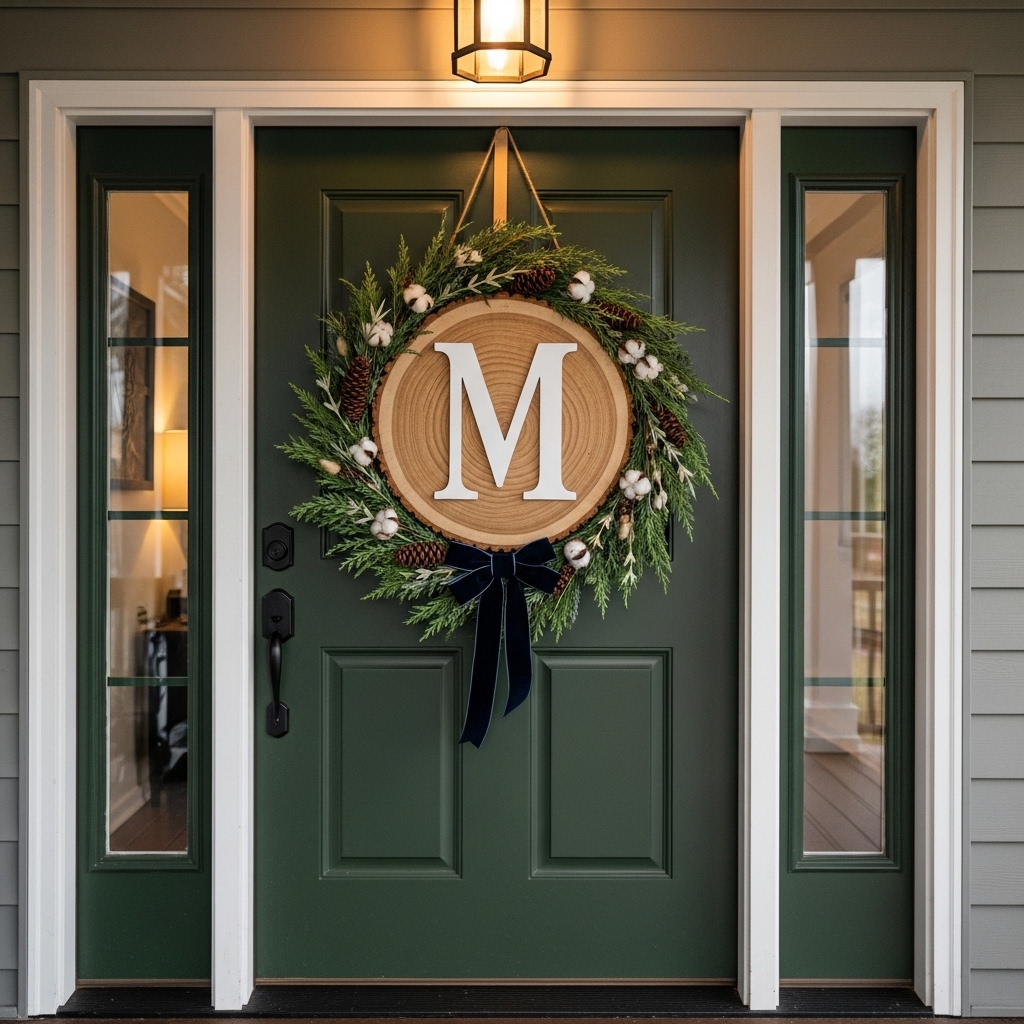
A personalized monogram sign hung on your front door adds a distinctive, custom touch to your winter porch display that sets your home completely apart from every neighbor on the street. A natural wood round slice with a painted initial letter at its center creates a warm, handcrafted focal point that communicates personal style and intentional decorating. Furthermore, surrounding the monogram with a mini botanical wreath — pine sprigs, cedar clusters, and dried cotton stems — transforms a simple letter display into a full decorative installation. Additionally, a wide velvet ribbon bow at the bottom of the botanical frame adds a luxurious, polished finish. This personalized winter porch idea costs between $20 and $45 depending on the wood round size and letter style you choose.
- Monogram sign creates a personalized porch focal point
- Natural wood round adds warm handcrafted texture
- Surround letter with mini botanical wreath frame
- Navy velvet bow adds luxurious polished detail
- Total cost only $20–$45 depending on size
Creating a DIY monogram porch sign requires only 3 affordable materials — a natural wood slice, a wood letter from any craft store, and basic white paint. You sand the wood slice lightly to remove any rough edges, then center and glue the painted letter directly onto the wood surface. Moreover, sealing the finished monogram with a coat of clear outdoor Mod Podge protects the painted letter from rain, frost, and snow throughout the entire winter season. Additionally, attaching a sturdy jute twine loop to the back of the wood slice creates a reliable hanging mechanism that suits most standard door wreath hooks without any additional hardware. I’ve made this exact monogram sign for under $18 and received more front-door compliments from it than from any wreath I have ever purchased.
Stacked Pumpkin Topiary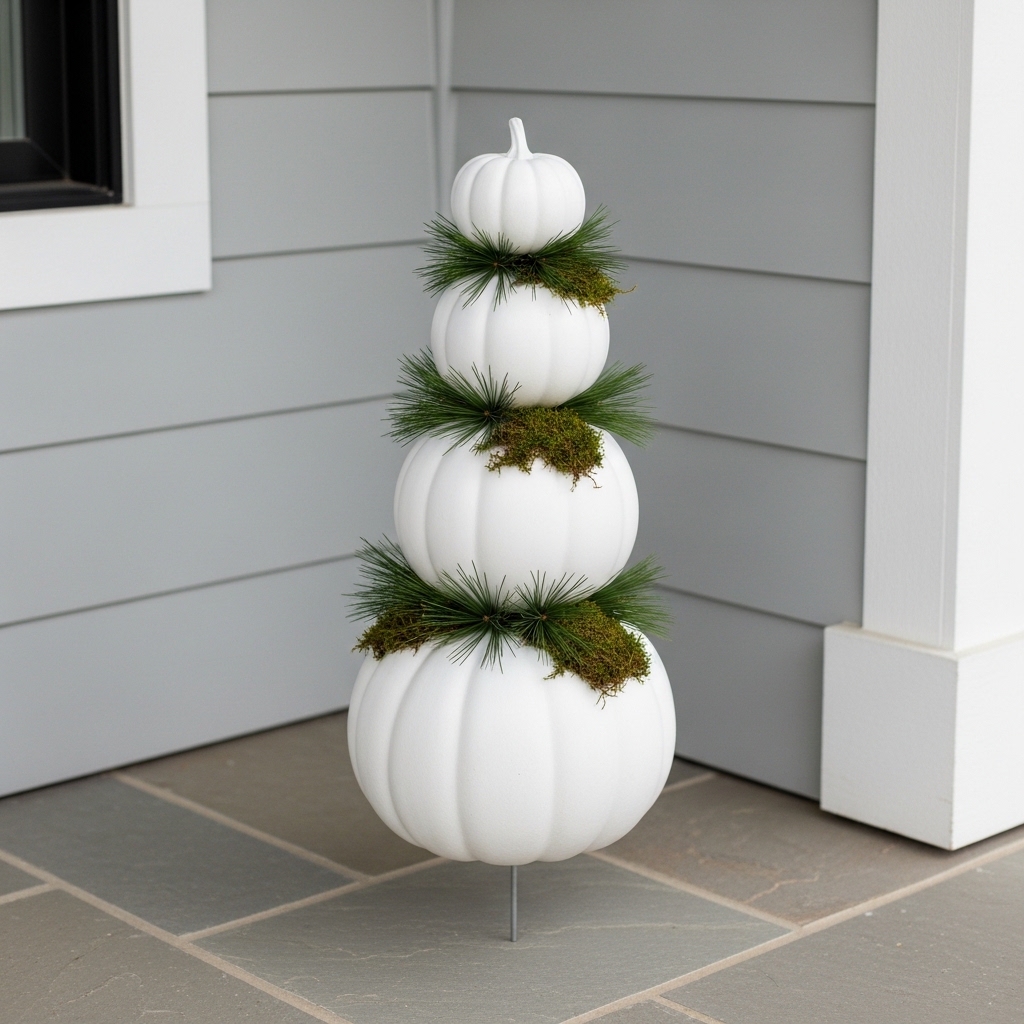
A stacked white pumpkin topiary extends your front porch decorating season elegantly from late autumn all the way through the winter holiday months. Painting 3 pumpkins matte white and stacking them vertically on a single metal garden stake creates a clean, sculptural tower that suits farmhouse, coastal, and minimalist exterior aesthetics beautifully. Furthermore, decorating each white pumpkin with patches of fresh moss, pine sprigs, and tiny pinecones transforms a simple autumn prop into a genuinely winter-ready botanical statement. Additionally, using high-quality foam craft pumpkins instead of real pumpkins makes this topiary 100% reusable across multiple seasons without any deterioration. This creative winter porch accent costs between $25 and $50 depending on whether you choose real or foam pumpkins.
- Paint pumpkins matte white for winter transformation
- Stack 3 sizes for sculptural topiary silhouette
- Foam pumpkins last multiple seasons without decay
- Add moss and pine sprigs for winter texture
- Works for farmhouse and minimalist home styles
Securing a stacked pumpkin topiary against wind and winter weather requires running a sturdy 18-inch metal garden stake vertically through the center of all 3 pumpkins before decorating the surface. The stake anchors all 3 pumpkins together as a single unit and drives several inches into the ground or a heavy weighted pot base for maximum stability. Moreover, placing the finished topiary inside a large galvanized tub filled with gravel adds extra base weight that prevents tipping even in strong gusts. Additionally, applying a coat of matte white outdoor spray paint rather than indoor chalk paint protects the pumpkin surface from moisture and frost for the entire display season. That’s why exterior decorators recommend outdoor-rated spray paint specifically for any painted porch accent exposed to winter weather conditions.
Frosted Berry Branch Vase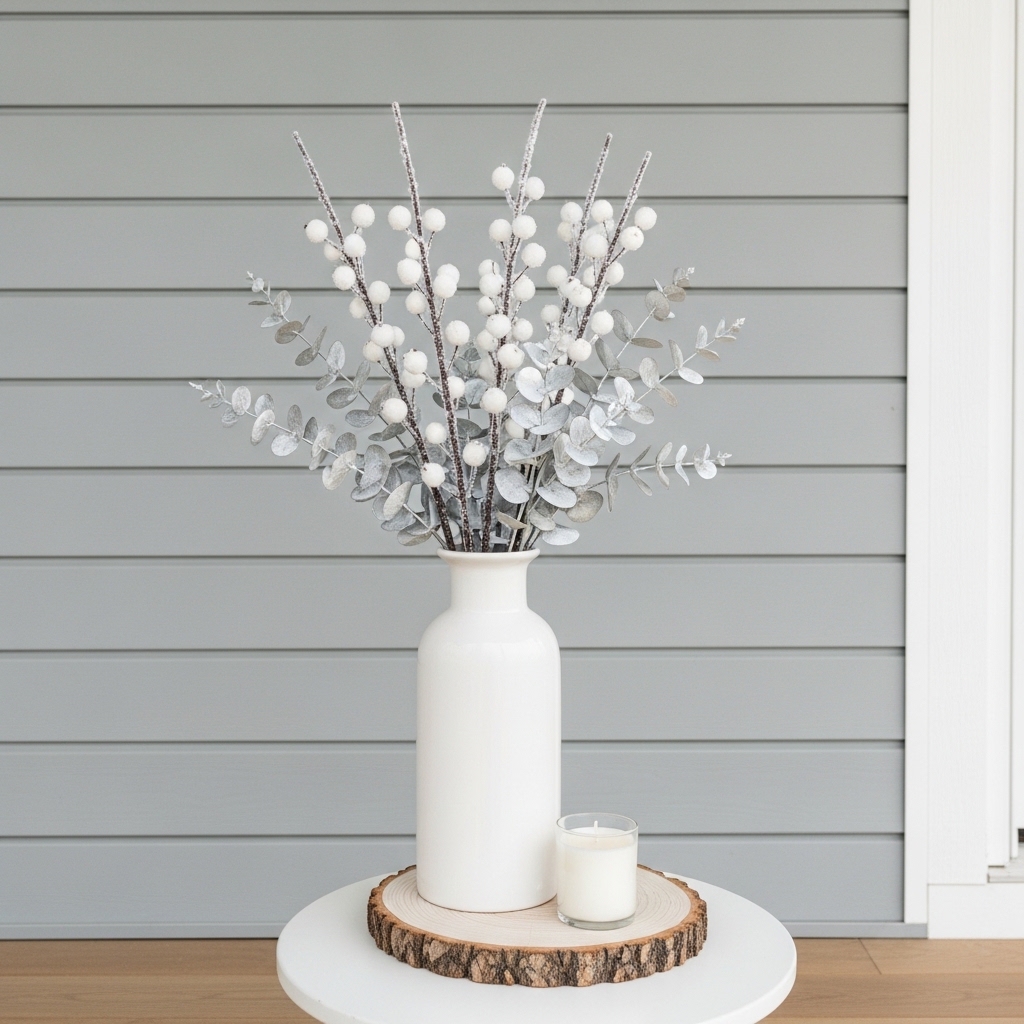
Frosted white berry branches arranged in a tall ceramic vase create one of the most effortlessly elegant winter porch accents available at any budget level. The delicate white berries against silvery eucalyptus stems deliver a frosty, ethereal quality that captures natural winter beauty in a completely minimal display. Furthermore, this porch styling idea requires only a single vase, 5 berry branches, and 3 eucalyptus stems — a total investment of under $18 at most craft or floral supply stores. Additionally, frosted berry branches come pre-faux-snowed and require zero additional styling effort beyond arranging them loosely inside the vase. This winter porch vignette idea suits modern farmhouse, Scandinavian, and coastal home exterior aesthetics perfectly.
- Frosted berry branches need zero extra styling
- Mix with eucalyptus for elegant frosty texture
- Full vase display costs under $18
- White ceramic vase suits every exterior aesthetic
- Natural wood slice base adds warm contrast
Choosing the right vase height amplifies the visual elegance of a frosted berry branch display significantly. A vase between 14 and 18 inches tall allows berry branches to extend 8 to 12 inches above the rim, creating a generous, airy silhouette that fills vertical porch space beautifully. Moreover, cutting branch stems at 3 slightly different lengths before arranging them in the vase prevents a flat, uniform top line and creates a more organic, natural shape. Additionally, filling the vase base with 2 inches of smooth white river pebbles before adding branches weights the vase securely and prevents tipping in winter winds. That’s why many porch stylists recommend a heavy stone-base vase or weighted ceramic specifically for any branch display exposed to outdoor winter conditions.
Woodland Animal Figurine Display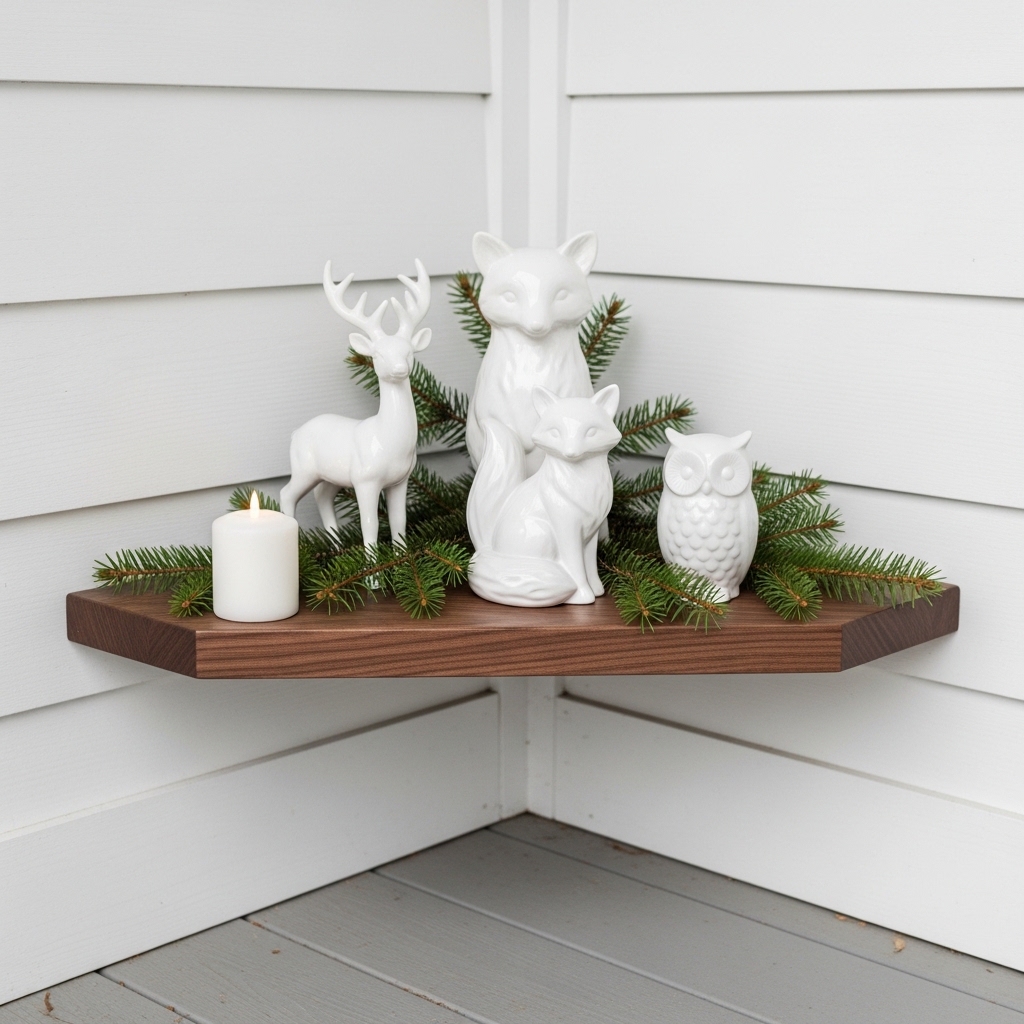
A small grouping of white ceramic woodland animal figurines on a porch shelf creates a whimsical, storybook-quality winter display that every visitor finds completely irresistible. Deer, fox, and owl figurines arranged at alternating heights on a simple wood shelf create a charming, narrative scene that brings genuine personality and warmth to your front porch entry. Furthermore, nestling fresh pine sprigs between each figurine connects all 3 pieces into a unified botanical tableau. Additionally, this winter porch decorating idea costs between $15 and $35 depending on where you source the ceramic figurines. This display idea works beautifully on porch ledges, railings, console tables, and any flat porch surface available near your front door.
- White ceramic animals create storybook porch charm
- Arrange 3 animals at alternating heights
- Pine sprigs between figurines unify the display
- Works on ledges, railings, and console tables
- Total display costs only $15–$35
Sourcing white ceramic woodland figurines for a winter porch display requires minimal shopping effort because most major retailers carry them affordably throughout the entire holiday season. Target, HomeGoods, and Hobby Lobby all stock white ceramic deer, owls, and fox figurines between October and January each year at prices ranging from $6 to $15 per piece. Moreover, coating each outdoor figurine with a clear waterproof sealant spray before placing them on your porch protects the ceramic finish from frost, rain, and moisture damage throughout the entire winter season. Additionally, storing your ceramic figurines inside during heavy snowstorms prevents accidental breakage from falling ice or severe wind. I’ve used this exact woodland figurine display on my own porch shelf for 3 consecutive winter seasons and it has never failed to generate genuine admiration from visitors.
Neutral Wreath Trio
Hanging 3 matching neutral wreaths in a vertical column beside your front door creates a bold, gallery-style wall installation that makes your porch exterior look like a high-end design feature. Natural twig wreaths dressed with dried cotton stems, pampas grass tips, and eucalyptus sprigs deliver a warm, textural, and completely season-neutral display that suits winter, early spring, and even autumn decorating simultaneously. Furthermore, using 3 identical wreaths hung at equal spacing creates a clean, architectural rhythm along the exterior wall that looks intentional and professionally planned. Additionally, cotton and pampas wreaths last indefinitely indoors and 3 to 4 months outdoors before showing any weathering. This stunning porch wall display costs between $45 and $90 for all 3 wreaths combined.
- Hang 3 matching wreaths in vertical column
- Natural cotton and pampas last months outdoors
- Equal spacing creates clean architectural wall rhythm
- Works across winter, autumn, and early spring
- Full trio display costs $45–$90 combined
Installing a vertical wreath trio on an exterior wall requires only 3 small outdoor-rated adhesive hooks rated for at least 5 pounds each. You space each hook exactly 18 inches apart vertically to create uniform gaps between each wreath that maintain clean proportional spacing from top to bottom. Moreover, using cream or white velvet ribbon loops on each wreath instead of metal hooks adds a soft, luxurious hanging detail visible at the top of each piece. Additionally, choosing wreaths with identical diameters — typically 18 to 22 inches — ensures the vertical column looks perfectly aligned rather than randomly mismatched. That’s why many exterior decorators recommend measuring and marking hook positions with removable chalk before installing anything permanently on an outdoor wall surface.
Porch Ceiling Snowflake Hangings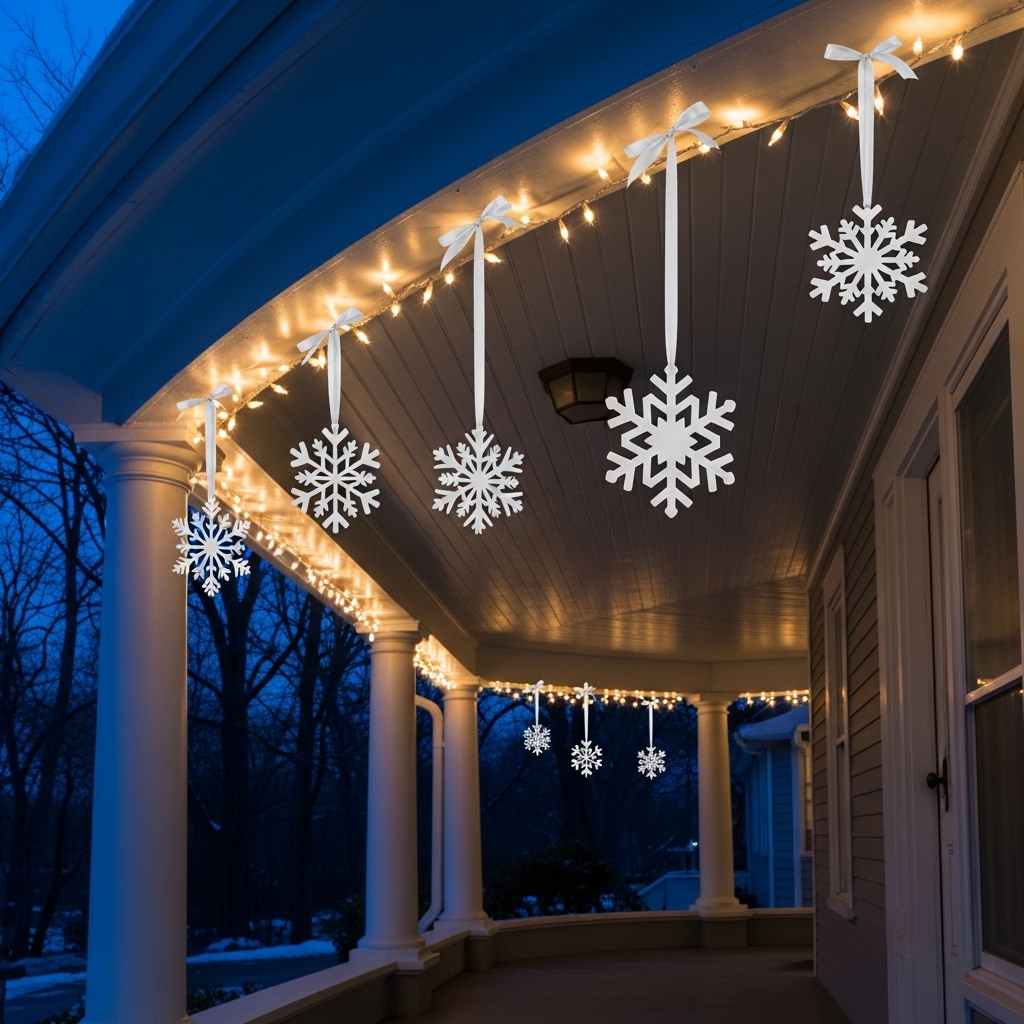
Hanging white laser-cut snowflake ornaments from your covered porch ceiling at varying lengths creates a breathtaking winter installation that transforms the overhead space into a magical snow-filled canopy. The interplay of dimensional wood snowflakes and warm string lights behind them creates a layered, glowing overhead display that looks completely spectacular after dark. Furthermore, varying the drop length of each snowflake between 12 and 30 inches creates a dynamic, floating installation rather than a flat, uniform row. Additionally, white laser-cut wood snowflakes cost between $3 and $8 each at most craft stores, making a full 5-piece ceiling installation achievable for under $40 total. This enchanting winter porch display idea works exclusively on covered porches with accessible ceiling beams or hooks.
- Hang snowflakes at 3 different drop lengths
- String lights behind snowflakes create magical glow
- White wood snowflakes cost only $3–$8 each
- Full 5-piece display costs under $40 total
- Works on any covered porch with ceiling beams
Choosing the right snowflake sizes for a porch ceiling display creates visual depth and prevents the installation from looking too uniform or repetitive across the overhead space. Use 3 large snowflakes at 12-inch diameter, 2 medium snowflakes at 8-inch diameter, and 2 small snowflakes at 5-inch diameter for a layered, dimensional composition. Moreover, alternating large and small snowflakes as you move across the porch ceiling creates a natural, scattered snowfall rhythm that looks organic rather than mathematically arranged. Additionally, using a hot glue dot to secure the ribbon at the top of each snowflake hook point prevents wind from spinning the ornaments and tangling the ribbons together throughout the winter season. In my experience, porch ceiling snowflake installations consistently generate the most enthusiastic reactions from holiday visitors of any single porch decor element.
Rustic Sled Porch Accent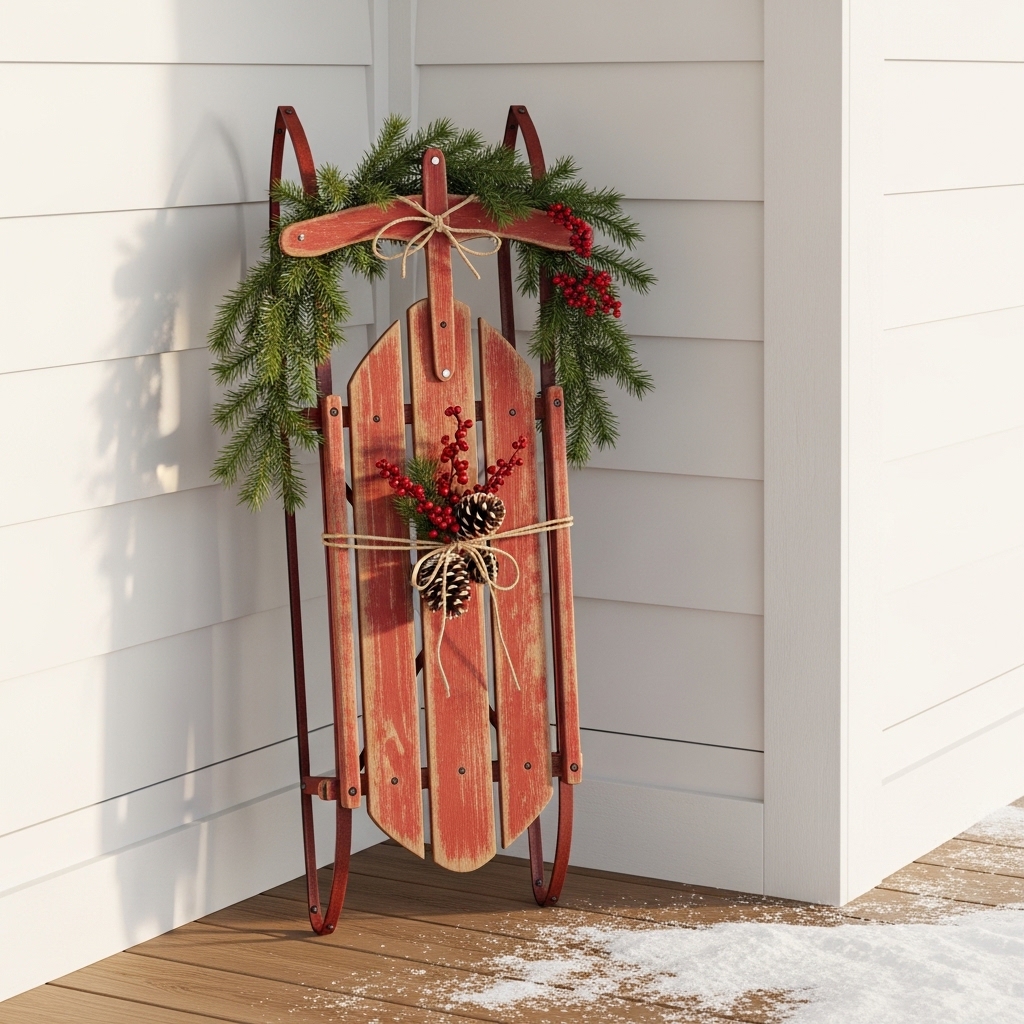
A vintage-style wood sled propped against the porch wall creates one of the most nostalgic and charming winter porch accent pieces you can display outside your front door. The weathered red paint finish of a classic wood sled immediately communicates warmth, childhood joy, and seasonal celebration in a single glance from the street. Furthermore, draping fresh pine garland over the sled rails and tying red berry clusters with jute twine at the crossbar transforms a simple prop into a fully decorated botanical installation. Additionally, a light dusting of faux snow across the porch floor boards beneath the sled completes the wintery storybook scene effortlessly. This vintage porch accent costs between $30 and $60 for a decorative wood sled at most holiday decor retailers.
- Weathered red sled delivers instant nostalgic charm
- Drape pine garland over the sled rails
- Tie berry clusters with jute for rustic detail
- Faux snow at base completes the winter scene
- Costs $30–$60 at holiday decor retailers
Positioning your decorative porch sled correctly maximizes its visual impact from the street and prevents it from looking awkwardly placed against the wall. Lean the sled at a slight diagonal angle — approximately 15 degrees off vertical — rather than straight upright, which creates a more casual, natural posture. Moreover, placing the sled in the corner where your porch wall meets the railing post creates a natural architectural anchor that grounds the display within the existing porch structure. Additionally, choosing a covered porch position for your sled display protects the wood and paint finish from direct rain and heavy snowfall during the deepest winter months. That’s why decorative sleds used on covered porches consistently maintain their appearance and finish across 3 to 4 full winter seasons.
Porch Chandelier Greenery Wrap
Wrapping your existing porch chandelier or hanging lantern in fresh eucalyptus and pine sprigs creates a breathtaking botanical installation that costs almost nothing and transforms your entire porch ceiling focal point. The contrast of dark metal chandelier arms against lush green foliage creates a rich, jewel-like display that photographs beautifully from any angle and direction. Furthermore, tucking sprigs directly into the existing metal chandelier frame requires zero wire, zero tools, and zero permanent modification to your light fixture. Additionally, adding 3 small glass votive holders with white candles hanging from the chandelier arms introduces a warm, flickering light element that makes evenings on the porch feel genuinely enchanting. This luxurious winter porch upgrade costs under $20 in fresh greenery.
- Tuck pine sprigs directly into chandelier frame
- Zero tools or permanent fixture modification needed
- Glass votives add warm flickering candlelight detail
- Fresh eucalyptus costs under $20 in total
- Creates a breathtaking botanical ceiling focal point
Keeping fresh greenery on an outdoor chandelier looking lush and vibrant throughout the winter season requires one simple weekly maintenance step. Every 7 days, mist the eucalyptus and pine sprigs lightly with water using a small spray bottle to replenish lost moisture from outdoor air exposure. Moreover, replacing any browning or dried sprigs with fresh clippings every 10 to 14 days keeps the chandelier wrap looking freshly installed rather than aged and neglected. Additionally, choosing cold-hardy varieties like blue spruce, cedar, and preserved eucalyptus instead of fresh-cut pine extends the display life significantly in freezing outdoor temperatures. I’ve maintained a chandelier greenery wrap for 6 full weeks through a cold winter simply by misting it regularly and swapping out 2 to 3 sprigs weekly.
Winter Welcome Sign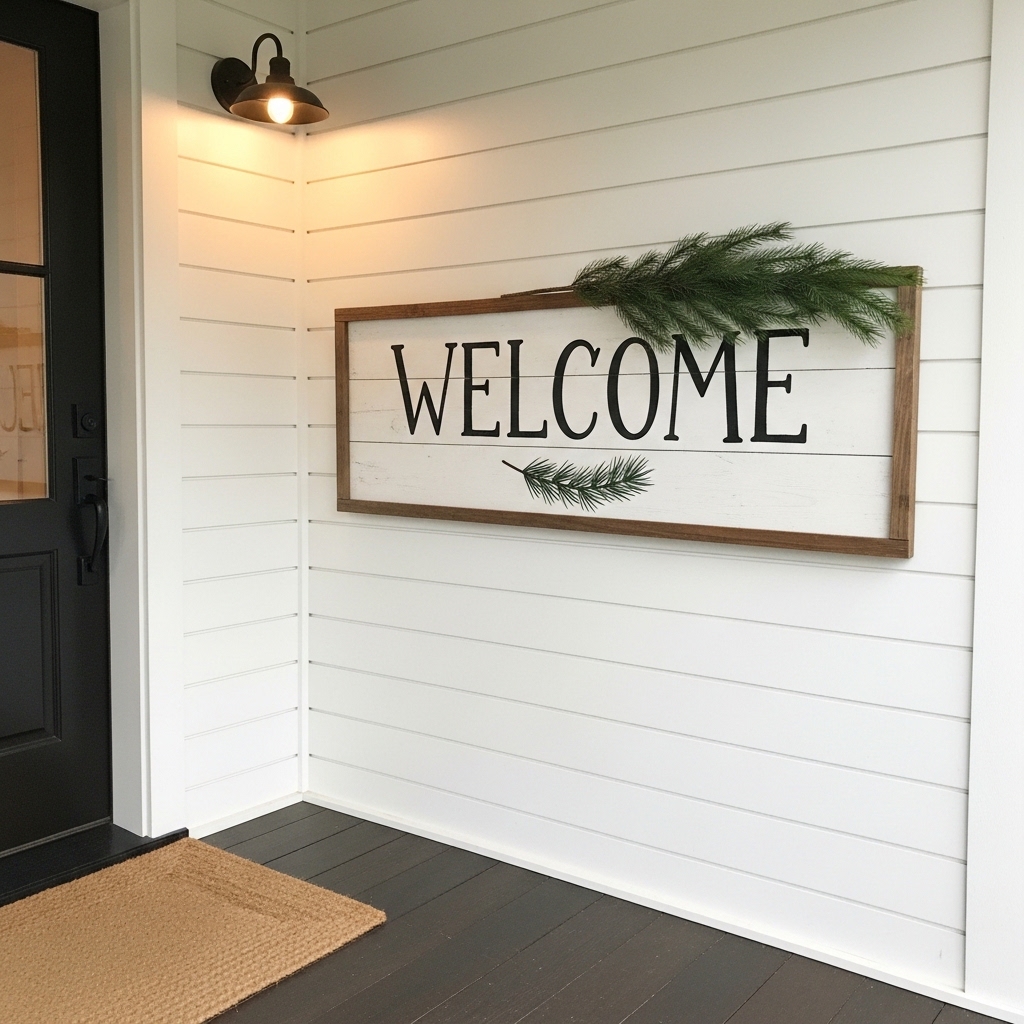
A hand-lettered reclaimed wood welcome sign beside your front door adds a warm, personalized layer of winter hospitality that commercial store signs simply cannot replicate. The combination of rustic reclaimed wood grain, bold black hand-lettered text, and a delicate painted pine branch illustration creates a sign that feels genuinely artisanal and thoughtfully made. Furthermore, laying a single fresh pine bough along the top edge of the sign frame connects the wooden sign to the broader botanical winter porch display without requiring any additional styling effort. Additionally, reclaimed wood welcome signs suit farmhouse, rustic, and transitional home exteriors beautifully without any styling modifications. A quality wooden welcome sign costs between $25 and $55 at most Etsy shops and holiday markets.
- Reclaimed wood grain adds authentic rustic warmth
- Pine bough on top frame ties display together
- Hand-lettered signs feel artisanal and personalized
- Suits farmhouse and transitional home exteriors
- Quality Etsy signs cost only $25–$55
Creating a DIY reclaimed wood welcome sign requires minimal tools and even less artistic experience than most beginners expect. You purchase a pre-cut 8×24-inch reclaimed wood plank from any hardware store, sand it lightly with 120-grit sandpaper, and apply a base coat of white chalk paint. Moreover, printing your desired lettering in a bold font at the correct scale and tracing it lightly onto the wood surface with a pencil creates clean, confident letter guides before applying black craft paint. Additionally, sealing the finished sign with 2 coats of clear outdoor Mod Podge protects the paint from frost, rain, and moisture throughout every winter season. That’s why DIY welcome signs made with outdoor sealant consistently outlast store-bought versions by 2 to 3 additional display seasons.
Hay Bale Porch Seating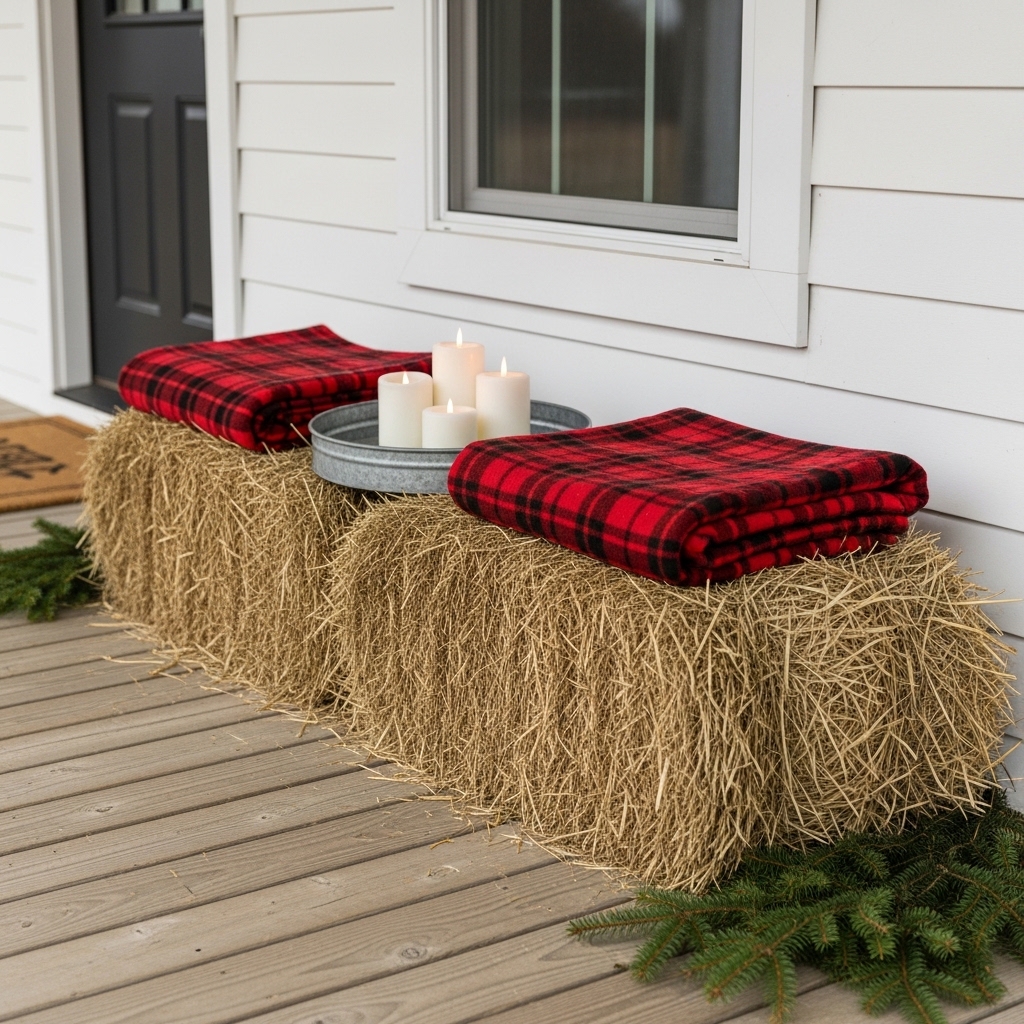
Hay bales used as rustic porch seating create an incredibly charming and warmly inviting winter entrance that perfectly complements a farmhouse or cottage home exterior. 2 small square hay bales placed side by side beside your front door with plaid wool blankets folded on top instantly create an outdoor seating moment that feels festive, functional, and deeply seasonal. Furthermore, placing a galvanized metal tray between the 2 hay bales and styling it with 3 white pillar candles creates a complete styled vignette that uses the hay bales as both seating and decor simultaneously. Additionally, fresh pine boughs laid at the base of each hay bale ground the display with natural botanical texture. This complete porch seating display costs under $35 total.
- Hay bales create charming rustic porch seating
- Plaid blanket on top adds cozy textile warmth
- Galvanized tray between bales creates styled vignette
- Pine boughs at base add botanical grounding
- Complete display costs under $35 total
Maintaining hay bale porch seating through winter moisture and cold requires one simple protective step that most decorators overlook entirely. Placing each hay bale on a small square of waterproof rubber matting or a folded tarp piece prevents ground moisture from wicking upward through the bale bottom and causing premature deterioration. Moreover, covering the top of each hay bale with your plaid blanket when guests are not seated creates an additional moisture barrier that significantly extends the bale’s outdoor life. Additionally, sourcing small square decorative hay bales from local farm supply stores rather than large feed stores gives you access to tighter, cleaner-bound bales that hold their shape more reliably through the entire winter season. I’ve used hay bale porch seating for 3 consecutive winters and each bale lasts the full season with proper moisture protection in place.
Snow Globe Porch Lantern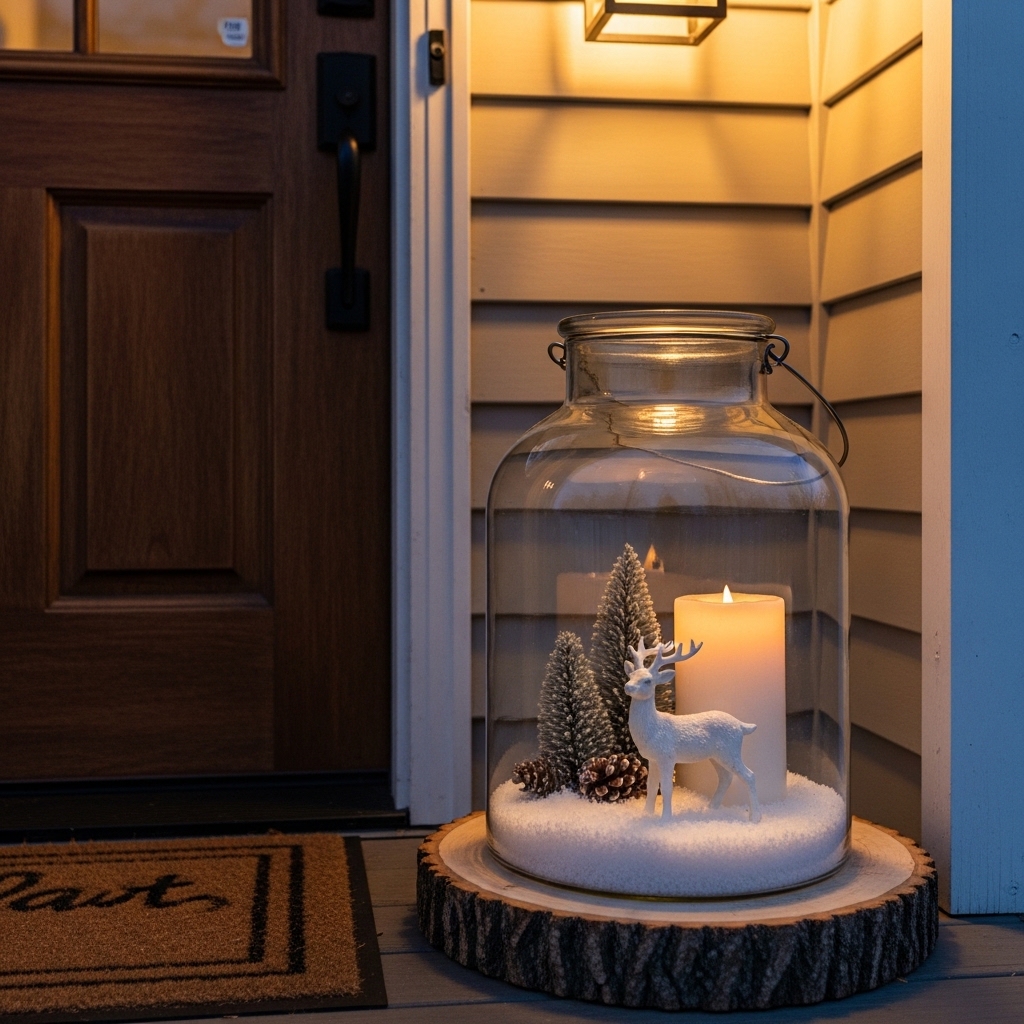
Transforming a large clear glass apothecary jar into a DIY snow globe lantern creates one of the most magical and conversation-starting winter porch decor pieces imaginable. A miniature ceramic deer figurine, a handful of white artificial snow flocking, and 3 tiny dried pine sprigs arranged inside a sealed glass jar create a self-contained winter scene that glows warmly beside your front door. Furthermore, placing a large white pillar candle beside the snow globe jar creates a paired display that feels curated and intentional without requiring any additional accessories. Additionally, this creative winter porch decorating idea costs under $15 using a basic craft store apothecary jar and a ceramic miniature. The visual impact this display delivers far exceeds its extremely modest cost.
- Large apothecary jar creates DIY snow globe display
- White snow flocking fills jar with winter magic
- Miniature deer figurine adds storybook focal element
- Paired pillar candle completes the full vignette
- Entire display costs under $15 to create
Building your DIY snow globe porch lantern requires choosing a jar wide enough to accommodate your miniature figurine and allow your hand to reach inside comfortably during assembly. A jar with a minimum 5-inch opening diameter and 10-inch height provides the ideal proportions for a full snow globe scene with adequate visual depth. Moreover, gluing your miniature figurine to a small flat stone using waterproof adhesive before placing it inside the jar creates a stable base that prevents the figurine from shifting when the jar is moved. Additionally, using artificial snow flocking rather than real glitter prevents slippery surfaces and environmental mess on your porch floor. That’s why craft decorators consistently recommend apothecary jar snow globes as the most rewarding and affordable DIY winter porch project for beginners.
Evergreen Topiary Pair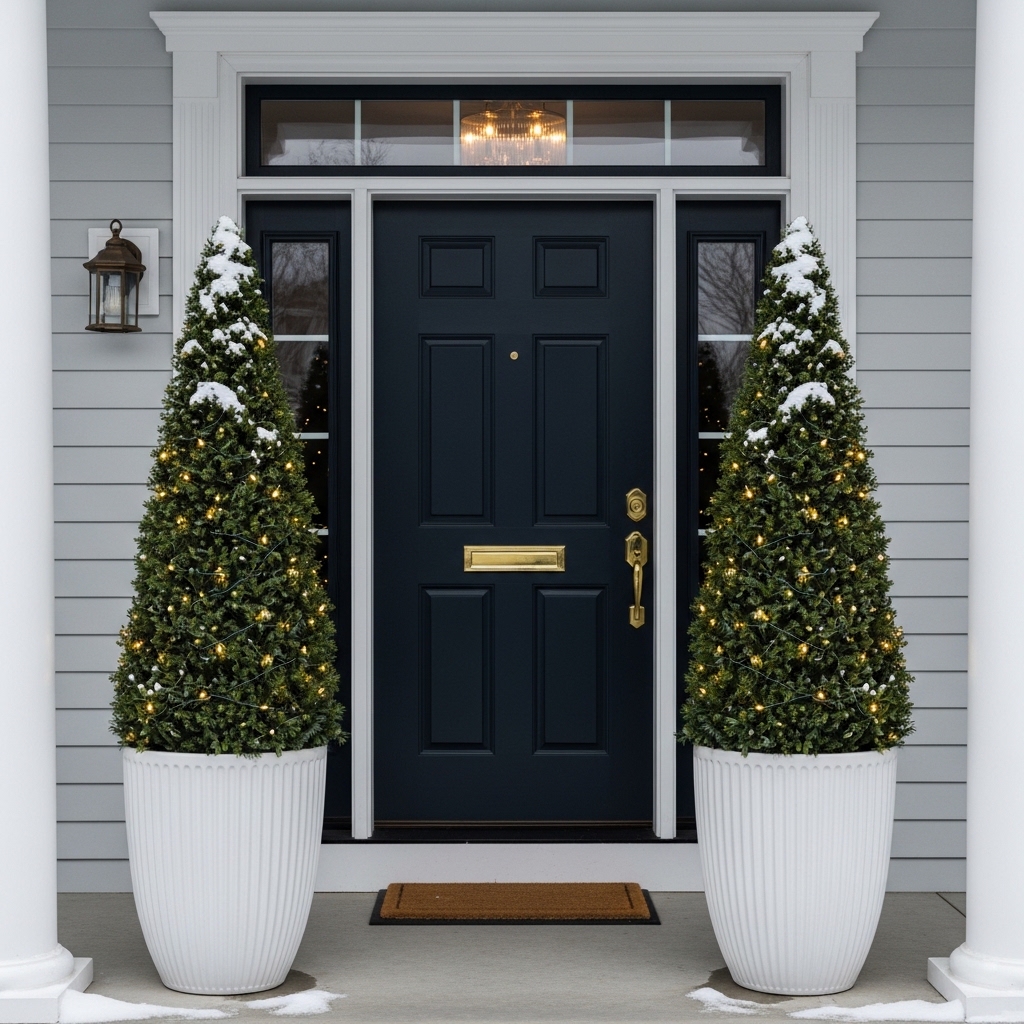
A matching pair of cone-shaped evergreen topiaries flanking your front door creates the single most impactful and classically elegant winter porch display achievable on any home exterior. The strong vertical symmetry of 2 identical topiaries in matching white ceramic pots frames your front door like a formal architectural gateway that commands immediate attention from the street. Furthermore, weaving warm white LED lights throughout each topiary’s branches transforms the daytime botanical display into a glowing, jeweled nighttime installation that rivals any professionally decorated home. Additionally, this ways to decorate your porch for winter idea works on every home style — colonial, craftsman, farmhouse, and modern — because the clean cone topiary silhouette suits every architectural vocabulary equally. This display costs between $80 and $150 for a complete matching pair.
- Matching topiary pair creates formal door framing
- Cone shape suits every home architectural style
- Woven LED lights glow magically after dark
- White ribbed pots look elegant and timeless
- Full matching pair costs $80–$150 total
Keeping evergreen cone topiaries healthy and green throughout the entire winter display season requires watering them deeply once every 10 to 14 days even in cold temperatures. Evergreen roots continue growing slowly in winter and need consistent moisture to prevent needle browning and premature drop. Moreover, choosing cold-hardy topiary varieties like arborvitae, Alberta spruce, or Italian cypress ensures the plants withstand freezing temperatures without suffering significant damage. Additionally, removing the LED light strands carefully at the end of the season and storing the topiaries in a sheltered garage location during the coldest weeks protects both the plants and the lights for reuse next year. I’ve maintained the same pair of Alberta spruce topiaries on my porch for 4 consecutive winter seasons by following this exact care routine every year.
Conclusion
Your porch deserves to feel just as warm, beautiful, and welcoming as the inside of your home this winter. Every idea in this guide proves that the best ways to decorate your porch for winter do not require a large budget, professional help, or hours of complicated installation. Furthermore, even 1 or 2 of these ideas — a lantern cluster, a garland-draped railing, or a plaid blanket on a chair — can completely transform how your home looks and feels from the street. I’ve seen how one small porch change creates a ripple of warmth and pride that lasts the entire season. Save this post, try one idea today, and share it with a neighbor who needs this inspiration.
Frequently Asked Questions
How do I decorate a small front porch for winter on a budget?
Start with 1 lantern cluster and a simple evergreen garland on the railing. Add a layered doormat and a plaid throw blanket on your existing chair. These 3 elements cost under $50 combined and create an immediate, complete winter porch display.
What plants survive outdoors on a porch during winter?
Boxwood topiaries, arborvitae, Alberta spruce, and English ivy all survive freezing winter temperatures reliably. Cedar and pine branches stay fresh for 3 to 4 weeks in cold outdoor conditions. Always choose frost-resistant containers to prevent cracking during hard freezes.
How do I keep porch garland fresh throughout the winter season?
Mist real evergreen garland lightly with water every 5 to 7 days to replenish lost moisture. Cold outdoor temperatures naturally extend garland freshness significantly. Avoid placing garland near heat vents or outdoor heating units that dry the branches out quickly.
What outdoor lighting works best for a winter porch display?
Warm white Edison string lights rated at 2200K to 2700K create the richest amber glow. Battery-operated LED candles inside lanterns eliminate fire and weather risk completely. Always use outdoor-rated extension cords and plug-in timers for safe, automatic nightly operation.
How do I secure porch decorations against winter wind and storms?
Wire garland to railings every 18 inches using thin floral wire to prevent wind displacement. Secure lanterns to railing surfaces with removable mounting putty. Store delicate ceramic figurines and glass items inside during heavy snowstorms to prevent breakage.
Can I decorate a rental porch for winter without making permanent changes?
Yes. Use adhesive outdoor hooks rated for at least 5 pounds for all wreath and sign hangings. Tension rods in doorframes hold swag displays without any drilling. Layered doormats, potted plants, and hay bale displays all sit freely on porch floors without any installation.
When should I start decorating my porch for winter?
Most home decorators begin winter porch styling between late November and the first week of December. However, neutral greenery displays using eucalyptus, cotton stems, and birch branches suit the porch from mid-November onward. Starting early gives you more time to enjoy the full display before the season ends.