27 Stunning fall outdoor decor ideas To Copy In 2026
Your front yard and porch sit completely bare while the most beautiful season of the entire year unfolds around them — and that missed opportunity is more frustrating than most homeowners realize. The right fall outdoor decor ideas cost less than a single dinner out and take under one weekend afternoon to execute beautifully. I remember standing at my own front door one October morning staring at a completely plain, undecorated porch while every neighbor’s home glowed with pumpkins, garlands, and warm lantern light. I spent $42 that same afternoon and completely transformed my entire front yard before sunset. Furthermore, you do not need a large outdoor space, a professional landscaper, or an unlimited budget to create an exterior that looks genuinely seasonal, warm, and intentionally styled.
Experienced outdoor stylists and home decorators consistently confirm that combining just 4 well-chosen elements — pumpkins, greenery, lighting, and natural textures — creates an outdoor display that looks far more elaborate and expensive than it actually is. Additionally, this article covers 27 specific autumn outdoor styling ideas ranging from cascading porch step pumpkin displays and corn stalk bundle flanking to backyard firepit seating areas and magical harvest moon party setups. Moreover, every single idea in this guide suits homeowners, renters with outdoor access, beginners, and anyone working with a tight seasonal decorating budget. You will finish reading this article knowing exactly which outdoor ideas to implement this weekend — and your home exterior will never look bare during autumn again.
Harvest Pumpkin Porch Steps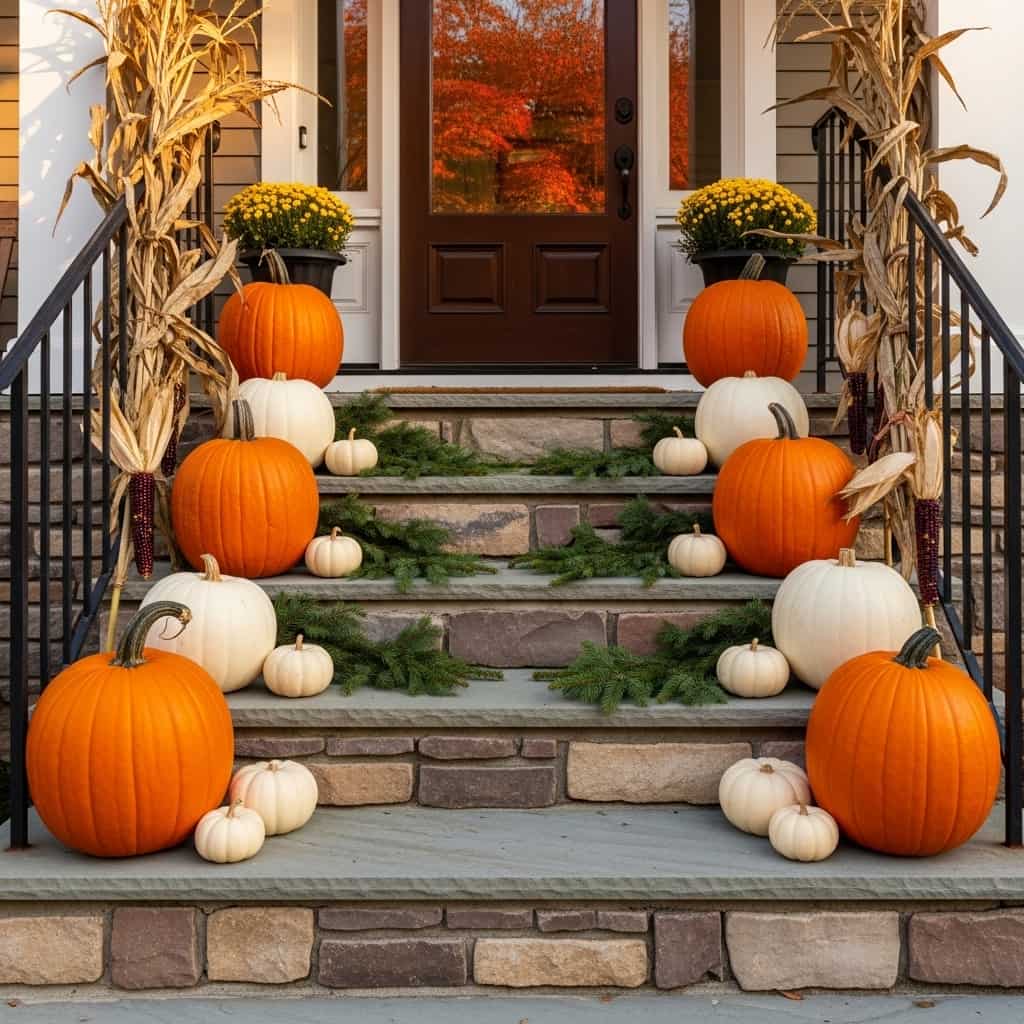
A cascading pumpkin display arranged across porch steps creates the most immediately recognizable and visually abundant fall outdoor decor statement possible on any home exterior. Mixing 7 pumpkins in large orange, medium white, and small cream across 3 step levels builds a natural color gradient that guides the eye upward from the sidewalk directly toward your front door. Furthermore, tucking fresh pine boughs between each pumpkin and flanking both sides with dried corn stalks creates a layered, harvest-inspired composition that fills vertical and horizontal space simultaneously. Additionally, this autumn porch styling idea costs between $25 and $45 using grocery store pumpkins and craft store corn stalks. The visual impact far exceeds the modest investment required.
- Mix orange, white, and cream pumpkin tones
- Arrange across 3 step levels for depth
- Tuck pine boughs between each pumpkin
- Dried corn stalks flank both stair sides
- Full display costs only $25–$45 total
Preserving your porch step pumpkin display through several weeks of autumn weather requires 2 simple preparation steps before placing any pumpkin outdoors. Apply a thin layer of petroleum jelly across each pumpkin surface immediately after purchase to seal the skin and dramatically slow moisture loss. Moreover, placing each pumpkin on a small piece of rubber matting rather than directly on stone or wood steps prevents the bottom from absorbing ground moisture that accelerates mold development. Additionally, positioning your pumpkin display in a shaded portion of the porch rather than in direct afternoon sunlight extends the fresh appearance by an additional 1 to 2 weeks beyond the standard untreated outdoor lifespan. That’s why experienced fall outdoor decorators consistently recommend this dual preservation approach for every porch step pumpkin display.
Corn Stalk Bundle Flanking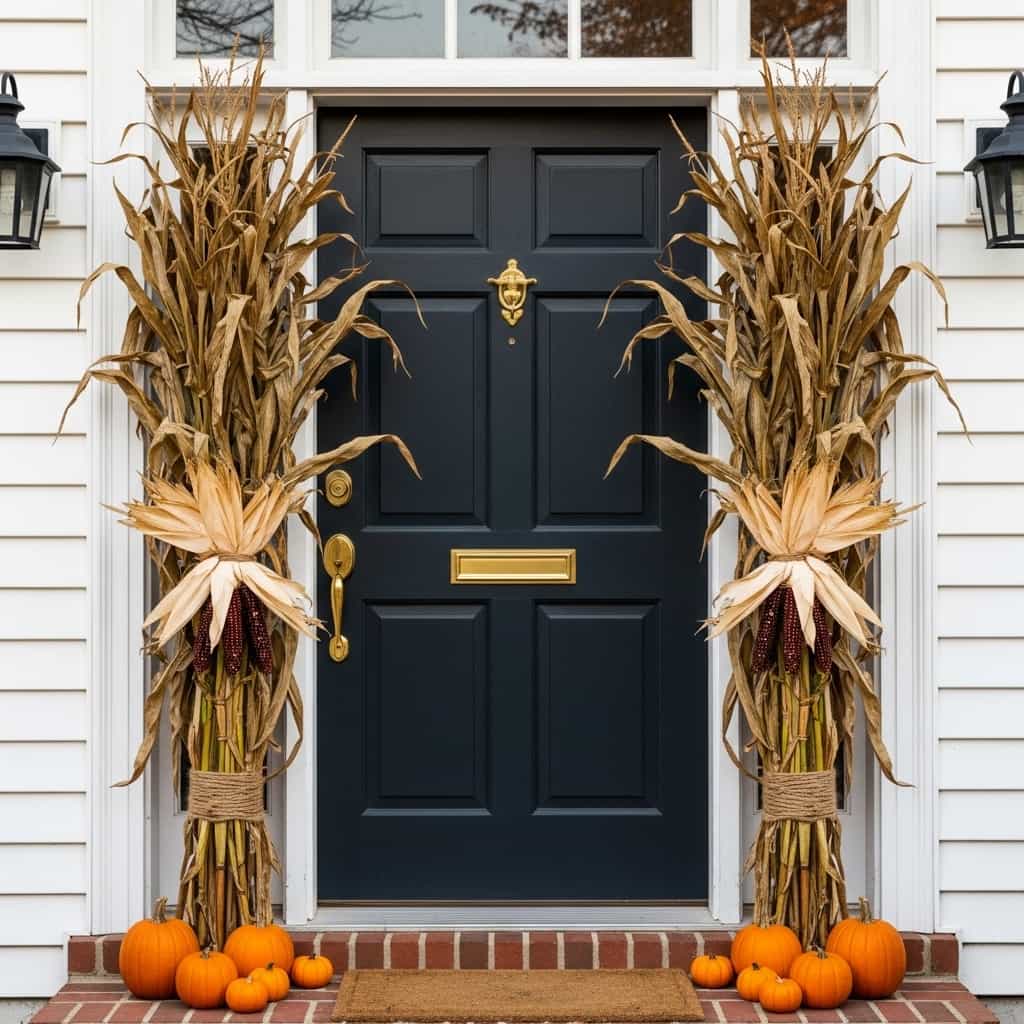
Flanking your front door with 2 tall dried corn stalk bundles creates an instantly recognizable harvest season display that transforms any home exterior into a warm, abundantly decorated autumn welcome. The natural golden-tan color of dried corn husks against a white or brick exterior creates a rich, earthy contrast that looks genuinely rustic and seasonal without any sophisticated design skills. Furthermore, tying each bundle with thick jute twine and placing 3 mini orange pumpkins at the base creates a complete, grounded display that connects the vertical corn stalks to the horizontal porch floor beautifully. Additionally, dried corn stalk bundles cost between $8 and $15 each at most garden centers and farm supply stores throughout the entire fall season.
- Corn stalk bundles frame the door symmetrically
- Jute twine tie adds rustic natural detail
- Mini pumpkin base grounds the tall bundle
- Bundles cost only $8–$15 each
- Works on brick, wood, and vinyl exteriors
Sourcing the best quality dried corn stalk bundles for your fall front door display requires shopping at farm stands and garden centers rather than large box retailers whenever possible. Farm-sourced corn stalk bundles feature naturally fuller husks, more authentic coloring, and better structural stability than pre-packaged versions sold at national chain stores. Moreover, checking that each bundle stands completely upright without leaning before purchasing ensures your finished display maintains a symmetrical, balanced appearance throughout the entire season. Additionally, securing each corn stalk bundle to a small discreet stake driven into a flanking planter box — rather than leaning it freely against the door frame — prevents wind from knocking bundles over during autumn storms. I’ve used this staking technique for 3 consecutive fall seasons and neither bundle has ever fallen during even the strongest wind events.
Mum Flower Planter Clusters
Overflowing chrysanthemum planters clustered beside your front door steps create the most lush, colorful, and botanically rich fall outdoor display achievable with a single afternoon of work. The dense, rounded flower heads of full-bloom mums in deep burgundy, golden yellow, and burnt orange deliver a saturated autumn color explosion that reads boldly from the street and photographs brilliantly in natural afternoon light. Furthermore, clustering 3 large terra cotta planters at slightly different heights — using a brick or wood riser under 1 planter — creates visual variety that prevents the grouping from looking flat and uniform. Additionally, chrysanthemums cost between $6 and $14 per plant at most garden centers throughout the entire fall season. This complete 3-planter display costs under $45.
- Cluster 3 mum planters at different heights
- Mix burgundy, yellow, and burnt orange mums
- Terra cotta pots add warm earthy texture
- Full 3-planter display costs under $45
- Mums bloom continuously for 4–6 weeks outdoors
Keeping your outdoor mum planters blooming vigorously throughout the entire fall season requires 3 consistent care practices that most homeowners overlook after the initial planting. Water each chrysanthemum planter deeply every 2 to 3 days rather than giving shallow daily waterings that only wet the surface soil. Moreover, deadheading spent flower heads — pinching off brown and wilted blooms at the stem base — encourages the plant to redirect energy toward producing fresh new flower clusters. Additionally, applying a single dose of slow-release balanced fertilizer at planting time provides the steady nutrient supply that keeps mum plants producing dense, vivid blooms from September through November. That’s why well-maintained outdoor mum planters consistently outlast untreated ones by 3 to 4 additional weeks of full, colorful bloom display.
Lantern And Gourd Grouping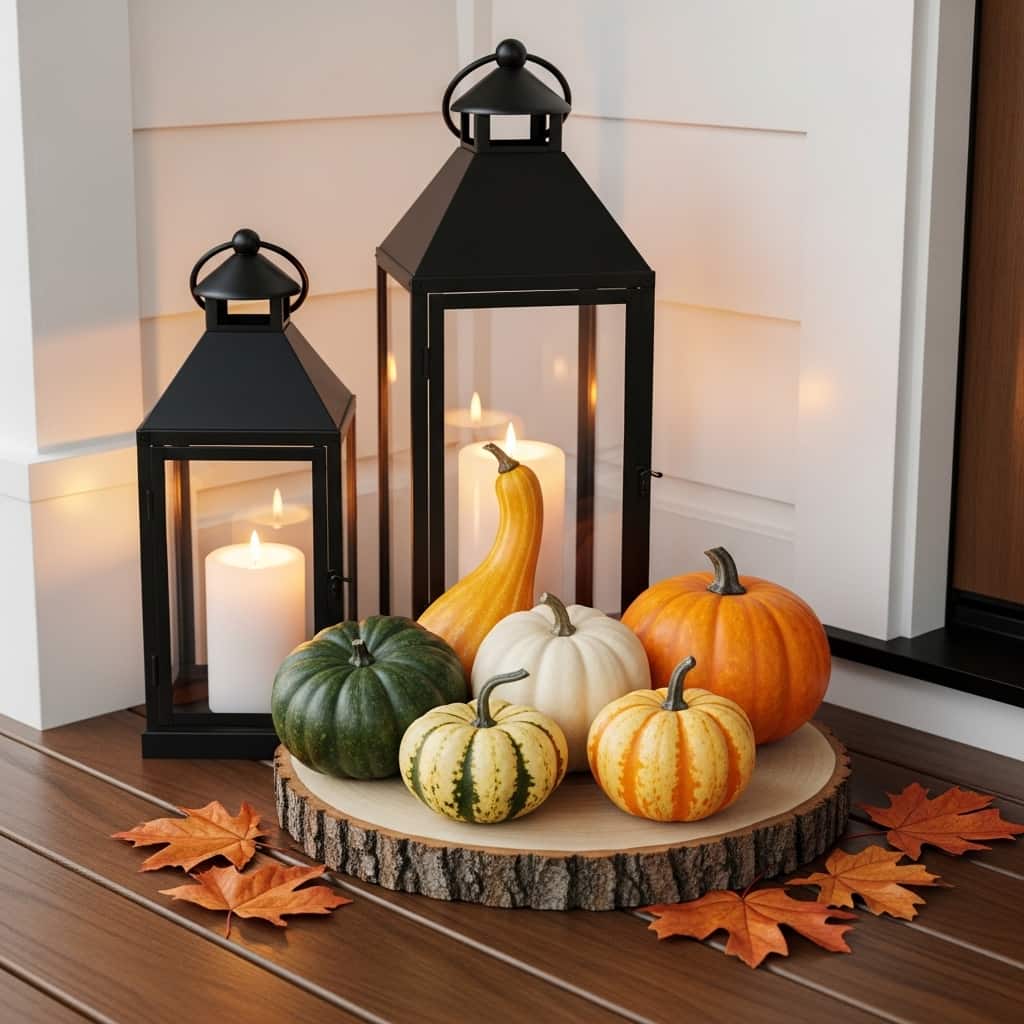
A grouped display of black metal lanterns and mixed gourds creates one of the most visually layered and sophisticated autumn porch corner vignettes achievable at any budget level. The contrast between the structured, geometric lines of black metal lanterns and the organic, irregular shapes of mixed gourds creates a rich visual tension that makes the display feel deliberately artistic and curated. Furthermore, placing both lanterns and gourds on a natural wood slice base unifies all display elements into a single cohesive composition rather than a randomly assembled collection. Additionally, the warm candlelight glow from pillar candles inside the lanterns after dark transforms this autumn porch display into a genuinely magical evening focal point. This complete grouping costs under $40.
- Black lanterns contrast beautifully with organic gourds
- Natural wood slice base unifies all elements
- Mix 5 gourds in 4 different colors
- Candlelight creates magical evening ambiance
- Full grouping display costs under $40
Building a visually balanced lantern and gourd grouping requires understanding the triangle composition principle before placing any elements on your porch corner surface. Position your tallest lantern at the back left, your second lantern at the front right at a slightly lower height, and distribute the 5 gourds between and around both lantern bases to fill the triangular space naturally. Moreover, placing the largest gourd closest to the tallest lantern creates a visual anchor that grounds the tallest display element and prevents it from looking top-heavy or isolated. Additionally, scattering 6 to 8 dried maple leaves loosely around the outer edges of the wood slice base extends the organic, natural quality of the display beyond its immediate footprint. I’ve used this exact triangle composition for lantern and gourd groupings for 4 consecutive fall seasons and it consistently creates the most admired porch corner display on my street.
Outdoor Hay Bale Seating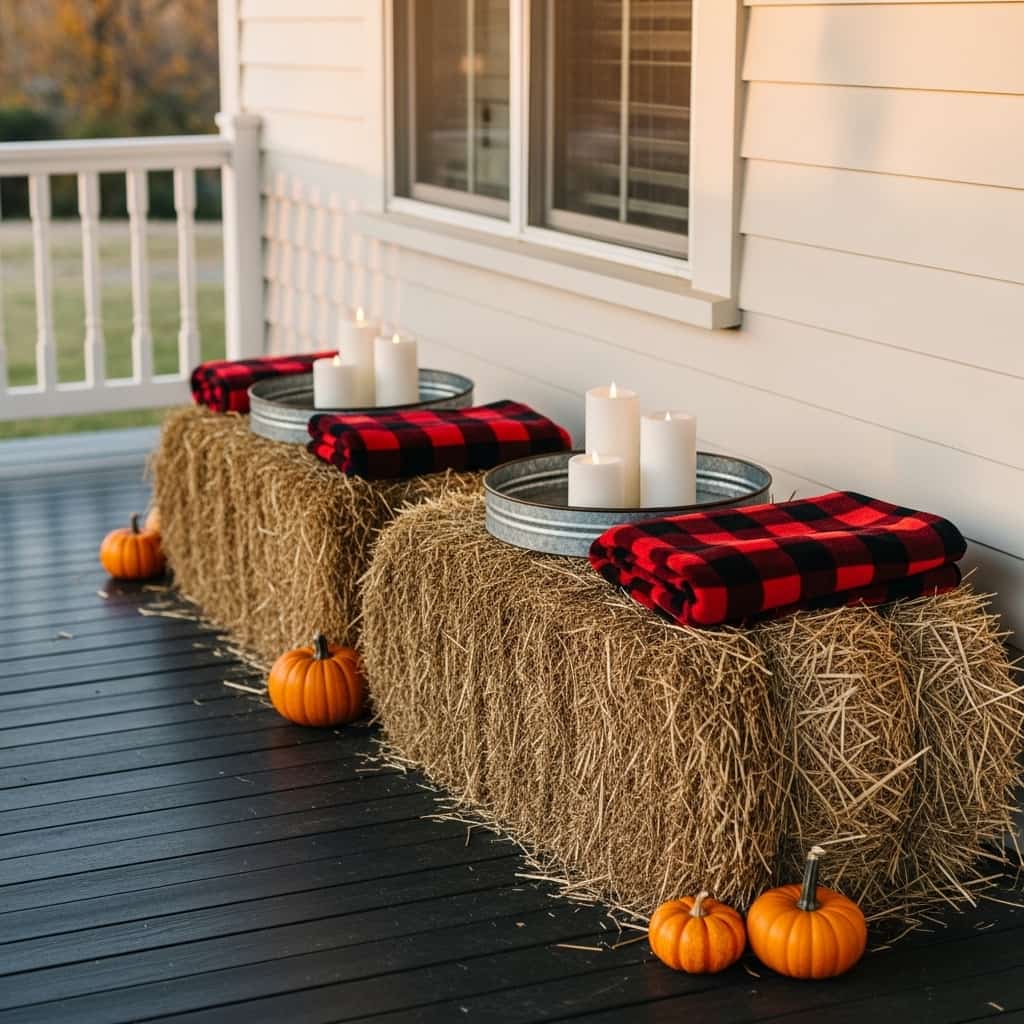
Hay bales styled as porch seating create the most authentically rustic and seasonally festive outdoor autumn display that any front porch can feature. 2 small square hay bales placed side by side with buffalo plaid flannel blankets folded on top instantly communicate harvest season warmth, homespun comfort, and outdoor living in a single unmistakable visual statement. Furthermore, placing a galvanized metal tray between the 2 bales and styling it with 3 varying-height white pillar candles creates a complete outdoor living vignette that makes your porch feel like a genuine autumn gathering space. Additionally, this fall outdoor entertaining setup costs under $40 for both hay bales, blankets, and the candle tray display combined. The seasonal charm delivered is extraordinary.
- Plaid blanket on hay bale adds cozy warmth
- Galvanized tray between bales creates styled vignette
- 3 pillar candles add warm evening glow
- Mini pumpkins at bases anchor the display
- Full seating setup costs under $40 total
Protecting your outdoor hay bale seating display from autumn rain and ground moisture extends its seasonal life significantly beyond the standard untreated duration. Place each hay bale on a small waterproof rubber mat or folded tarp piece to prevent ground moisture from wicking upward through the bale bottom and causing premature deterioration and mold. Moreover, covering the top surface of each hay bale with its flannel blanket at all times — except when guests actively sit on them — creates an additional moisture barrier that keeps the bale surface dry and intact. Additionally, sourcing tightly bound decorative hay bales from local farm supply stores specifically labeled for decorative outdoor use provides bales that hold their shape and structural integrity far better than loosely packed feed bales throughout the full autumn season.
Fall Wreath Front Door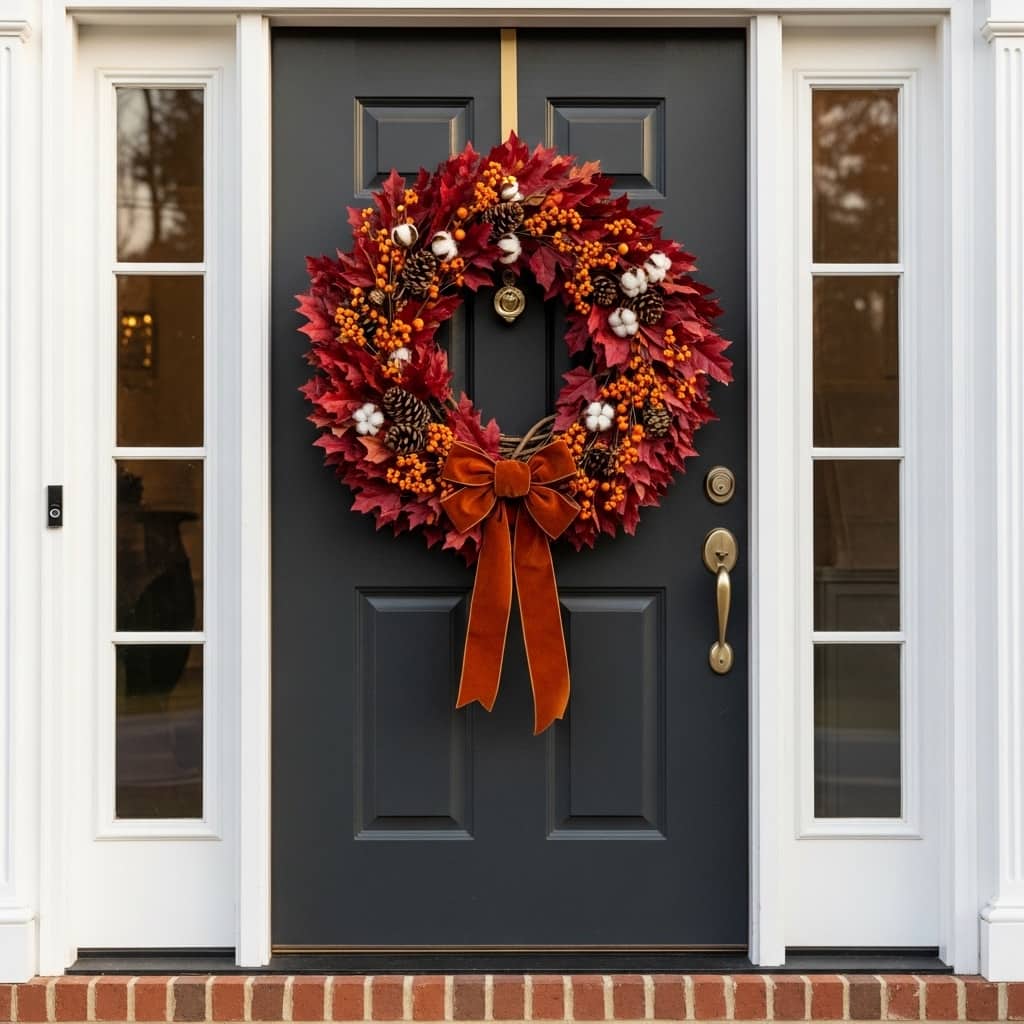
A richly layered autumn wreath on your front door creates the single most impactful and seasonally immediate fall outdoor upgrade achievable with a single purchase or afternoon of DIY crafting. The combination of deep red dried maple leaves, orange berry clusters, pinecones, and a rust velvet ribbon bow on a natural grapevine base delivers a multi-textural, jewel-toned display that looks genuinely handcrafted and deeply personal. Furthermore, an over-the-door wreath hanger eliminates any need for nails, screws, or adhesive — making this fall front door decor idea completely renter-friendly and damage-free. Additionally, a quality autumn wreath of this style costs between $25 and $60 depending on whether you purchase or DIY the grapevine base and botanicals.
- Grapevine base creates rich natural wreath foundation
- Rust velvet bow adds luxurious fall color
- Over-door hanger leaves zero wall damage
- Deep red maple leaves deliver bold autumn drama
- DIY or purchase for $25–$60 total
Creating a DIY autumn front door wreath achieves a more personal, customized result than any store-purchased version because you control every botanical element and color combination individually. Start by purchasing a plain 18-inch grapevine wreath base from any craft store for approximately $6 to $10. Moreover, attaching your largest dried maple leaves around the outer edge of the wreath first using a hot glue gun creates a rich botanical border that frames and grounds the entire composition before you add any accent materials. Additionally, building a focal cluster of pinecones, berry sprigs, and cotton stems in the lower third of the wreath — rather than distributing them evenly — creates a visually dominant accent point that draws the eye naturally toward the velvet ribbon bow at the bottom center. That’s why a focal cluster wreath design consistently looks more intentional and professionally crafted than an evenly distributed arrangement.
Outdoor String Light Canopy
A crisscross Edison bulb string light canopy stretched above an outdoor dining area creates one of the most breathtakingly beautiful and atmospherically rich fall outdoor entertaining spaces imaginable. The warm amber glow of vintage-style Edison filament bulbs suspended at 8-foot height above a styled dining table transforms any backyard patio into a genuinely magical autumn evening destination that rivals any restaurant setting. Furthermore, the visual effect of string lights against a backdrop of orange and red autumn trees creates a layered, cinematic outdoor scene that looks spectacular both in person and in photographs. Additionally, a standard 50-foot outdoor string light set costs between $18 and $35 and provides enough coverage for a full dining canopy installation. This fall backyard display assembles in under 2 hours.
- Edison bulb canopy creates magical evening atmosphere
- Crisscross pattern fills backyard ceiling beautifully
- Warm amber bulbs enhance autumn tree backdrop
- 50-foot string light set costs $18–$35
- Full canopy installation takes under 2 hours
Installing an outdoor string light canopy safely and securely requires choosing the correct mounting hardware for your specific backyard fence or wall surface. Use heavy-duty outdoor-rated screw hooks rated for at least 10 pounds per hook when mounting into wood fence posts or deck railings. Moreover, running your string light power cord along the fence line and securing it with small cable clips every 18 inches prevents the cord from hanging loosely and creating a tripping or tangling hazard across your outdoor entertaining space. Additionally, connecting your outdoor string light canopy to an outdoor-rated outlet timer programmed for automatic dusk-to-dawn operation eliminates the daily task of manually switching the lights on and off throughout the entire autumn entertaining season. That’s why timer-controlled outdoor string light installations consistently deliver the most effortless and reliable backyard ambiance throughout fall.
Porch Railing Garland Drape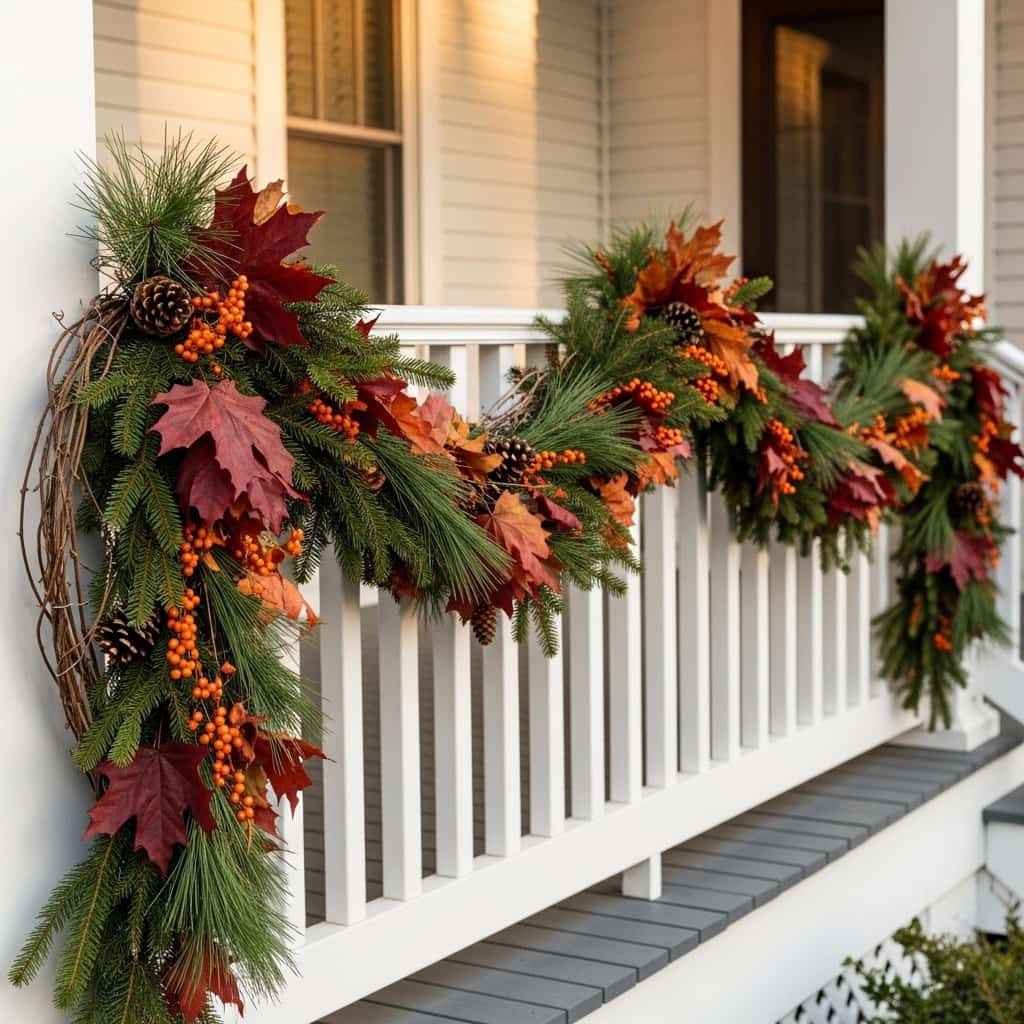
A fresh pine and autumn leaf garland draped in graceful swags along your porch railing creates a lush, botanical fall outdoor display that transforms the entire front of your home from the street. The combination of deep green pine, deep red maple leaves, orange berries, and small pinecones creates a rich, multi-tonal autumn palette that looks genuinely abundant and professionally installed. Furthermore, swag-draping the garland — allowing it to dip between each railing post rather than running it straight and flat — creates an elegant, architectural rhythm that makes the railing display look far more deliberate and sophisticated. Additionally, a 9-foot fresh pine garland costs between $20 and $35 at most garden centers throughout the fall season. This porch railing display takes under 30 minutes to install.
- Swag-drape garland between each railing post
- Fresh pine and maple leaves create rich mix
- Orange berry clusters add warm autumn color
- 9-foot garland costs only $20–$35 total
- Full railing installation takes under 30 minutes
Securing a porch railing garland properly prevents wind from displacing and tangling the display throughout the full autumn season. Use thin green floral wire wrapped around the garland and railing post at every swag peak point — approximately every 24 to 30 inches — to anchor the garland firmly without any visible fasteners from the front viewing angle. Moreover, starting your garland installation at one end post and working toward the opposite end post while maintaining equal swag depth between each post creates perfectly consistent spacing across the full railing length. Additionally, refreshing your fresh pine garland by lightly misting it with water every 5 to 7 days significantly extends its vibrant green color and prevents premature browning during the drier autumn weather conditions. I’ve maintained a fresh pine porch railing garland for 5 full weeks using this misting technique before needing any replacement.
Outdoor Chalkboard Sign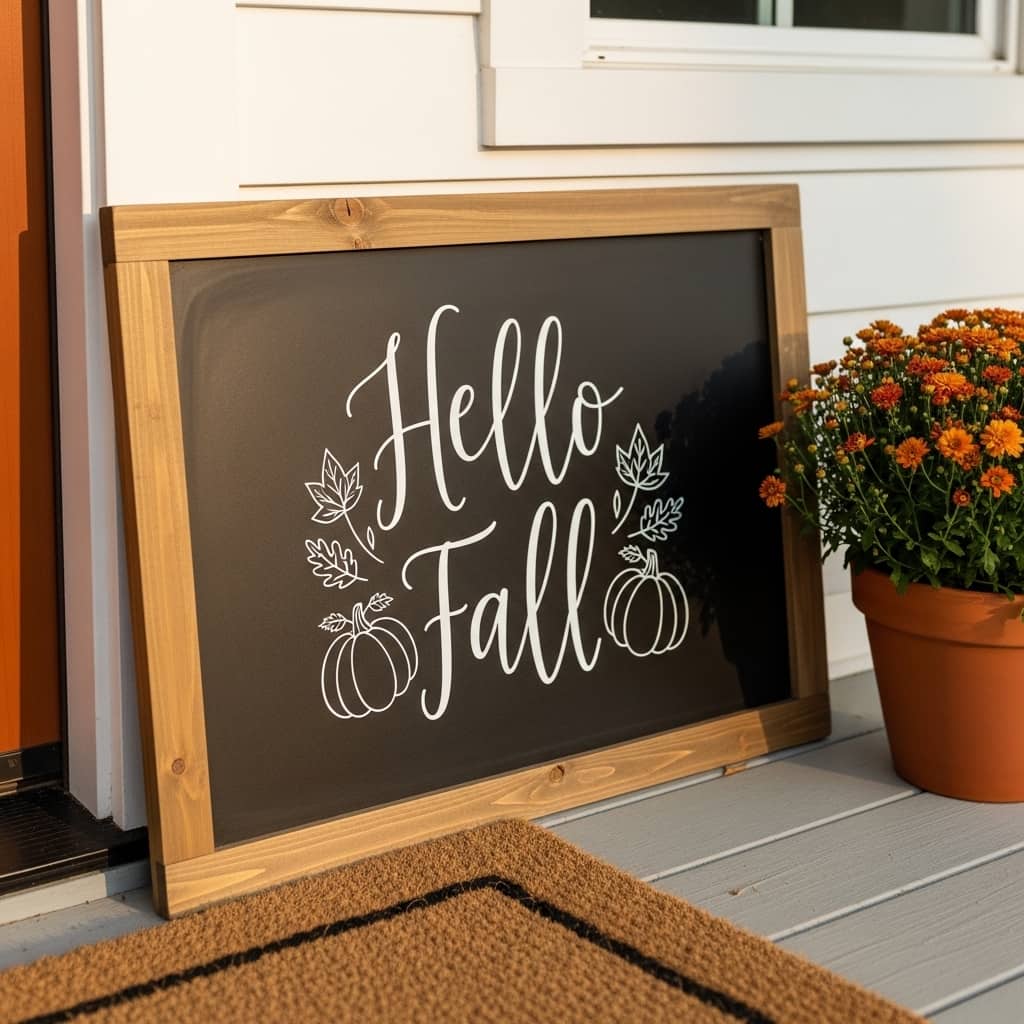
A hand-lettered outdoor chalkboard sign propped beside your front door creates a warm, personal, and endlessly customizable fall outdoor welcome detail that costs under $20 and updates instantly for every autumn occasion. The rustic wood frame and white chalk lettering against a dark chalkboard surface create a beautiful visual contrast that suits farmhouse, cottage, and transitional home exteriors equally well. Furthermore, chalkboard signs update effortlessly for Halloween, Thanksgiving, and every autumn weekend gathering simply by wiping clean and re-lettering with a new seasonal message. Additionally, using a chalk paint marker rather than standard chalk creates sharper, more consistent letterforms that last 3 to 4 weeks outdoors without smearing in light rain or humidity. This fall front porch accent costs under $20.
- Chalkboard updates for every autumn occasion
- Rustic wood frame suits farmhouse exteriors perfectly
- Chalk paint markers create crisp lasting letterforms
- Terracotta mum pot pairs beautifully beside sign
- Full display costs under $20 total
Designing a visually appealing chalkboard sign for your fall outdoor display requires understanding 2 fundamental hand-lettering principles before picking up your chalk marker. First, sketch your desired text layout lightly with a regular piece of chalk before committing to permanent chalk marker lines — this allows you to adjust letter sizing and spacing without any messy erasures on the final surface. Moreover, mixing 2 lettering styles — a bold block print for the main word and a flowing script for smaller accent words — creates visual hierarchy that makes your sign message readable from a greater distance outdoors. Additionally, adding small illustrated accents like leaf outlines, pumpkin silhouettes, or simple branch drawings in the corners of your chalkboard sign creates a finished, editorial quality that makes the entire display look professionally designed rather than casually written.
Galvanized Tub Planter Display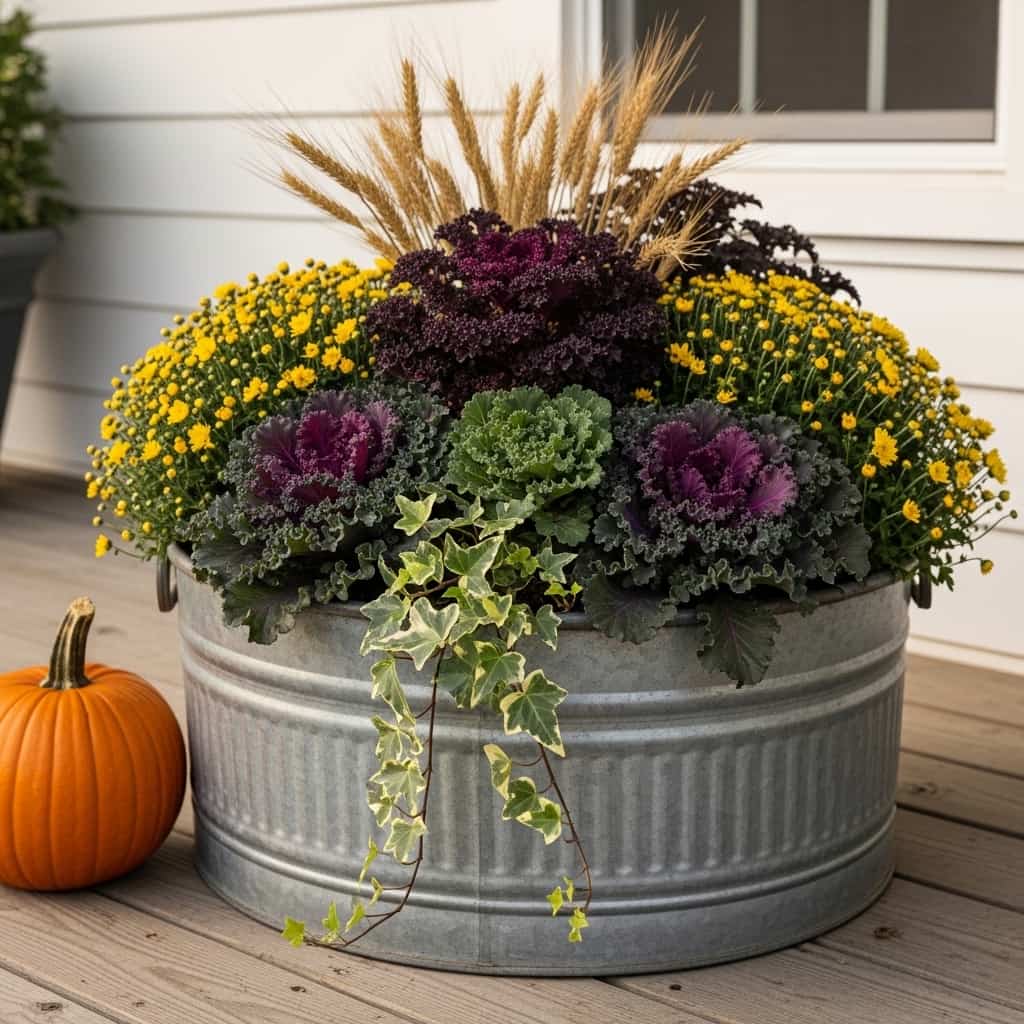
A large galvanized metal tub overflowing with a mixed autumn planting of ornamental kale, chrysanthemums, trailing ivy, and dried wheat stems creates one of the most abundantly beautiful and texturally rich fall outdoor planter displays achievable on any porch. The industrial, weathered quality of aged galvanized metal creates a stunning visual contrast against the lush, organic abundance of mixed autumn botanicals spilling over the rim from every angle. Furthermore, combining plants at 3 different growth habits — upright kale, mounding mums, and trailing ivy — creates a full, layered planting that fills both vertical and horizontal space around the tub generously. Additionally, galvanized metal tubs cost between $15 and $30 at most farm supply stores. This complete planter display costs under $50.
- Mix upright, mounding, and trailing plants together
- Galvanized metal contrasts beautifully with lush botanicals
- Ornamental kale adds bold textural autumn drama
- Tuck a small pumpkin beside the tub base
- Full planter display costs under $50 total
Creating a visually full and professionally styled galvanized tub planter arrangement requires understanding the thriller, filler, and spiller planting formula that professional container gardeners use on every seasonal display. Your thriller plant — the tallest, most dramatic element — anchors the center or back of the tub. Moreover, your filler plants surround the thriller with dense, mounding growth that fills the middle layer of the tub display without competing for visual dominance. Additionally, your spiller plants cascade over the front and side rim of the galvanized tub, softening the hard metal edge and creating a generous, abundant quality that makes the entire planting look lush and intentional from every viewing angle. That’s why the thriller-filler-spiller formula consistently produces the most visually impressive and Instagram-worthy autumn container planting results.
Scarecrow Yard Accent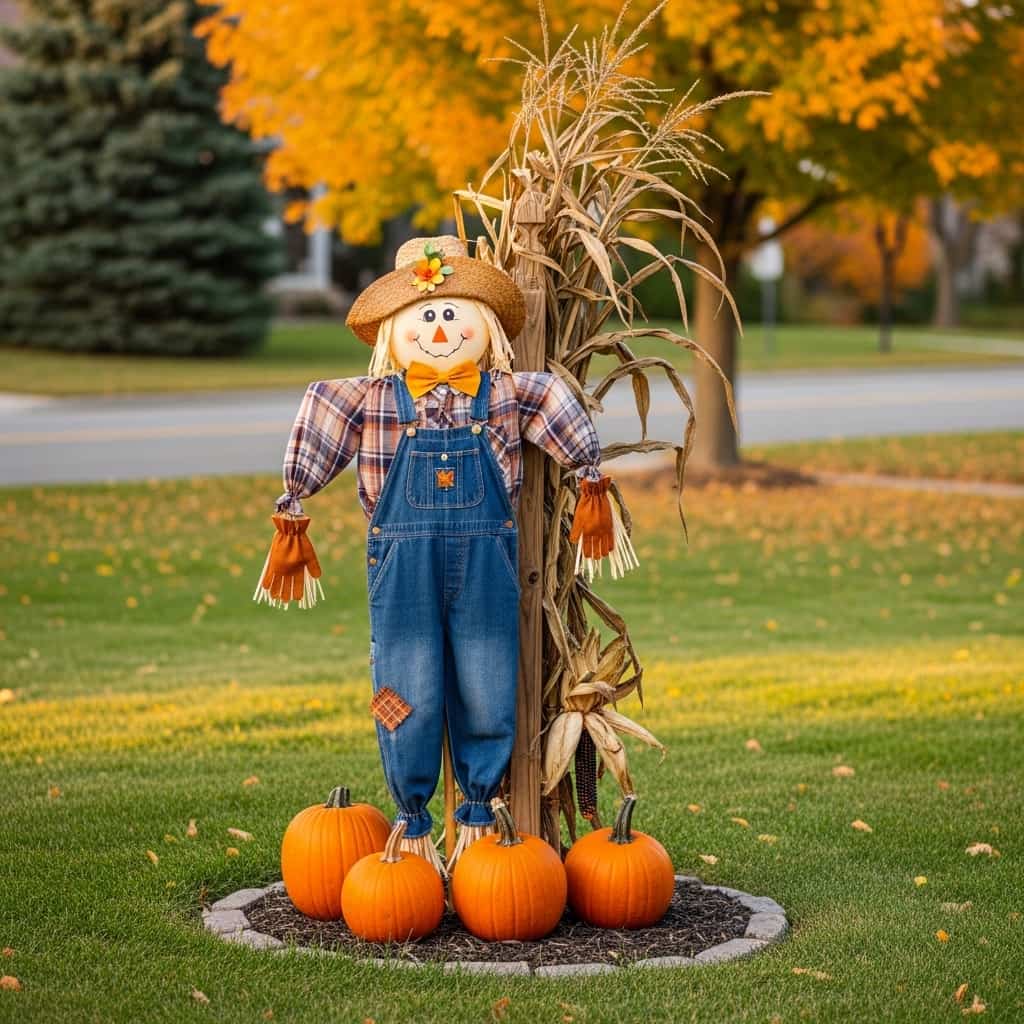
A handmade decorative scarecrow standing in your front garden bed creates the most charming, personality-filled, and nostalgically festive fall yard accent that any home exterior can feature. The combination of denim overalls, plaid flannel shirt, straw hat, and straw-stuffed body creates an instantly recognizable harvest season figure that delights children and adults equally from the street. Furthermore, surrounding the scarecrow base with 3 small orange pumpkins and dried corn stalks behind it builds a complete harvest scene that makes the entire front yard feel like a seasonal celebration. Additionally, a DIY decorative scarecrow costs under $25 using thrifted clothing, craft store straw, and a simple wooden stake. This fall yard decor idea requires under 45 minutes to assemble completely.
- Plaid flannel and straw hat create classic charm
- Surround base with 3 small orange pumpkins
- Dried corn stalks behind add harvest backdrop
- DIY materials cost under $25 total
- Assembly takes under 45 minutes
Building a weather-resistant outdoor scarecrow that maintains its appearance throughout the full autumn season requires choosing clothing and filling materials that withstand rain, wind, and temperature changes effectively. Use polyester fiberfill or synthetic straw filling rather than real straw whenever possible — synthetic filling resists moisture absorption and mold far better than natural straw throughout extended outdoor exposure. Moreover, securing a plastic grocery bag stuffed with fiberfill as the head base rather than a burlap sack prevents the face from collapsing or losing its round shape during wet autumn weather. Additionally, treating any fabric elements with a clear waterproof fabric spray before outdoor placement significantly extends the color vibrancy and structural integrity of your scarecrow’s clothing across the entire fall season. I’ve used this waterproof spray technique on my own outdoor scarecrow for 2 consecutive autumn seasons with excellent results.
Backyard Firepit Seating Area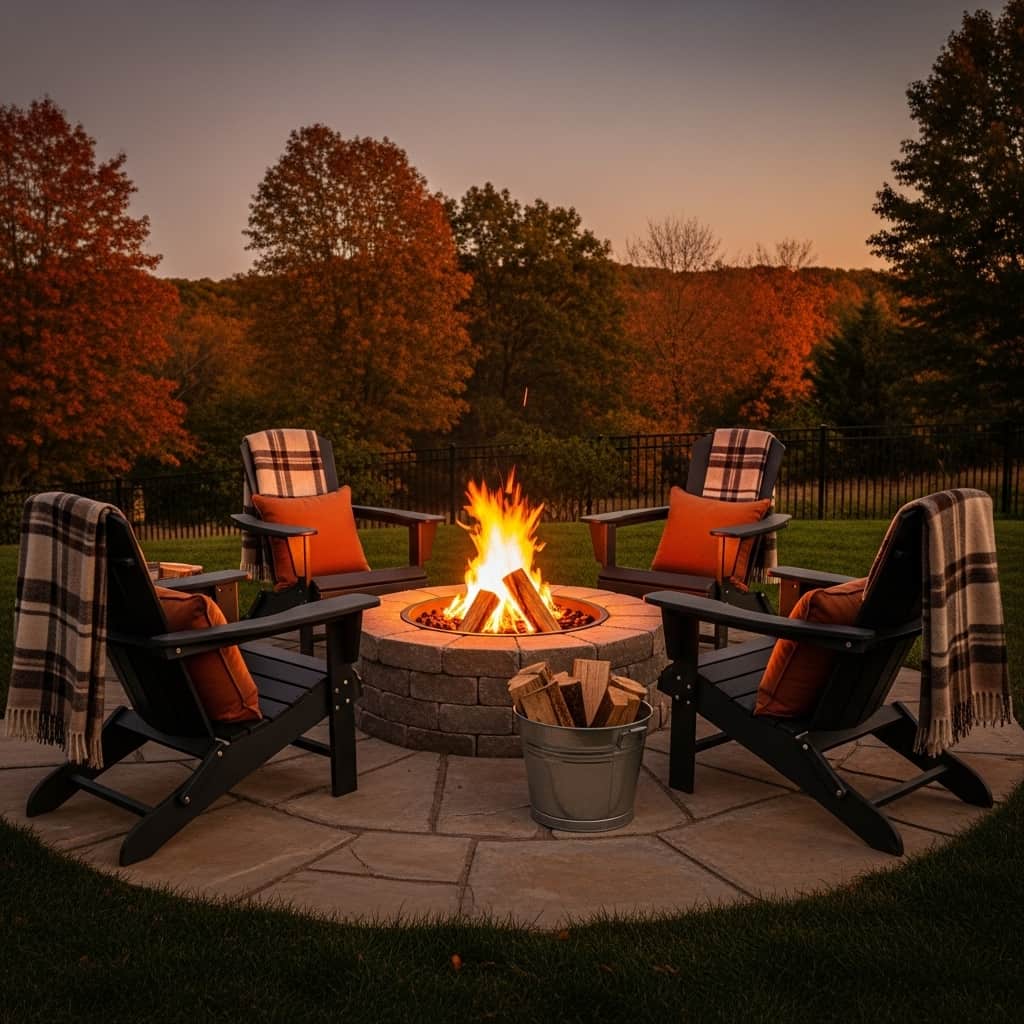
A styled outdoor firepit seating area transforms any backyard into the most compelling and socially magnetic autumn gathering destination on the entire street. Arranging 4 dark Adirondack chairs in a semicircle around a glowing stone firepit and dressing each chair with a plaid blanket and rust throw pillow creates a complete outdoor living room that feels genuinely inviting from the moment guests step into the backyard. Furthermore, placing a galvanized metal bucket of stacked firewood logs beside the firepit creates both a functional and decorative element that communicates warmth, preparedness, and rustic autumn hospitality simultaneously. Additionally, this fall outdoor entertaining setup costs between $0 and $60 depending on whether you already own the chairs and blankets. The firepit itself creates the entire atmosphere.
- Semicircle chair arrangement maximizes firepit warmth
- Plaid blanket on each chair arm adds coziness
- Galvanized firewood bucket is functional and decorative
- Rust throw pillows tie autumn color palette together
- Setup costs $0–$60 using chairs you own
Maximizing the comfort and safety of your outdoor autumn firepit seating area requires 3 practical setup decisions before your first fall gathering. Position each Adirondack chair at least 3 feet from the firepit edge to prevent heat discomfort and accidental ember contact during active fire burning. Moreover, placing a flat stone or pavers surface beneath each chair prevents the chair legs from sinking into soft autumn lawn after rainfall and creating an uneven, uncomfortable seating surface. Additionally, keeping a metal spark screen over the firepit opening when the fire burns reduces flying ember risk significantly — especially important when plaid blankets and throw pillows surround the fire on all sides. That’s why outdoor living designers consistently recommend a full spark screen as the single most important safety accessory for any styled backyard firepit seating area.
Autumn Wreath Garden Gate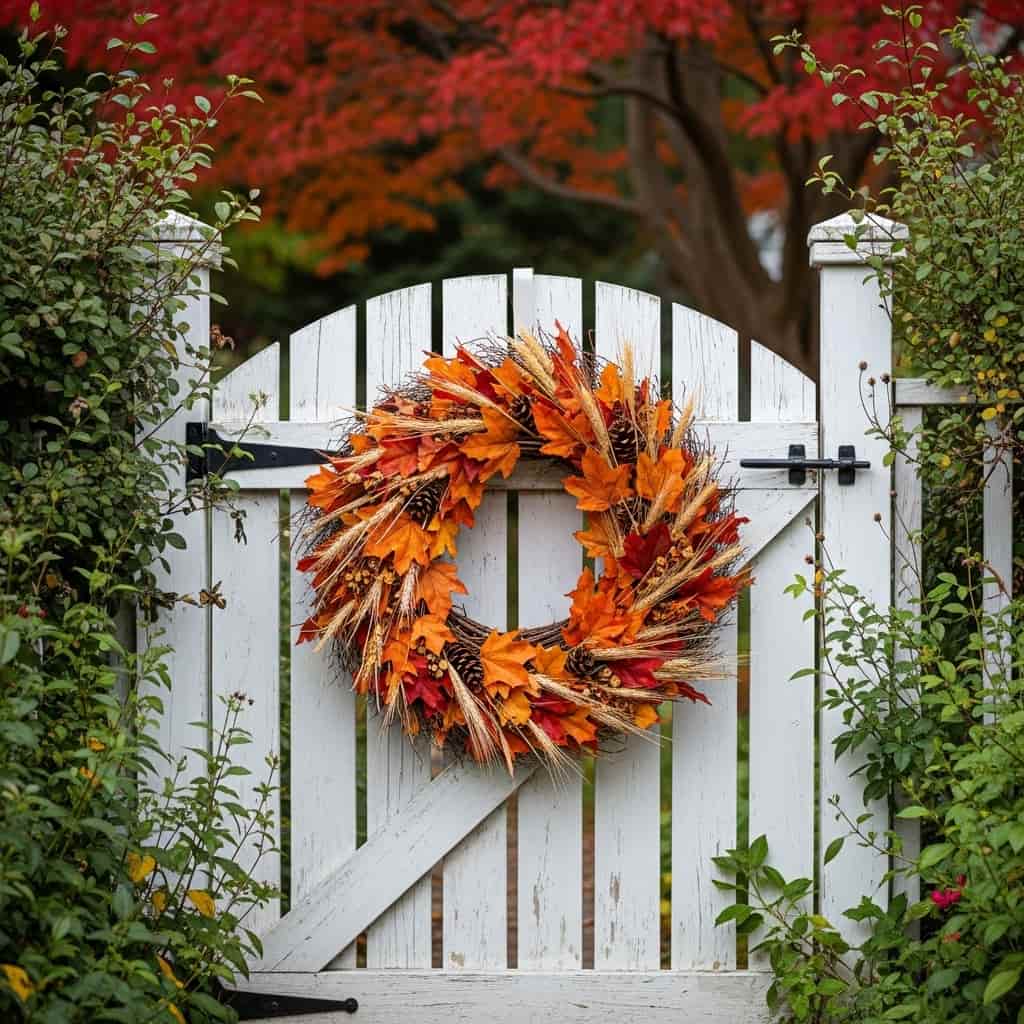
Hanging an autumn wreath on a garden gate rather than the front door creates an unexpected and enchanting fall outdoor accent that delights every visitor the moment they enter your property. A simple twig wreath dressed with dried orange and red maple leaves, wheat stems, and small pinecones creates a naturalistic, foraged-quality display that suits cottage, farmhouse, and traditional garden aesthetics beautifully. Furthermore, a garden gate wreath without a ribbon bow creates a more organic, understated display that feels genuinely discovered rather than heavily decorated — an aesthetic that resonates strongly with minimalist fall outdoor decorating trends in 2026. Additionally, a twig wreath of this style costs between $15 and $30 at most craft stores and garden centers throughout the fall season.
- Garden gate wreath creates unexpected charming detail
- Twig base looks natural and foraged in quality
- No ribbon creates minimalist organic aesthetic
- Dried maple leaves cost nothing to forage
- Wreath base costs only $15–$30 total
Choosing the right wreath attachment method for a garden gate ensures the display stays securely in place throughout autumn wind and rain without damaging the gate hardware or wood surface. A simple S-hook looped over the top gate rail and through the wreath back wire creates a tool-free, damage-free hanging solution that takes under 30 seconds to install and remove. Moreover, choosing an S-hook with a rubber coating prevents metal-on-metal scratching on painted or powder-coated gate surfaces throughout the entire season. Additionally, selecting a wreath diameter that fills approximately 50 to 60 percent of your gate width creates the most visually proportionate display — large enough to make a clear decorative statement without visually overwhelming the gate structure it hangs on. That’s why a correctly proportioned garden gate wreath consistently creates more visual impact than an oversized version that crowds the gate completely.
Potted Ornamental Cabbage Row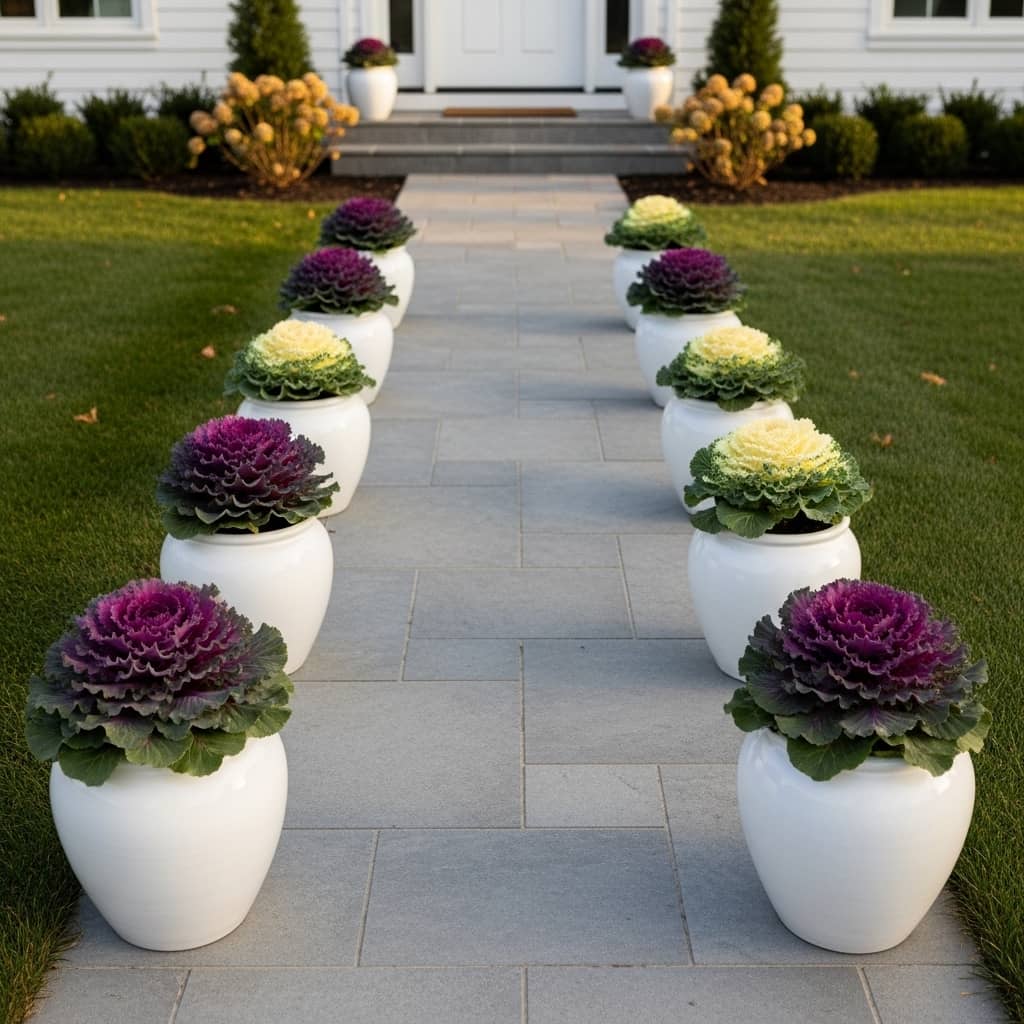
A symmetrical row of ornamental cabbage pots lining your front pathway creates one of the most graphically bold and architecturally striking fall outdoor planting displays achievable on any home exterior. Alternating deep purple and pale cream ornamental cabbage varieties in matching white ceramic pots creates a clean, repeating color pattern that guides visitors from the street directly toward your front door with deliberate visual intention. Furthermore, ornamental cabbage thrives in cool autumn temperatures and actually develops its most vibrant, deeply saturated purple and cream tones as temperatures drop below 50 degrees Fahrenheit each evening. Additionally, ornamental cabbage plants cost between $3 and $8 each at most garden centers throughout fall. This complete 5-pot pathway display costs under $60 total.
- Alternate purple and cream cabbage for bold pattern
- Matching white pots create clean graphic rhythm
- Cool autumn temps intensify ornamental cabbage color
- Each plant costs only $3–$8 at garden centers
- Full 5-pot pathway costs under $60 total
Maintaining ornamental cabbage plants in outdoor pots throughout the full autumn season requires understanding their specific watering and temperature preferences. Water each ornamental cabbage pot deeply every 3 to 4 days rather than daily — ornamental brassicas prefer slightly drier soil conditions between waterings and develop root rot quickly in consistently soggy containers. Moreover, ornamental cabbage plants tolerate frost temperatures as low as 20 degrees Fahrenheit without damage, making them one of the longest-lasting and most cold-hardy autumn container plants available for outdoor fall decorating in most USA climate zones. Additionally, removing any yellow outer leaves promptly as they develop keeps the plant looking fresh, tidy, and ornamental throughout its entire display period. That’s why ornamental cabbage consistently ranks as the most reliable and lowest-maintenance fall container planting option for front pathway displays.
Wheelbarrow Pumpkin Display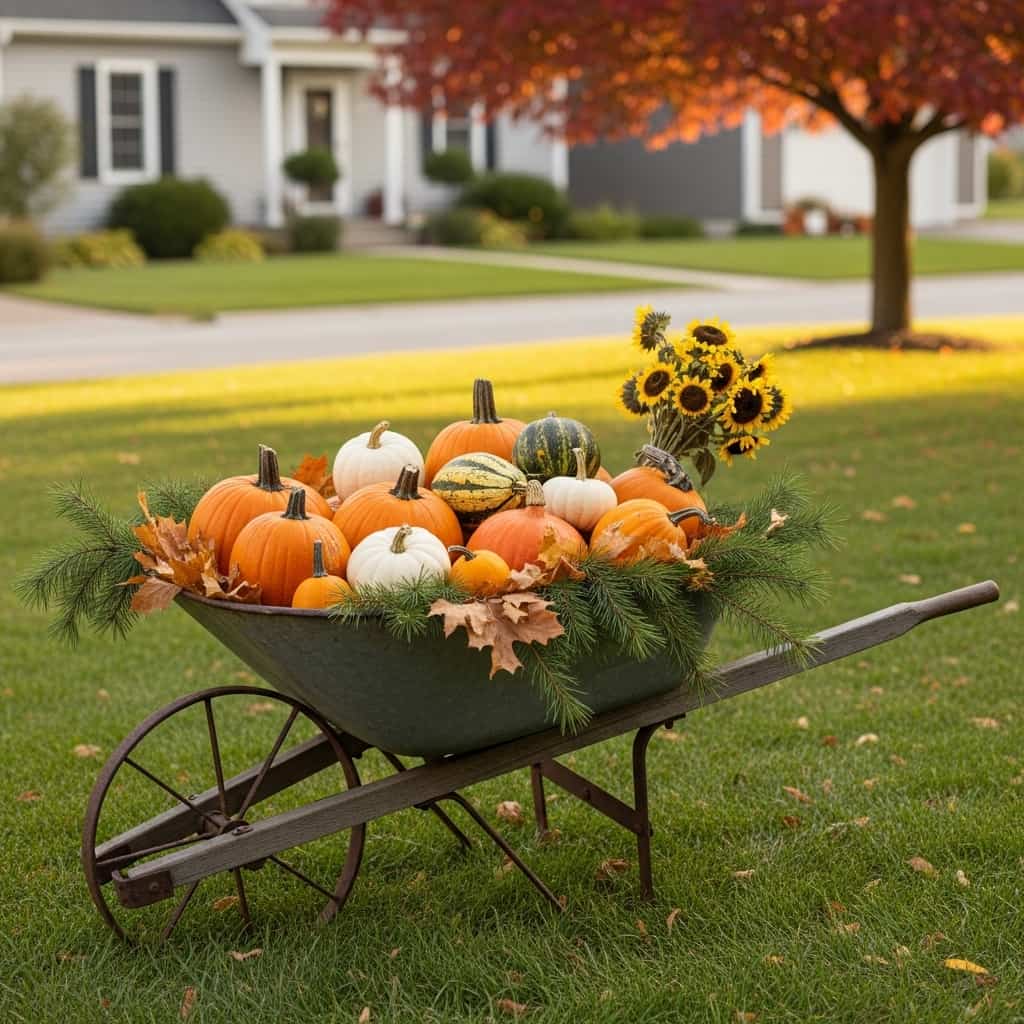
A vintage wheelbarrow overflowing with mixed pumpkins, gourds, pine boughs, and dried sunflowers creates the most abundantly charming and nostalgically rustic fall yard decor accent that any farmhouse or cottage home exterior can display. The organic, overflowing quality of a fully loaded wheelbarrow communicates harvest abundance, outdoor living, and autumn warmth in a single unmistakable visual statement that stops passersby every single time. Furthermore, mixing 8 pumpkins and gourds in orange, white, cream, and green within the same wheelbarrow creates a rich, multicolored harvest palette that looks genuinely gathered rather than store-packaged. Additionally, this autumn yard display costs between $30 and $55 total using grocery store pumpkins and a thrifted or existing wheelbarrow. The visual reward is extraordinary.
- Overflow 8 pumpkins and gourds generously
- Mix orange, white, cream, and green varieties
- Tuck pine boughs between pumpkins naturally
- Dried sunflowers prop against the wheelbarrow side
- Full display costs only $30–$55 total
Sourcing an authentic vintage wheelbarrow for your fall outdoor pumpkin display creates a far more visually compelling result than a brand-new wheelbarrow with a clean, factory finish. Aged metal with natural rust patina, weathered wood handles, and genuine wear marks communicate authentic farmhouse character that a new wheelbarrow simply cannot replicate. Moreover, checking local estate sales, farm auctions, Facebook Marketplace, and neighborhood yard sales between July and September typically yields vintage wheelbarrows priced between $15 and $40 before the fall decorating season drives prices higher. Additionally, if your existing wheelbarrow shows very little weathering, applying a thin wash of diluted gray chalk paint across the metal body and dry-brushing rust-colored craft paint over raised edges creates a convincingly aged patina finish in under 30 minutes.
Stacked Pumpkin Tower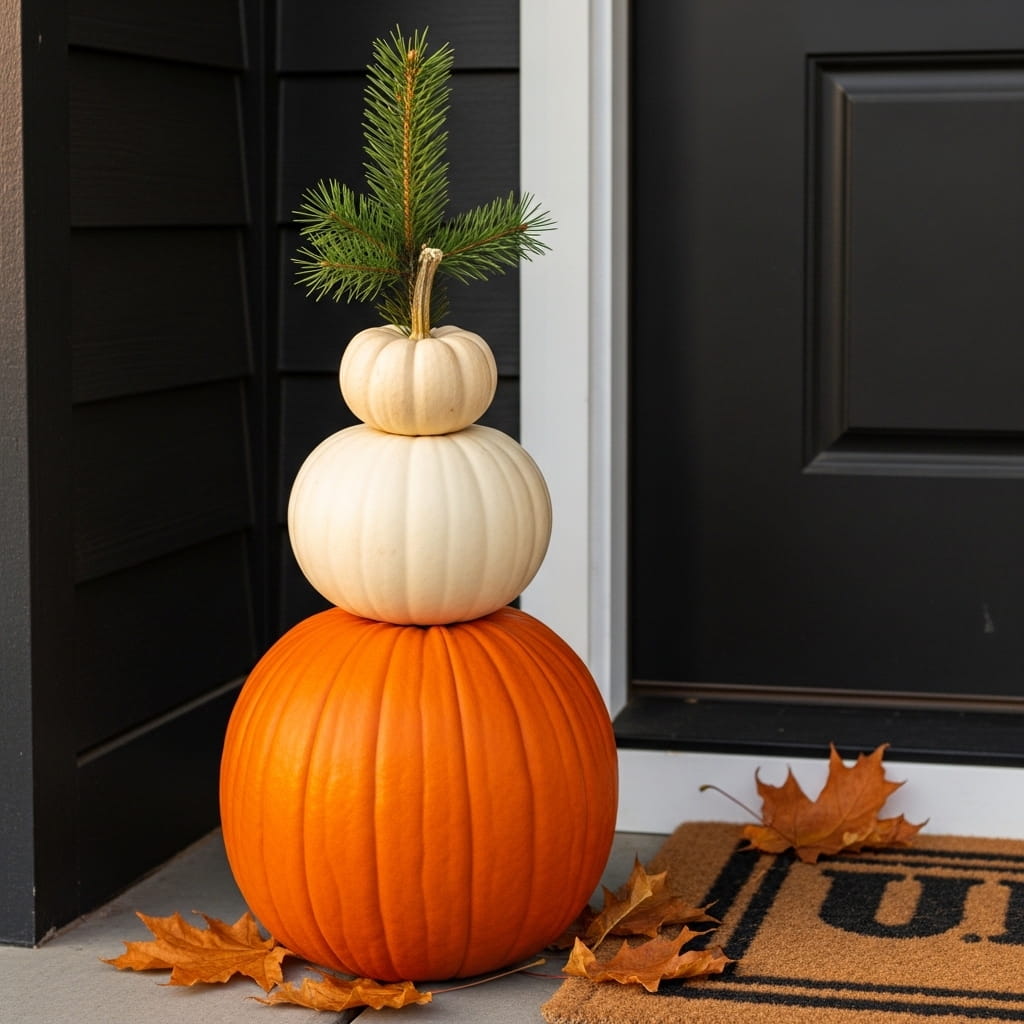
A stacked pumpkin tower beside your front door creates the most dramatically eye-catching and architecturally bold fall porch display achievable with just 3 pumpkins and 5 minutes of setup time. Balancing a large orange pumpkin on the bottom, a medium white pumpkin in the middle, and a small cream pumpkin on top creates a clean vertical sculpture that commands immediate attention from the street and photographs brilliantly from every angle. Furthermore, the contrasting orange, white, and cream color sequence creates a sophisticated autumn palette that feels far more intentional than a standard flat pumpkin grouping. Additionally, securing each stacked pumpkin with a small wooden skewer driven vertically through the center prevents the tower from toppling in autumn wind. This bold display costs under $20 total.
- Stack large orange, medium white, small cream pumpkins
- Wooden skewer through center prevents toppling
- Pine sprig in top stem adds botanical finishing touch
- Contrasting 3-tone palette feels sophisticated
- Entire tower display costs under $20 total
Selecting the right pumpkin shapes for a stable and visually elegant stacked tower requires checking flatness of both the top and bottom surfaces of each pumpkin before purchasing. Pumpkins with naturally flat bottoms stack far more securely than round-bottomed varieties that shift and rock under the weight of the pumpkins above them. Moreover, choosing pumpkins where each successive tier is approximately 40 to 50 percent smaller in diameter than the one below creates the most proportionate and visually stable tower silhouette from every viewing angle. Additionally, visiting a farm stand or pumpkin patch rather than a grocery store gives you access to a wider variety of pumpkin shapes, sizes, and surface textures that allow you to select the ideal combination for your specific stacked tower dimensions. I’ve built this exact stacked pumpkin tower on my own porch 3 years in a row and it has never failed to generate genuine admiration from every neighbor who passes by.
Sunflower Barrel Planting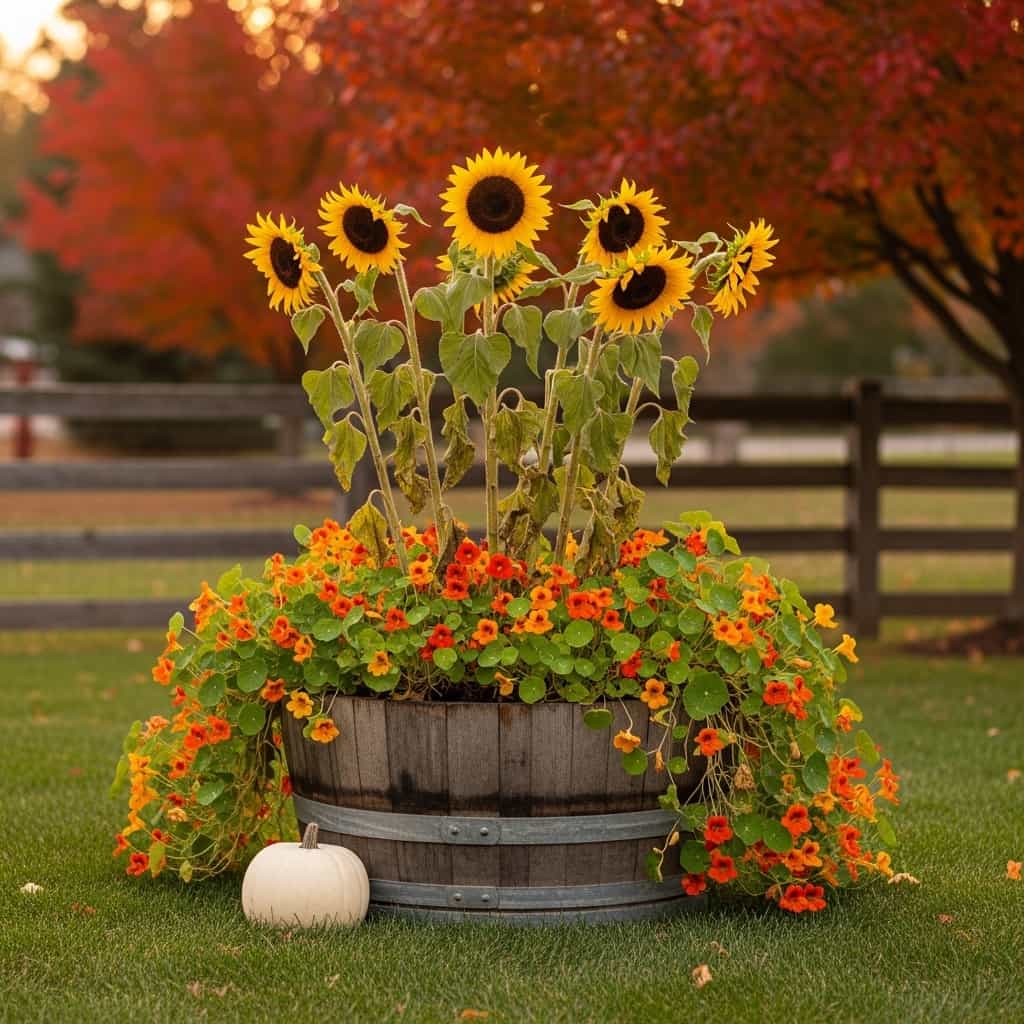
A half wine barrel planter overflowing with tall golden sunflowers and trailing orange nasturtiums creates one of the most warmly abundant and visually generous fall outdoor planting displays possible in any front yard. The dramatic height of sunflower stems — typically 36 to 48 inches above the barrel rim — creates a bold vertical statement that draws the eye from the street and fills a large visual field with rich autumn gold and burnt orange tones. Furthermore, pairing tall upright sunflowers with low trailing nasturtiums in the same barrel creates the dramatic height contrast that makes container plantings look professionally designed. Additionally, a half wine barrel planter costs between $20 and $45 and serves as a reusable autumn planting vessel for multiple consecutive fall seasons. This display costs under $35 total.
- Tall sunflowers create bold dramatic vertical height
- Trailing nasturtiums cascade over barrel rim beautifully
- White pumpkin at base completes the harvest scene
- Half wine barrel costs $20–$45 and lasts for years
- Full planting display costs under $35 total
Planting a fall wine barrel display for maximum visual impact requires building the arrangement specifically around the viewing angle that most visitors and passersby will experience. Position your tallest sunflower stems toward the back of the barrel — away from the primary street-facing viewing direction — so that the full height of every stem remains visible rather than being partially blocked by foreground plants. Moreover, tilting the entire barrel very slightly forward on a wooden wedge — approximately 5 degrees toward the viewer — prevents the planting from appearing to lean away from the street and ensures both the barrel face and the plant arrangement display at their most visually generous angle. Additionally, selecting sunflower varieties specifically bred for container growing — such as Sunspot or Big Smile dwarf varieties — prevents stem overgrowth that can make a barrel planting look top-heavy and structurally unstable in autumn wind conditions.
Porch Ceiling Fan Greenery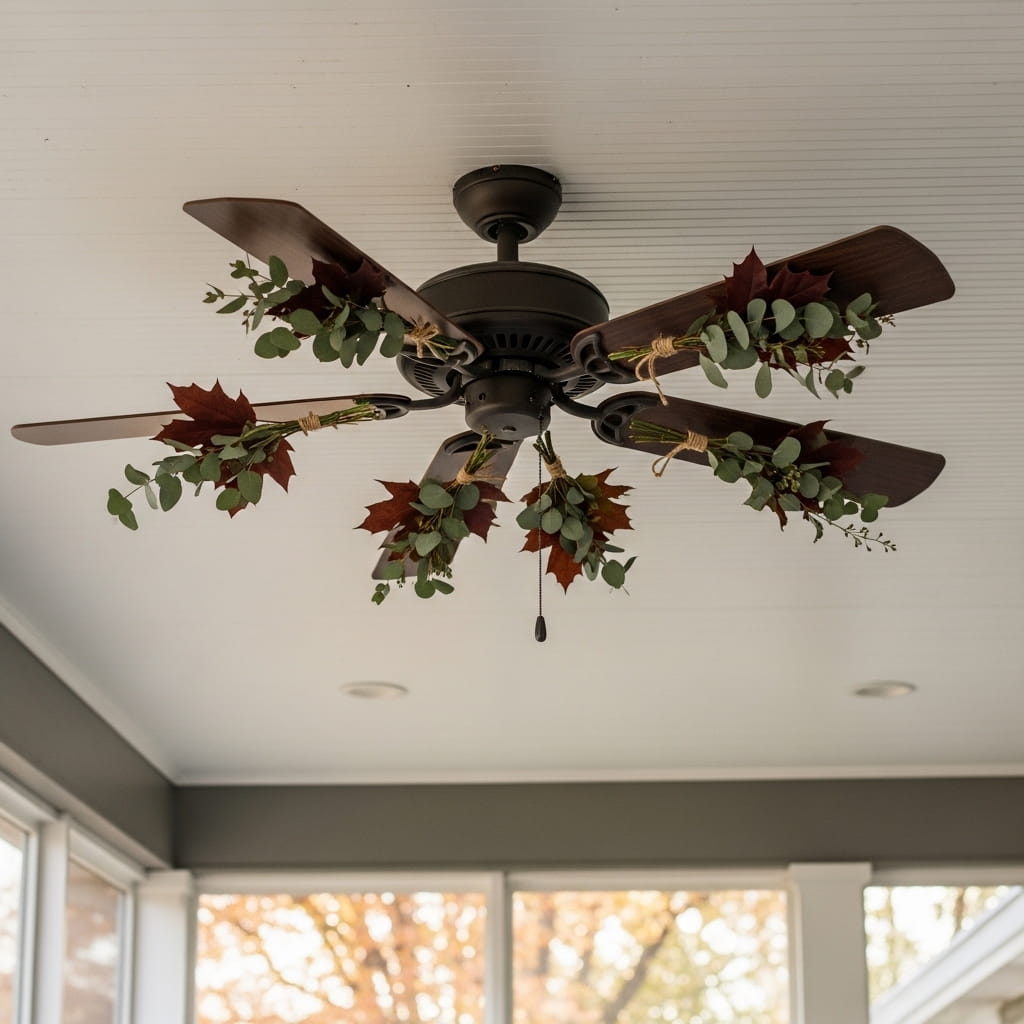
Wiring small eucalyptus and dried maple leaf bundles to each porch ceiling fan blade creates an enchanting overhead botanical installation that transforms a purely functional fixture into a stunning fall outdoor decor element. The sight of 5 fan blades each dressed with a small sage green and deep red botanical bundle creates a spinning floral-wheel effect when the fan operates — a genuinely magical visual detail that no other outdoor autumn display can replicate. Furthermore, attaching small bundles to fan blades requires only thin natural jute twine and zero permanent modifications to the fan fixture itself. Additionally, dried eucalyptus and maple leaf bundles cost under $10 total at most craft or floral supply stores. This creative fall porch ceiling idea costs under $10 completely.
- Wire 5 bundles to each fan blade individually
- Spinning fan creates magical botanical wheel effect
- Zero permanent fan fixture modifications needed
- Sage green eucalyptus and red maple leaves pair perfectly
- Complete ceiling decoration costs under $10 total
Attaching botanical bundles to porch ceiling fan blades securely requires using thin gauge floral wire rather than jute twine alone for the primary attachment connection. Jute twine stretches slightly when wet and can loosen the bundle attachment during rainy autumn weather, while thin floral wire maintains a firm grip regardless of moisture or temperature changes. Moreover, wrapping the floral wire attachment point with a short length of jute twine over the top creates a decorative finish that hides the functional wire completely from below — maintaining the clean, natural aesthetic of the installation. Additionally, keeping each botanical bundle lightweight — using only 3 to 4 stems per bundle — prevents any imbalance between fan blades that could create vibration or wobble during fan operation. That’s why lightweight dried botanicals specifically suit fan blade decoration far better than fresh-cut stems or heavier floral arrangements
Autumn Mailbox Garland Wrap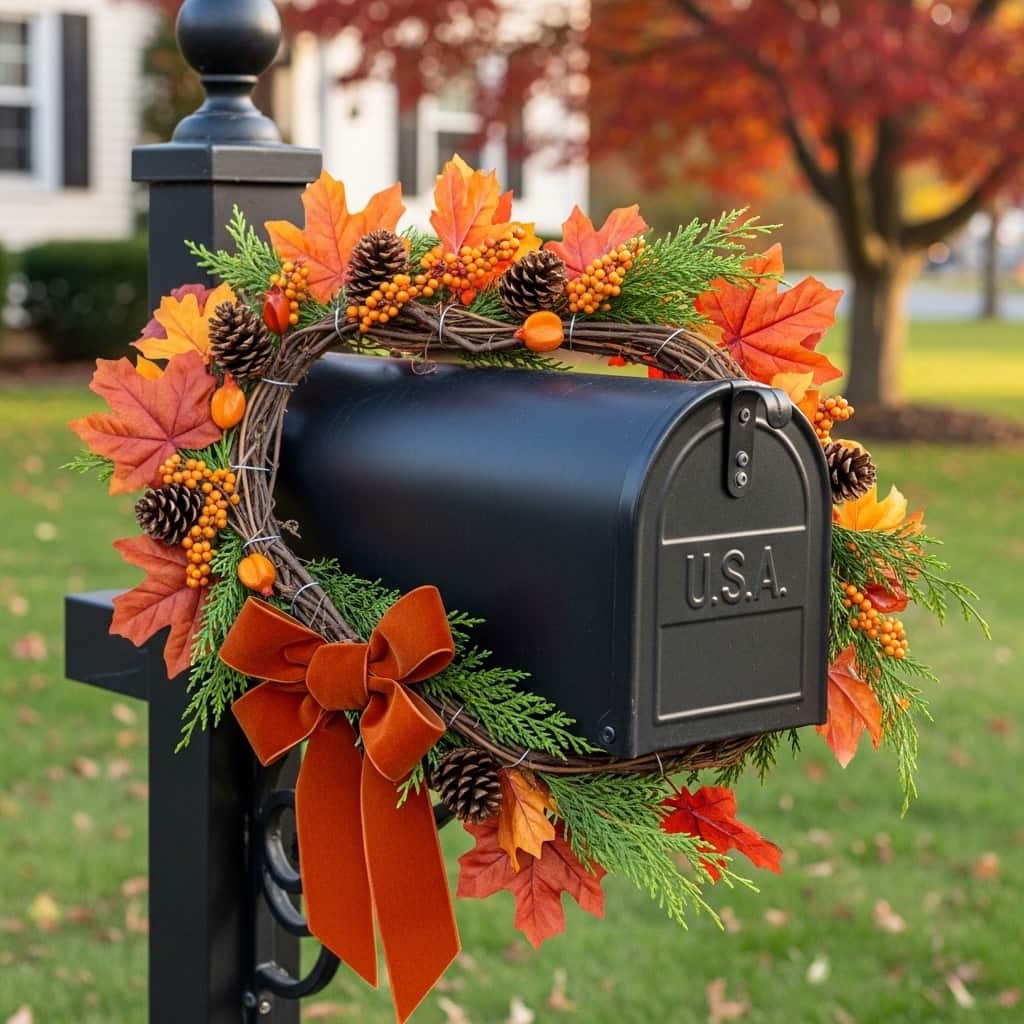
Wrapping your front yard mailbox with a fresh autumn garland creates one of the most unexpectedly charming and neighborhood-admired fall outdoor decor details that costs under $20 and takes under 15 minutes to install completely. A dried maple leaf and cedar sprig garland wound around a black metal post mailbox and finished with a rust velvet ribbon bow at the front face transforms a purely functional street fixture into a genuinely beautiful seasonal accent piece. Furthermore, this fall outdoor styling idea works on every mailbox style — post-mounted, wall-mounted, and cluster box units — because the garland simply wraps around the exterior surface without any permanent attachment. Additionally, the rust velvet bow at the front adds a rich color and texture detail visible from the street. This display costs under $20 total.
- Wrap garland around mailbox post and box body
- Rust velvet bow adds rich seasonal color detail
- Works on every mailbox style and material
- Fresh cedar sprigs add natural botanical fragrance
- Full mailbox display costs under $20 total
Securing an autumn mailbox garland firmly enough to withstand daily mail delivery activity and autumn wind requires a specific attachment approach that prevents the garland from unraveling or shifting over time. Wind thin green floral wire around the garland and mailbox body at 6-inch intervals along the full wrapped length — these anchor points hold the garland firmly without any visible fasteners from the street-facing view. Moreover, starting your garland wrap at the back bottom of the mailbox and spiraling upward toward the front face creates the cleanest, most evenly distributed wrap that covers the mailbox surface consistently from every viewing angle. Additionally, finishing the garland wrap with a velvet ribbon bow tied directly over the front wire anchor point conceals the primary attachment hardware and creates the most visually polished finished display possible.
Dried Leaf Luminaria Bags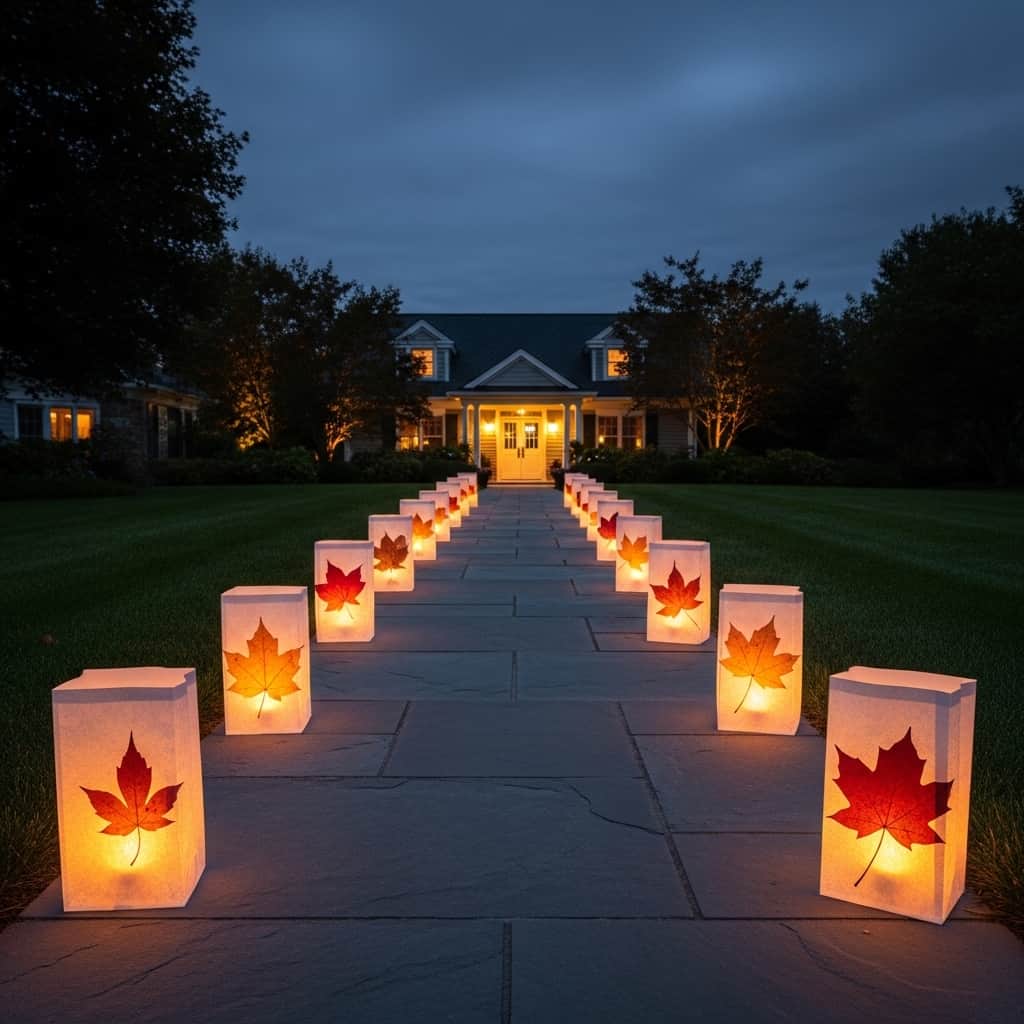
Dried leaf luminaria bags lining your front walkway create one of the most magically atmospheric and visually enchanting fall outdoor evening displays achievable with under $15 in materials. White paper bags with dried pressed autumn leaves adhered to the exterior glow from within when battery tea lights illuminate them — creating warm, amber-tinted leaf silhouettes that cast beautiful botanical shadows across the pathway surface after dark. Furthermore, battery-operated tea lights eliminate any open flame safety concern, making this fall outdoor walkway display completely safe for families with children and pets. Additionally, this autumn pathway decor idea costs under $15 for 8 bags using craft store paper bags, pressed leaves from your own yard, and $3 battery tea light sets. Assembly takes under 30 minutes total.
- Pressed leaves on bag exterior create botanical shadows
- Battery tea lights eliminate all fire safety concerns
- 8 bags line both walkway sides beautifully
- Full display costs under $15 in materials
- Assembly takes under 30 minutes total
Creating beautiful pressed leaf luminaria bags requires pressing your collected autumn leaves 7 to 10 days before your desired display date to ensure they reach the flat, dry state needed for clean adhesion to the paper bag surface. Collect freshly fallen leaves in peak autumn color condition and press them between 2 heavy books lined with absorbent paper towels, replacing the paper towels every 2 days as they absorb leaf moisture. Moreover, using a foam brush to apply a thin, even coat of Mod Podge directly to the paper bag surface before pressing each dried leaf creates a permanent bond that prevents leaves from peeling away during outdoor use in light wind. Additionally, applying a second coat of Mod Podge over the top of each adhered leaf seals and protects the botanical detail from light rain and morning dew throughout autumn evening display use.
Outdoor Blanket Ladder Display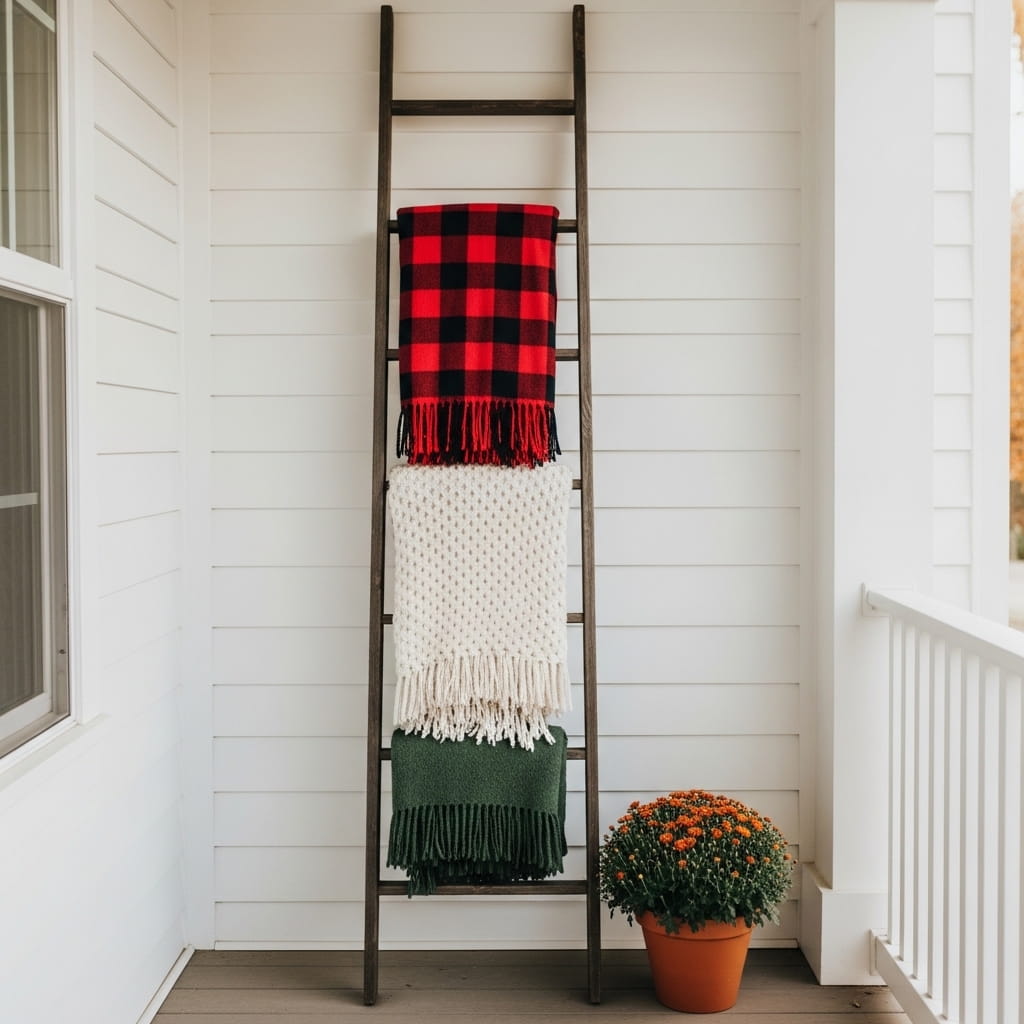
A rustic wooden ladder leaning against your porch wall with 3 autumn throw blankets draped over alternating rungs creates a stunning, practical, and deeply Pinterest-worthy outdoor fall display that costs zero dollars if you already own a ladder and blankets. The combination of red buffalo plaid, cream chunky knit, and forest green wool blankets cascading down a dark wood ladder creates a rich, layered textile display that invites every porch visitor to grab a blanket and settle in for an autumn evening. Furthermore, the outdoor blanket ladder serves a dual purpose — it looks beautiful as a styled display and simultaneously provides immediate blanket access for cool autumn evening gatherings. Additionally, a decorative wood ladder costs between $25 and $45 if purchased new. The complete display costs under $50.
- Drape 3 blankets over alternating ladder rungs
- Mix plaid, chunky knit, and wool textures together
- Blanket ladder serves styling and functional purpose
- Terracotta mum pot anchors the ladder base beautifully
- Free display using a ladder you already own
Choosing the right ladder style for your outdoor autumn blanket display ensures the piece looks intentional and decorative rather than accidentally left outside. A dark walnut-stained or weathered gray wood ladder suits farmhouse, cottage, and transitional porch aesthetics most broadly. Moreover, a ladder with 5 rungs provides the ideal number of display levels for a 3-blanket arrangement — using rungs 2, 3, and 4 from the bottom and leaving the top and bottom rungs bare creates a balanced, centered display that prevents the ladder from looking top-heavy or bottom-cluttered. Additionally, leaning the ladder at a consistent 15-degree angle from the wall — rather than nearly flat against it — creates enough visual separation between the ladder and wall to display the draped blankets as fully three-dimensional textile objects rather than flat wall decorations.
Front Yard Scarecrow Scene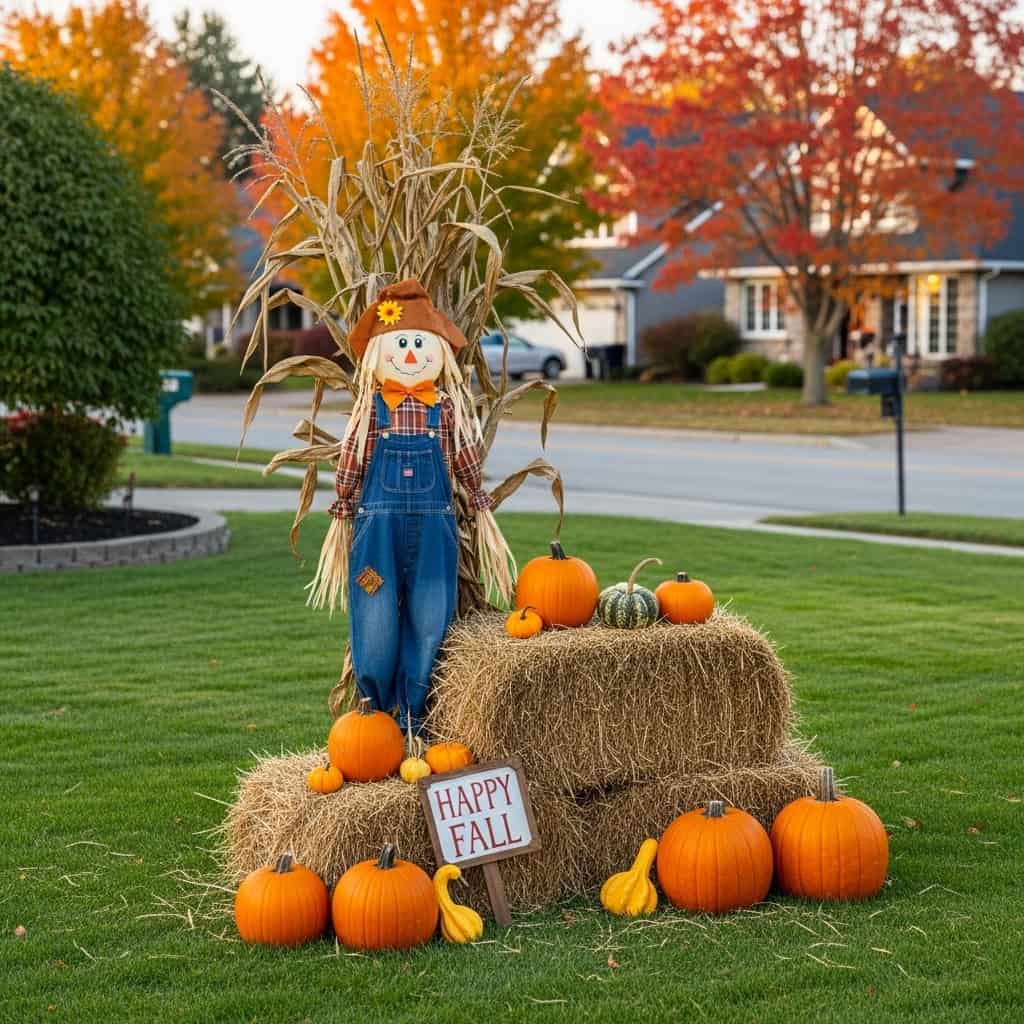
A full front yard harvest scarecrow scene — combining a standing scarecrow, hay bale display, scattered pumpkins, and a painted wooden sign — creates the most complete and narratively rich fall yard decor installation that any home exterior can feature. The fully assembled harvest scene creates a genuine sense of seasonal celebration visible from every passing vehicle and pedestrian on your street throughout the entire autumn. Furthermore, adding a small hand-painted wooden “Happy Fall” sign propped against the hay bale front gives the scene a warm, welcoming message that makes every neighbor and visitor smile. Additionally, this complete front yard autumn scene costs between $35 and $65 depending on whether you DIY the scarecrow or purchase a pre-assembled version. The neighborhood impact is genuinely extraordinary.
- Full harvest scene creates rich narrative display
- Painted wooden sign adds warm welcoming message
- Scattered pumpkins and gourds fill ground level
- Dried corn stalks create natural backdrop height
- Full yard scene costs only $35–$65 total
Planning a front yard harvest scene layout before placing any elements prevents the most common mistake — creating a randomly scattered display that reads as disorganized from the street rather than as a deliberate, cohesive seasonal installation. Establish a clear focal center point first — typically the scarecrow figure — and build all surrounding elements outward from that anchor. Moreover, grouping the hay bale, pumpkins, and sign within a 4-foot radius of the scarecrow creates a tight, unified scene that reads as a single composed display rather than unrelated objects spread loosely across the yard. Additionally, positioning your complete harvest scene slightly off-center in the front yard — rather than perfectly centered on the lawn — creates a more organic, naturally placed quality that feels genuinely discovered and authentically rustic rather than mathematically arranged.
Window Box Fall Planting
Overflowing autumn window boxes mounted below your front facade windows create one of the most elegant and architecturally integrated fall outdoor planting displays achievable on any home exterior. The combination of deep burgundy ornamental kale, golden trailing nasturtiums, orange chrysanthemums, and dried wheat stems spilling from dark green metal window boxes creates a lush, jewel-toned botanical facade that makes the entire home front look like a professionally landscaped property. Furthermore, window box plantings frame each window with a botanical border that draws visual attention upward along the facade and creates a strong, cohesive decorative relationship between the architecture and the seasonal planting. Additionally, dark metal window boxes cost between $20 and $45 each and serve as reusable seasonal planting vessels across multiple years. This facade display costs between $80 and $130 for 3 complete boxes.
- Overflowing window boxes frame each window beautifully
- Mix kale, mums, nasturtiums, and wheat stems
- Dark metal boxes contrast against white exteriors
- Botanical display draws the eye up the facade
- 3-box facade display costs $80–$130 total
Installing window boxes correctly on a home exterior requires using appropriately rated mounting hardware for your specific wall material to ensure the boxes remain securely attached under the combined weight of soil, plants, and water throughout the entire fall season. A fully planted and watered window box can weigh between 15 and 30 pounds — far more than most lightweight decorative hooks can support safely. Moreover, using lag bolt mounting brackets rated for at least 50 pounds per box into solid wood window framing or wall studs provides the structural security required for permanent seasonal window box installations. Additionally, drilling 4 to 6 drainage holes in the bottom of each window box before filling with soil prevents waterlogged roots and facade water staining from drainage overflow during heavy autumn rainfall events.
Pumpkin Monogram Door Decor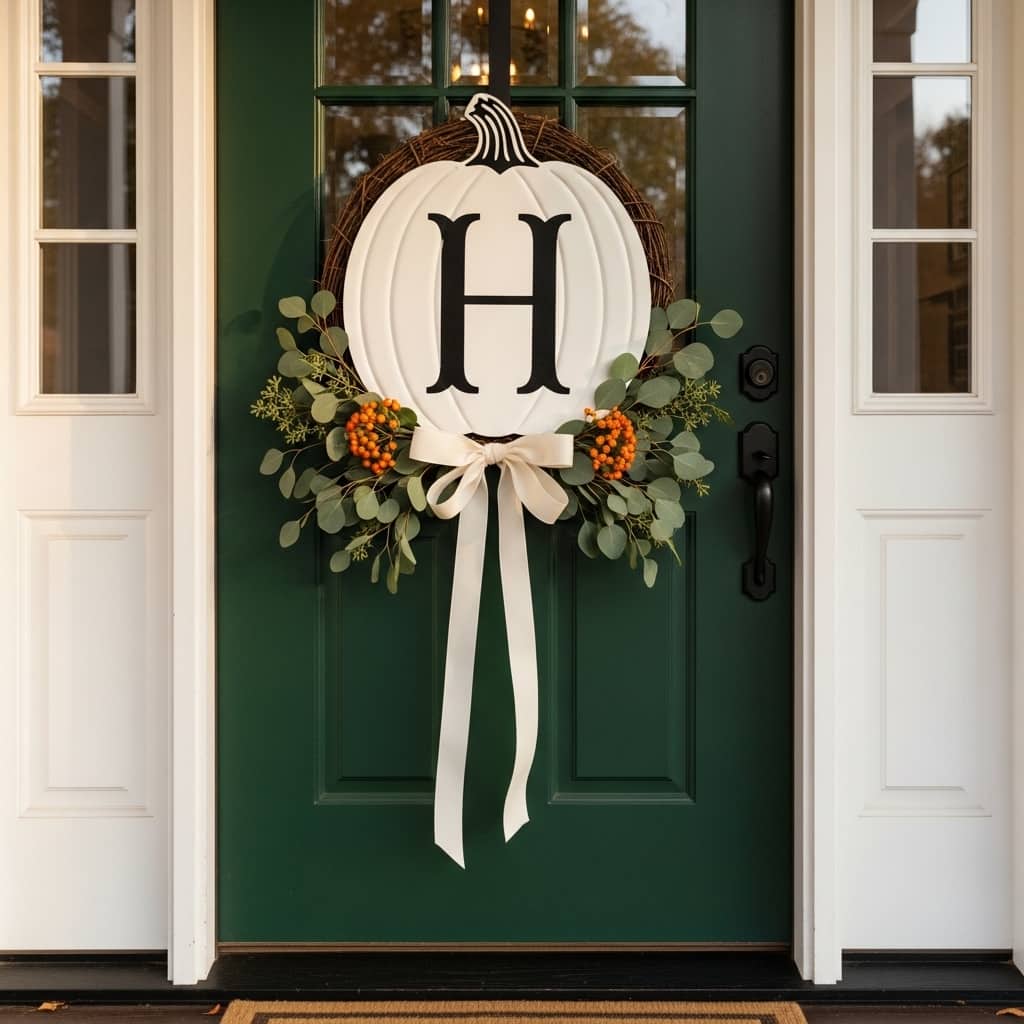
A monogram pumpkin displayed on your front door combines the 2 most beloved autumn decorating elements — personalized home decor and seasonal pumpkin styling — into a single striking, high-impact door accent. A large white pumpkin with a bold painted or carved initial letter creates an immediately personal and visually arresting fall front door display that stands apart from every standard wreath on your street. Furthermore, wrapping the pumpkin stem base with fresh eucalyptus sprigs and orange berry clusters tied with cream ribbon creates a botanical finishing detail that elevates the monogram pumpkin from a simple seasonal prop to a genuinely styled front door centerpiece. Additionally, a large white pumpkin costs between $5 and $12 at most garden centers and grocery stores. This complete door display costs under $20.
- Large white pumpkin creates bold monogram canvas
- Painted initial personalizes the fall door display
- Eucalyptus and berry wrapping elevates the pumpkin
- Cream ribbon tie creates elegant finishing detail
- Complete door display costs under $20 total
Creating a crisp, professional-looking monogram on a white pumpkin surface requires a specific painting technique that prevents bleeding and uneven edges on the curved surface. Print your desired initial letter in a bold font at the correct scale, cut the paper template out cleanly, and tape it firmly against the pumpkin surface before tracing the outline lightly with a pencil. Moreover, filling the traced letter outline with 2 thin coats of black chalk paint rather than 1 thick coat prevents dripping and creates a cleaner, more even coverage across the curved pumpkin surface. Additionally, sealing the finished painted monogram with 2 coats of clear matte Mod Podge after the paint dries completely protects the letter from rain, dew, and humidity throughout the full outdoor display period. That’s why chalk paint specifically — rather than acrylic or spray paint — creates the most durable and visually crisp monogram results on white pumpkin surfaces.
Outdoor Dining Table Styling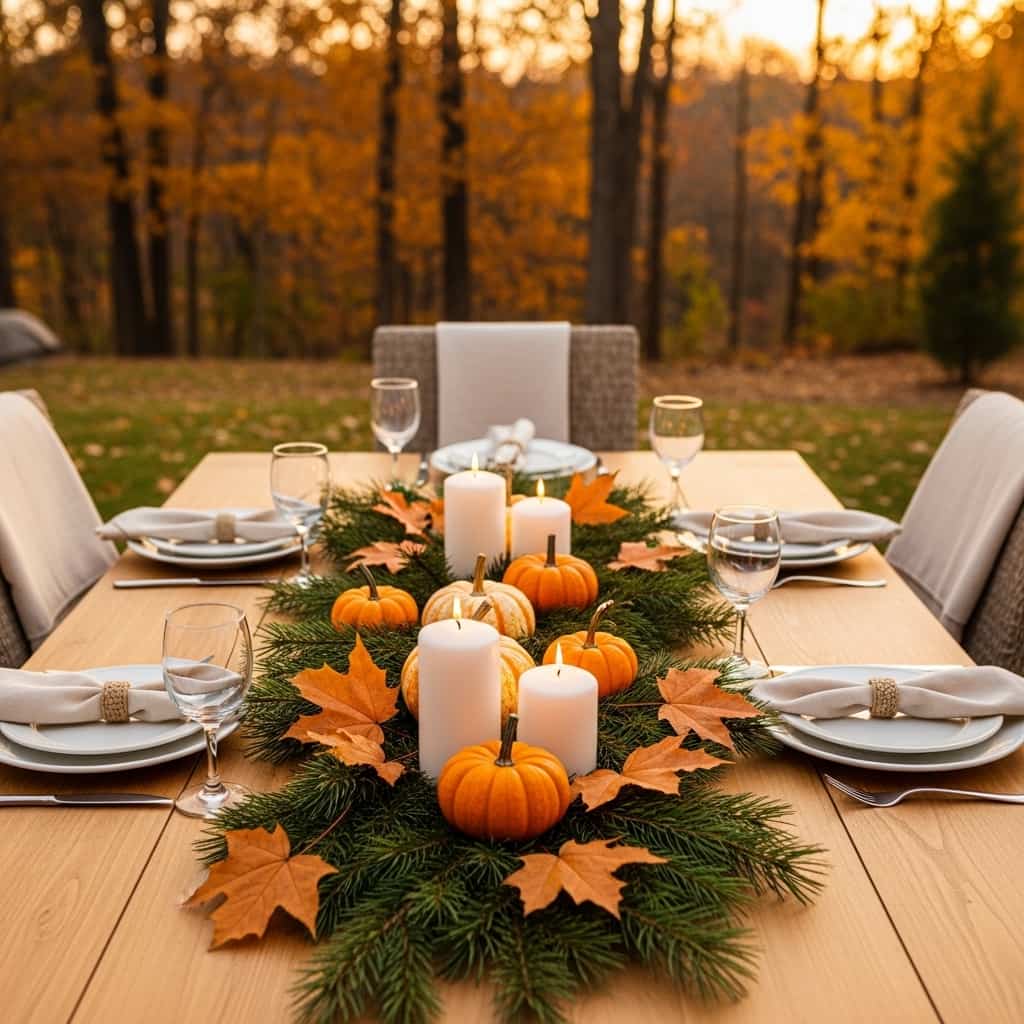
A fully styled outdoor harvest dining table creates the most memorable and visually spectacular fall outdoor entertaining centerpiece that any backyard gathering can feature. A long runner of fresh pine boughs and dried maple leaves running the full table length with pillar candle clusters and mini pumpkins tucked throughout creates an abundant, celebratory display that makes every outdoor autumn dinner feel like a genuine harvest feast. Furthermore, the warm glow of 6 white pillar candles along the center runner after dark creates an intimate, golden dining atmosphere that transforms any backyard into an outdoor venue of extraordinary beauty. Additionally, this complete outdoor fall dining table display costs under $45 using grocery store pumpkins, craft store candles, and foraged pine boughs. Assembly takes under 20 minutes.
- Fresh pine runner spans full table length generously
- Cluster 2 pillar candles at 3 table points
- Mini pumpkins between candle clusters add harvest charm
- Warm candlelight creates magical outdoor dining atmosphere
- Full table display costs under $45 total
Building a beautiful outdoor fall dining table display that survives the full duration of an autumn dinner party requires securing all candles and lightweight botanical elements against table movement and evening breeze. Place each pillar candle inside a small glass hurricane votive holder rather than directly on the table runner surface — the glass enclosure protects the flame from wind while also catching wax drips that would otherwise damage the table finish. Moreover, lightly misting the fresh pine bough runner with water before guests arrive keeps the greenery looking vibrant and prevents any dry needle drop onto place settings during dinner. Additionally, using battery-operated LED pillar candles for outdoor dining specifically eliminates all wind-related flame extinction issues that interrupt the ambiance and require repeated relighting throughout the evening meal.
Backyard Harvest Moon Party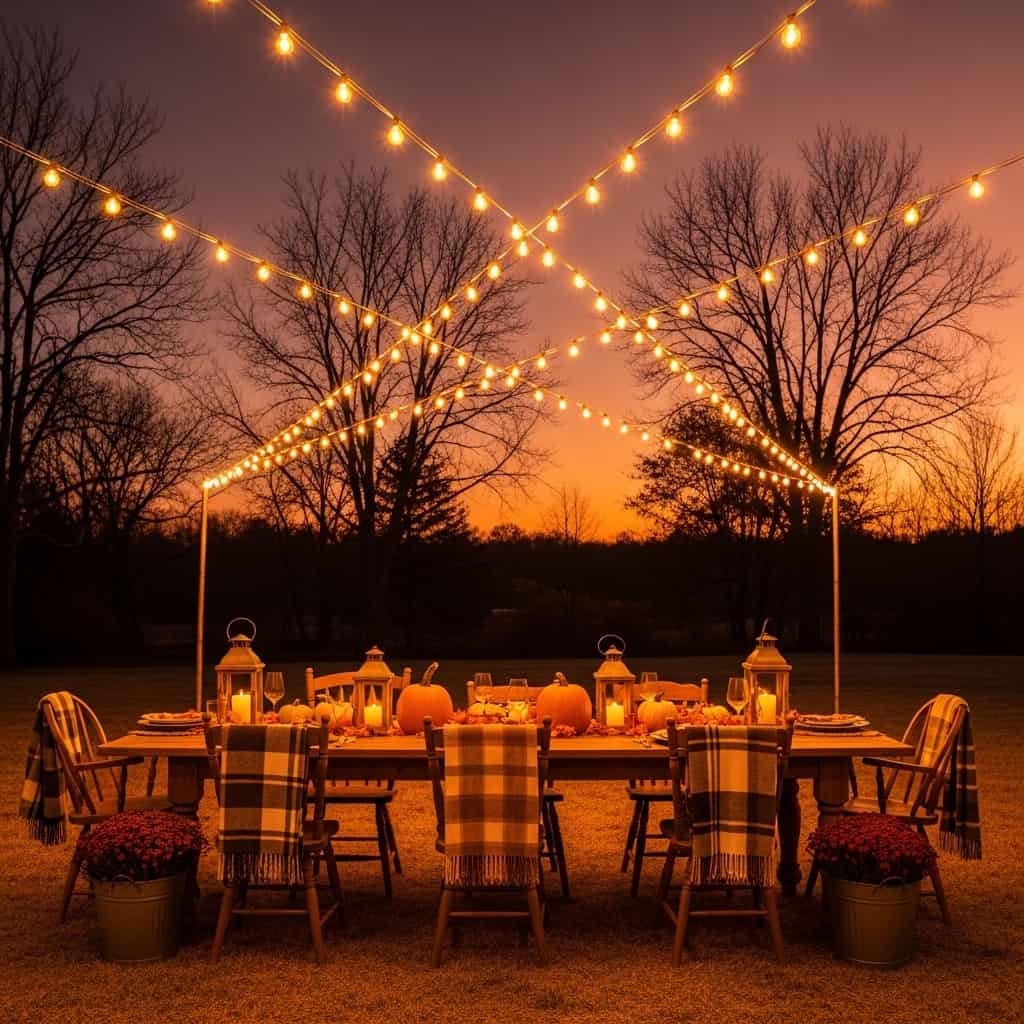
A styled backyard harvest moon party setup — combining a long farmhouse table, string light canopy, pumpkin centerpieces, and plaid blanket chairs — creates the single most magical and social-media-worthy fall outdoor entertaining installation achievable in any backyard. The combination of warm string light glow overhead, amber candlelight at table level, and deep orange sunset sky behind bare autumn tree silhouettes creates a layered, cinematic scene that feels genuinely otherworldly during peak harvest season evenings. Furthermore, draping plaid blankets over each chair back ensures guests stay warm as temperatures drop after sundown — combining practical comfort with powerful seasonal styling simultaneously. Additionally, galvanized metal buckets of fall flowers beside each table leg anchor the scene at ground level and complete the full harvest aesthetic from floor to canopy.
- String light canopy overhead creates magical party glow
- Plaid blanket on each chair keeps guests warm
- Pumpkin and lantern centerpiece anchors table center
- Galvanized flower buckets complete the ground-level display
- Sunset sky behind creates cinematic autumn backdrop
Planning a successful backyard harvest moon party requires preparing the string light canopy installation at least 1 full day before the event to allow adequate time for adjustments without last-minute pressure. Test every string light bulb and replace any burned-out bulbs during daylight hours when identifying dark spots in the canopy is significantly easier. Moreover, programming your string light timer to activate at exactly sunset on your party date eliminates the need to manually switch the canopy on during active hosting when your attention belongs on guests rather than technical details. Additionally, preparing a simple rain contingency plan — a large outdoor canopy or market umbrella available to deploy quickly — ensures your harvest moon party continues beautifully even if light autumn rain begins unexpectedly during the evening.
Conclusion
Your outdoor spaces deserve to feel as warm, abundant, and seasonally alive as the autumn happening all around your home every single day. Every fall outdoor decor idea in this guide proves that a stunning exterior transformation does not require a professional landscaper, a large budget, or hours of complicated installation work. Furthermore, even 2 or 3 of these ideas — a stacked pumpkin tower, a porch railing garland drape, or a styled firepit seating area — can completely change how your home looks and feels from the street this season. I’ve seen how the right outdoor autumn display transforms not just a home’s appearance but the entire feeling of arriving home each evening. Save this post on Pinterest, try one idea this weekend, and share it with a neighbor who needs this inspiration.
Frequently Asked Questions
What are the easiest fall outdoor decor ideas for beginners?
Start with a porch step pumpkin display, a corn stalk bundle beside the door, and a layered doormat. These 3 elements cost under $35 combined and require zero installation tools. They create an immediate, complete autumn exterior display in under 20 minutes.
How do I keep outdoor pumpkins from rotting too quickly?
Apply petroleum jelly across the entire pumpkin surface immediately after purchase. Keep pumpkins in a shaded porch spot away from direct afternoon sunlight. Place each pumpkin on a rubber mat to prevent ground moisture absorption. This extends outdoor life by 2 additional weeks.
What outdoor plants work best for fall porch decorating?
Chrysanthemums, ornamental kale, ornamental cabbage, and trailing ivy perform best. All 4 varieties thrive in cool autumn temperatures between 35 and 65 degrees Fahrenheit. Mums bloom continuously for 4 to 6 weeks outdoors with regular deadheading and deep watering every 2 to 3 days.
How do I decorate my backyard for fall on a budget?
Style a firepit seating area with chairs and plaid blankets you already own. Add a string light canopy using a single $25 light set. Place 3 galvanized buckets of mums beside the seating area. This complete backyard fall setup costs under $60 total.
Can renters use fall outdoor decor without damaging property?
Yes. Use over-door wreath hangers for all door displays. Use removable adhesive hooks rated for 5 pounds for garland and signs. Place all pumpkin, hay bale, and planter displays directly on ground or porch floor surfaces. Every idea in this guide causes zero permanent property damage.
When should I start decorating outdoors for fall?
Most outdoor decorators begin transitioning to autumn displays between September 15 and October 1. Neutral botanical displays using ornamental cabbage, dried wheat, and eucalyptus suit outdoor spaces from early September onward. Starting 2 weeks before October 1 gives you maximum seasonal enjoyment before Halloween arrives.
How do I protect outdoor fall decorations from autumn rain and wind?
Secure all garlands with floral wire every 18 inches. Apply clear waterproof spray to fabric elements like scarecrow clothing and blankets. Store ceramic figurines and glass lanterns indoors during heavy storms. Place rubber mats beneath all pumpkins and hay bales to prevent moisture damage from below.