30 Home Wall Decor Ideas For A Stylish Space 2026
Stare at a blank wall long enough and one thought takes over — this room is missing something. You rearrange the furniture. You buy a new throw pillow. Still, the room feels unfinished, flat, and strangely empty. The problem is almost always the walls. Most people spend their entire decorating budget on furniture and completely forget the largest visual surfaces in the room. Furthermore, home wall decor is not just about filling empty space — it is about creating atmosphere, personality, and a room that genuinely feels like yours.
I’ve noticed this pattern repeatedly across dozens of styled spaces: the moment someone adds one intentional, well-chosen wall piece, the entire room clicks into place. A gallery wall grounds a floating living room. A painted arch transforms a plain bedroom. A woven textile makes a cold space feel genuinely warm. Moreover, experienced interior stylists and decorators consistently emphasize that your walls are the most powerful and most underused tool in any room makeover. They are the backdrop against which every piece of furniture, every textile, and every accessory either sings or falls flat.
This article covers 30 unique, inspiring, and practical wall styling ideas for every room in your home — from bold statement murals and textured fabric panels to budget-friendly DIY painted arches and renter-safe peel-and-stick wallpaper. Additionally, every idea here includes real styling guidance so you can apply it confidently without guesswork or professional help. Therefore, whether you are decorating a compact studio apartment, a cozy family bedroom, or a modern open-plan living room, you will find the perfect wall solution right here. Your walls are ready. Let’s transform them.
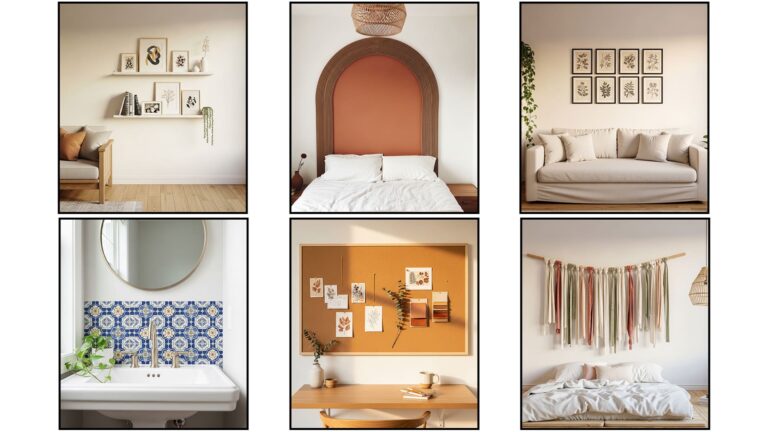
Neutral Gallery Wall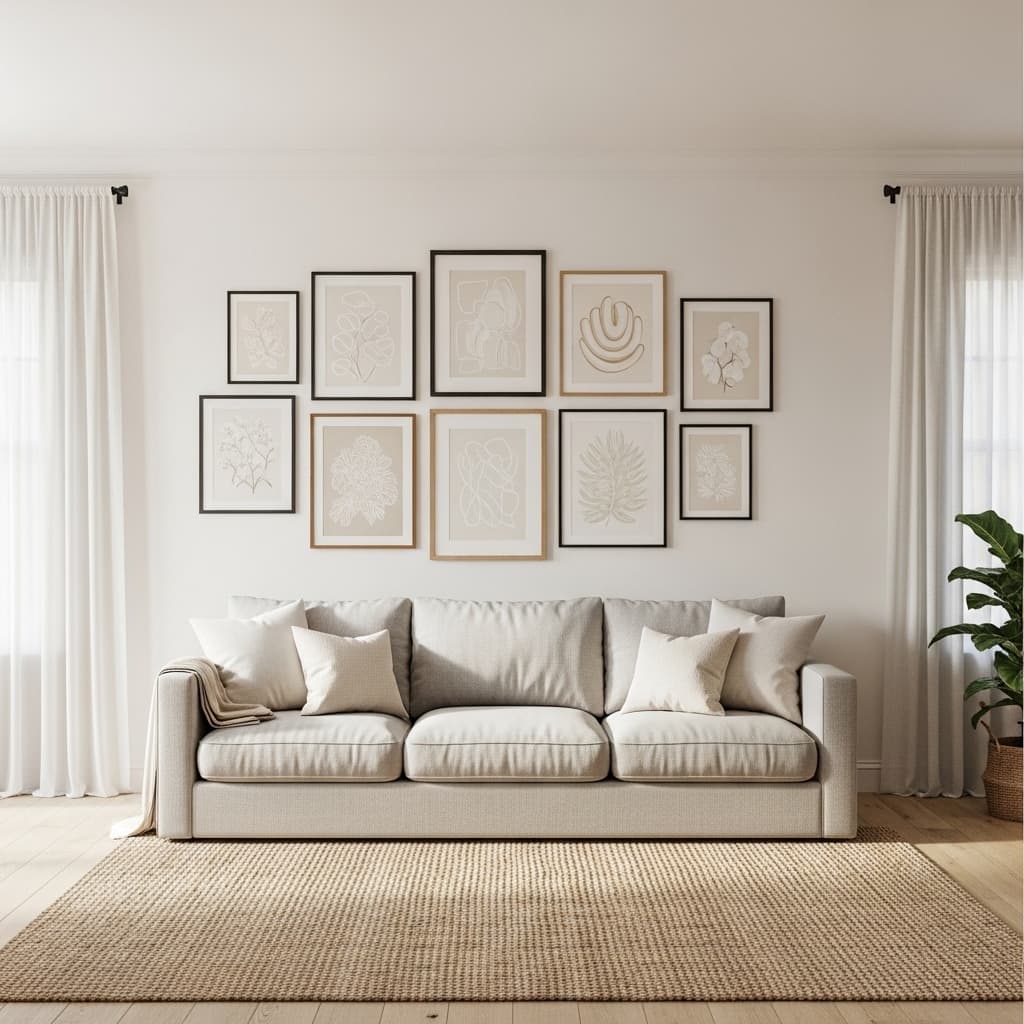
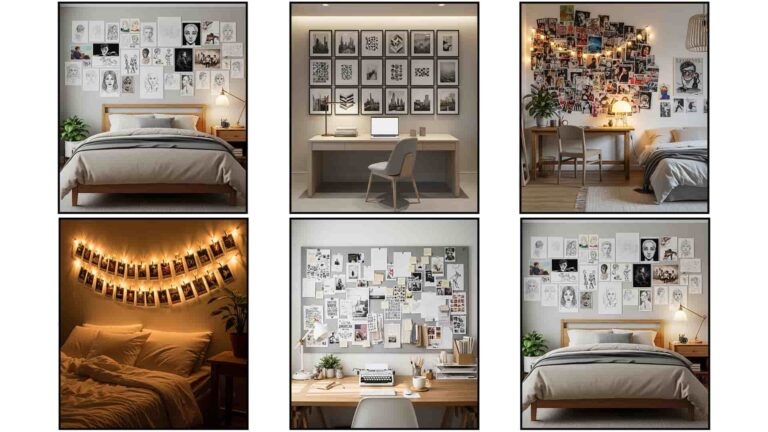
A neutral gallery wall is one of the most effective and budget-friendly ways to turn a completely bare living room wall into a stunning, designer-quality focal point. The beauty of this approach lies in its flexibility — you can mix family photos, art prints, and botanical illustrations without the display ever feeling cluttered or chaotic. Furthermore, neutral tones in cream, warm beige, and soft sage create a cohesive visual story that suits almost every interior color palette beautifully. I’ve noticed that homeowners who commit to a consistent mat color across all frames — even when the frame finishes vary — always achieve the most polished, gallery-quality result. Additionally, this wall styling idea works equally well in small apartments and large open-plan homes.
- Mix frames for layered, rich results
- Consistent mat color unifies the display
- Works in small and large rooms equally
- Neutral tones suit every interior palette
- Budget-friendly with free printable art
Choosing the right layout before hammering a single nail saves enormous time and frustration during the installation process. Moreover, arranging all frames flat on the floor first — experimenting with spacing and balance freely — lets you refine the composition without any wall damage. Therefore, trace each frame onto paper, cut the templates out, and tape them directly to the wall for a fully accurate preview. That’s why many interior stylists recommend this paper template method as their number one gallery wall tip for beginners. Additionally, starting with the largest frame as the visual anchor and building outward in both directions creates a naturally balanced arrangement. This systematic approach consistently delivers a result that looks intentionally designed rather than randomly assembled.
Sage Green Accent Wall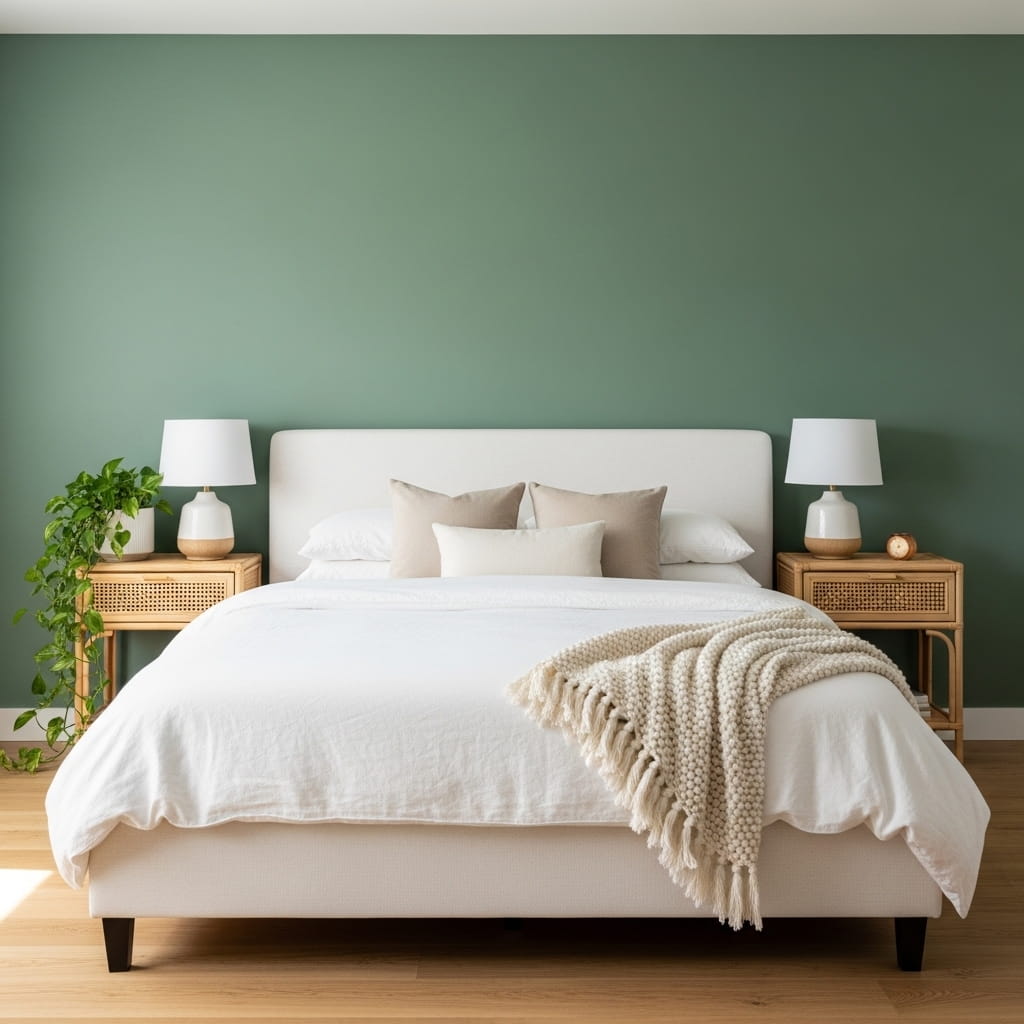
A sage green accent wall delivers one of the most calming, sophisticated, and visually grounding color transformations available to any bedroom or living room in 2026. This muted, earthy green tone sits perfectly between nature-inspired warmth and modern minimalism — making it one of the most universally flattering paint colors across a wide range of interior styles. Furthermore, sage green pairs effortlessly with white linen, natural rattan, warm wood tones, and aged brass accessories for a cohesive, organic room palette. I’ve tried this color in a north-facing bedroom and the result was remarkable — the room gained warmth and a sense of calm that no neutral paint had previously achieved. Additionally, sage green works beautifully as both a full-room color and a single accent wall behind a bed or sofa.
- Calming and universally flattering tone
- Pairs perfectly with rattan and brass
- Works on full walls and accent walls
- Suits bedrooms, living rooms, and offices
- Matte finish looks most sophisticated
Selecting the exact right sage green shade for your specific room requires careful testing under your actual lighting conditions before committing to a full wall. Moreover, sage green paint chips can shift dramatically between warm golden undertones and cool gray undertones depending entirely on the light source in your room. Therefore, always test at least three different sage green samples — painted directly on the wall as large swatches — and observe each one across morning light, afternoon sun, and evening lamp glow. In my experience, shades with slightly warm, yellow-green undertones perform best in rooms with limited natural light, while cooler gray-sage tones suit bright, naturally well-lit spaces. Additionally, pairing sage green walls with crisp white trim and ceiling creates a clean, intentional contrast that makes the color appear more deliberate and refined.
Floating Shelf Vignette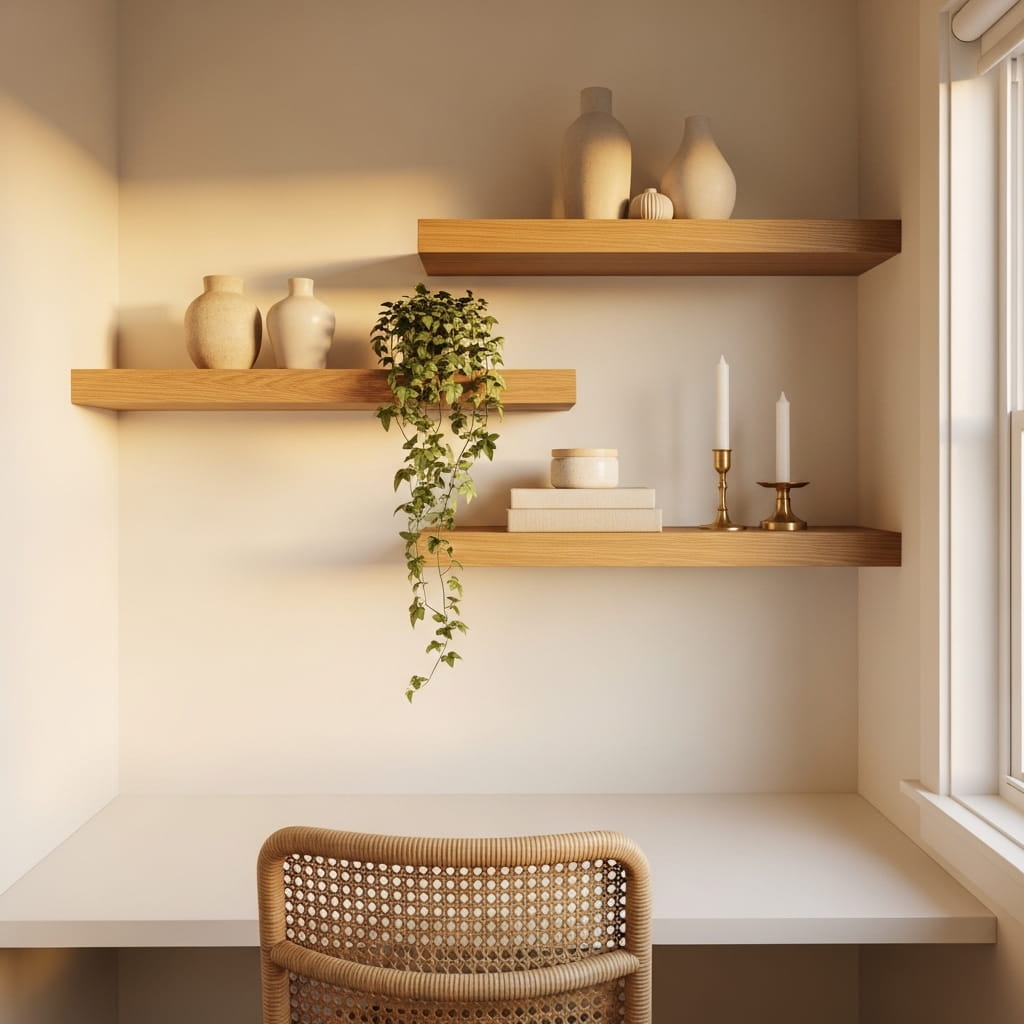
Floating shelves styled as deliberate wall vignettes represent one of the smartest intersections of practical storage and genuine decorative artistry in modern home styling. Unlike standard bookshelves, floating shelf vignettes treat each shelf as a curated mini-display — layering books, ceramics, plants, and candles with the same intentionality a museum applies to its exhibits. Furthermore, the visual weight of floating shelves draws the eye upward, making ceilings feel taller and rooms feel significantly less cramped. I’ve noticed this effect works especially powerfully in small apartments where floor space is limited but vertical wall space remains completely underused. Additionally, natural wood shelves in oak, walnut, or pine each bring a distinctly different warmth and texture that dramatically influences the overall room aesthetic.
- Draws the eye upward, lifts ceilings
- Combines storage with curated display
- Natural wood adds instant warmth
- Works in offices, kitchens, and bedrooms
- Style with plants, ceramics, and books
The single most important rule in floating shelf styling is variation — varying the height, material, and color of every object across the shelf creates visual rhythm and prevents the display from feeling flat or monotonous. Moreover, professional stylists consistently follow a simple layering formula: one tall vertical element, one medium horizontal item, and one small detail accessory per shelf section. Therefore, place a tall ceramic vase beside a horizontal stack of books, then tuck a small trailing plant or candle in front to add depth. Additionally, leaving intentional negative space — small deliberate gaps between objects — prevents the shelf from looking crowded and gives each piece room to breathe visually. In my experience, refreshing shelf vignettes seasonally by swapping in one or two new items keeps the display feeling perpetually curated and current.
Boho Macramé Hanging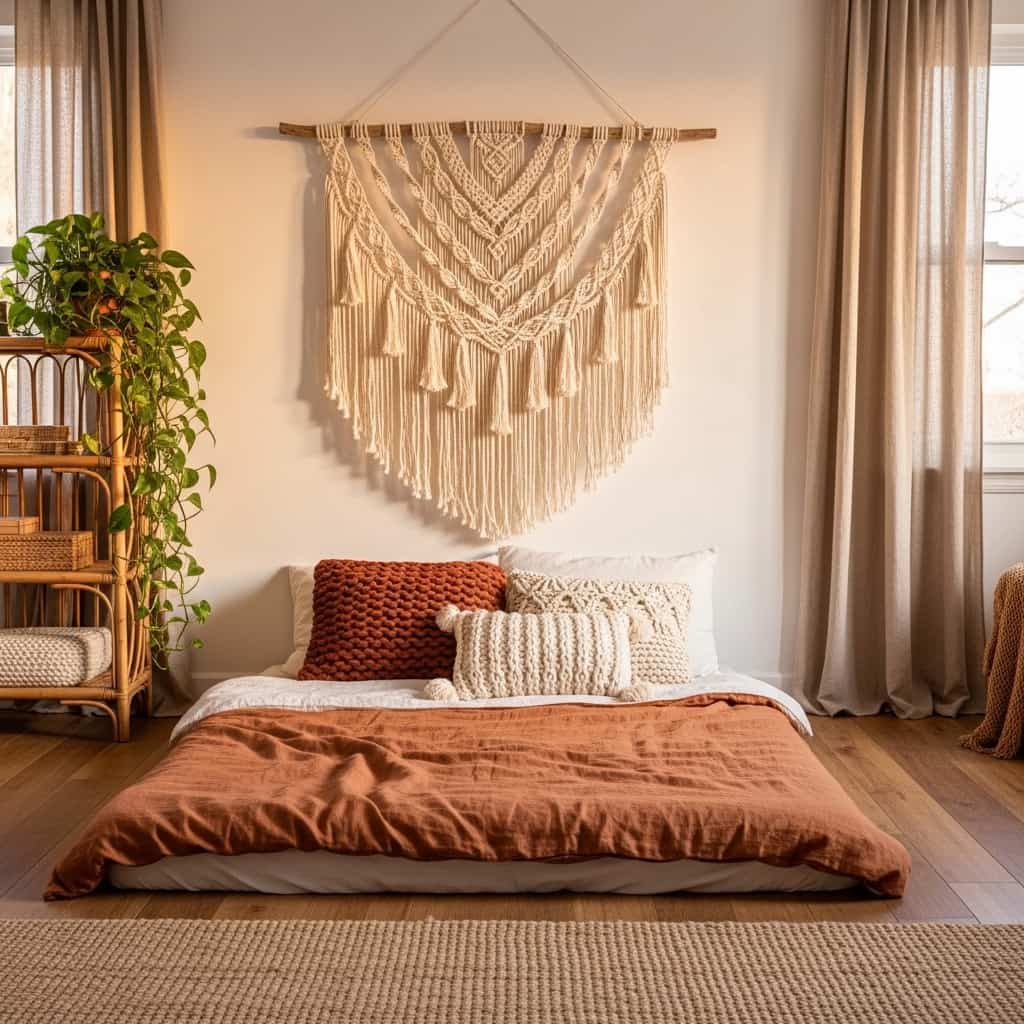
A hand-knotted macramé wall hanging brings a deeply tactile, artisanal warmth to bedroom and living room walls that no flat printed artwork can replicate. The three-dimensional texture of knotted natural cotton rope creates soft, shifting shadow patterns across the wall as light moves throughout the day — giving your room a subtly dynamic, living quality. Furthermore, macramé suits an impressively wide range of interior styles — from classic bohemian and coastal to modern organic and even minimalist Scandinavian rooms where one textured statement piece completes the space. Additionally, handmade or small-batch macramé pieces add genuine uniqueness to your home styling because no two hand-knotted pieces are ever perfectly identical. That’s why many interior stylists recommend macramé as their first choice for adding authentic, handcrafted character to a bedroom.
- Three-dimensional texture creates shadow play
- No two handmade pieces look identical
- Suits boho, coastal, and minimal styles
- Natural cotton rope stays versatile year-round
- Works beautifully above beds and sofas
Choosing the correct macramé size relative to the wall space and furniture below is absolutely critical for achieving a balanced, intentional result. Moreover, a macramé piece that is too narrow above a wide king-size bed looks lost and underwhelming rather than boldly decorative. Therefore, select a piece that spans at least two-thirds the width of the bed frame or sofa sitting directly below it. In my experience, pairing a large cream macramé hanging with a terracotta or warm sage painted wall creates one of the most cohesive and visually satisfying boho bedroom looks possible at any budget level. Additionally, hanging macramé at true eye level — rather than pushing it too high toward the ceiling — keeps the piece visually connected to the room’s furniture and overall composition. This single placement detail makes a significant difference in the final styling result.
Shiplap Feature Wall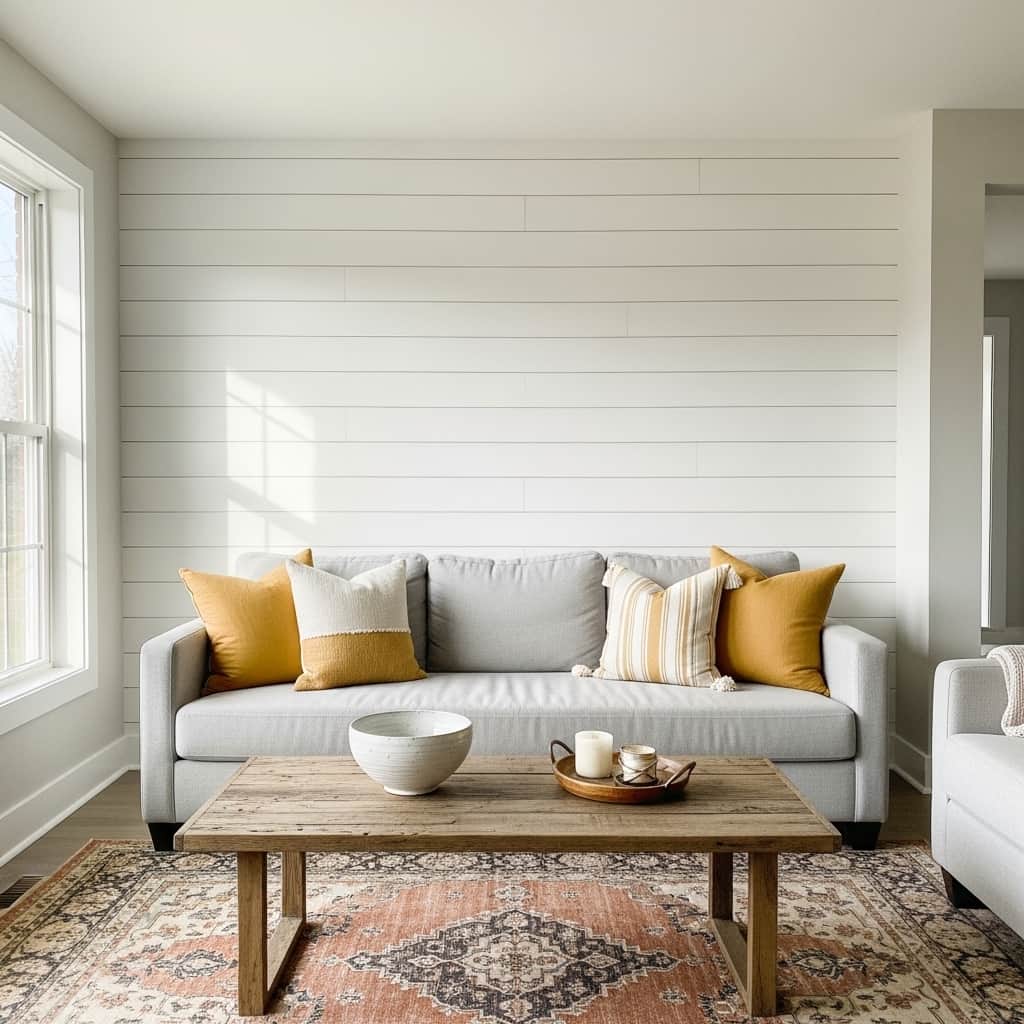
A shiplap feature wall delivers instant architectural character, warmth, and a clean farmhouse energy that elevates even the most basic and builder-standard living room into a space with genuine design personality. This horizontal board treatment has maintained its position as one of the most searched and most saved home wall decor updates across the United States for several consecutive years — and 2026 continues that trend strongly. Furthermore, shiplap works beautifully across multiple rooms — living rooms, bedrooms, entryways, and bathrooms — making it one of the most versatile wall treatments available at any budget point. Additionally, modern peel-and-stick shiplap panels now available at major home improvement retailers make this treatment genuinely accessible for renters who previously assumed it was permanently off-limits. I’ve seen this single wall change transform an entire room’s identity.
- Adds instant farmhouse architectural character
- Peel-and-stick panels suit rental spaces
- Works in living rooms and entryways
- Paint in white, greige, or sage green
- Single wall creates maximum visual impact
The paint color you choose for your shiplap feature wall determines the entire mood and aesthetic direction the room ultimately takes. Moreover, crisp white shiplap creates a clean, airy, coastal farmhouse feel, while warm greige shiplap reads as more sophisticated and transitional. Therefore, consider your existing furniture colors, flooring tone, and natural light levels carefully before selecting your final shiplap paint color. In my experience, painting shiplap in the same color as the surrounding walls — rather than contrasting white — creates a beautifully subtle textural effect that adds dimension without dominating the room. Additionally, mixing shiplap with open floating shelves mounted directly against it and a few carefully placed wall sconces creates a fully layered, designer-quality wall composition. That’s why shiplap remains a foundational recommendation from interior designers working across farmhouse, coastal, and transitional home styles.
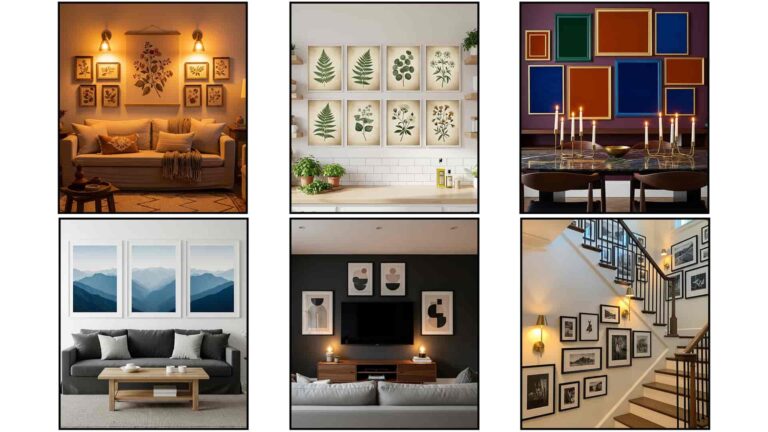
Framed Botanical Prints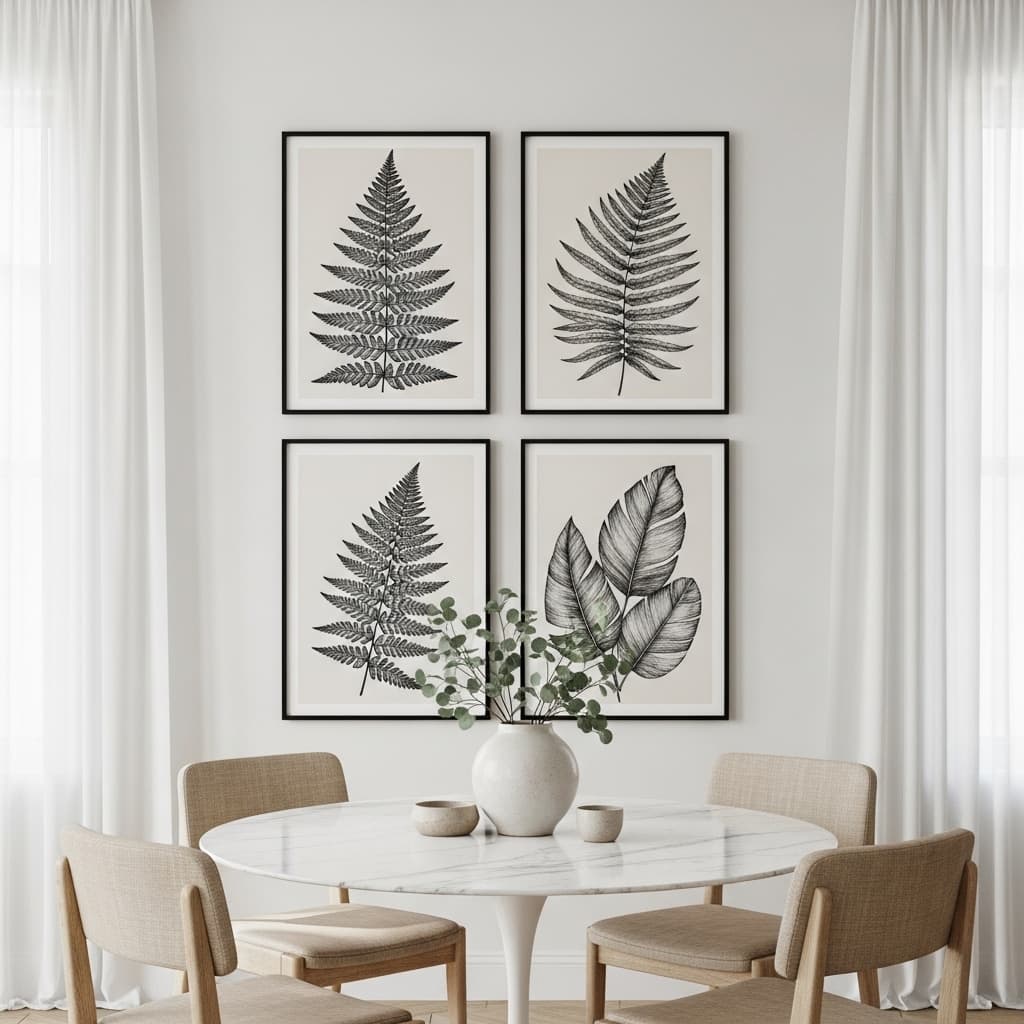
Framed botanical prints bring the quiet, enduring beauty of the natural world directly onto your walls in a way that feels simultaneously timeless, artistic, and deeply calming. This wall art style suits an exceptionally wide range of interior aesthetics — from clean Scandinavian minimalism to warm modern farmhouse to sophisticated traditional rooms — without ever feeling out of place or trend-dependent. Furthermore, large-scale botanical illustrations in matching slim black frames arranged symmetrically above a dining table create a formal, editorial wall display that photographs beautifully and communicates genuine design intentionality. I’ve noticed that sourcing high-quality botanical illustrations from free public domain archives — printing them locally and framing them yourself — delivers a result virtually identical to expensive designer art at a fraction of the retail cost. Additionally, symmetrical arrangements of four matching frames bring elegant visual balance to dining rooms and bedroom walls.
- Timeless style suits every interior aesthetic
- Free public domain art reduces costs significantly
- Symmetrical grids add formal dining room elegance
- Black frames on white walls always look polished
- Large scale prints command immediate attention
Choosing the right print scale for your specific wall dimensions is the single most important factor in making a botanical print arrangement land with genuine visual impact. Moreover, small prints placed on a large wall disappear completely and make the space feel unresolved and unfinished rather than styled. Therefore, select prints that measure at least 16 by 20 inches for any wall wider than five feet, and consider 24 by 30 inch prints for large dining room or living room feature walls. In my experience, selecting botanical illustrations that share a consistent line weight and ink color — all rendered in black ink on cream paper, for example — creates a cohesive, collected-series quality across the arrangement even when the individual plant subjects differ. Additionally, using identical mat board dimensions and colors across all frames in the grouping reinforces the curated, intentional presentation that elevates the entire wall display.
DIY Painted Arch
A painted arch directly on your bedroom or living room wall is the most creative, impactful, and genuinely cost-effective wall decor idea gaining serious design momentum heading into 2026. You need only a pencil, a piece of string, and one can of paint — and the result looks like a custom architectural feature that took a professional designer to execute. Furthermore, painted arches frame beds, reading nooks, and console tables as natural vignettes that focus the eye and give the room an immediate sense of purpose and intentionality. I’ve tried this technique using dusty terracotta paint on a white bedroom wall and the transformation genuinely surprised me — the room shifted from plain and forgettable to warmly Mediterranean and deeply considered. Additionally, arches complement virtually every furniture style, from rattan and linen to dark wood and velvet.
- Zero cost beyond one can of paint
- Creates custom architectural detail instantly
- Frames beds and nooks as natural vignettes
- Terracotta and sage green work best
- Fully reversible with fresh white paint
Selecting the right paint color for your arch determines whether the final result feels subtle and sophisticated or bold and dramatically statement-making. Moreover, soft terracotta on white creates a warm, sun-soaked Mediterranean atmosphere, while dusty sage on a warm greige wall delivers a quieter, more botanically inspired result. Therefore, test your chosen arch color as a large swatch on the actual wall before committing to the full arch shape — lighting conditions dramatically affect how bold or subtle the color reads in real life. In my experience, adding a small floating shelf, a hanging pendant light, or a single potted plant positioned inside the arch transforms the painted detail from a simple decorative gesture into a fully developed room feature. Additionally, using matte paint finish for the arch rather than eggshell gives the edge a cleaner, more gallery-quality appearance against the surrounding wall surface.
Antique Mirror Wall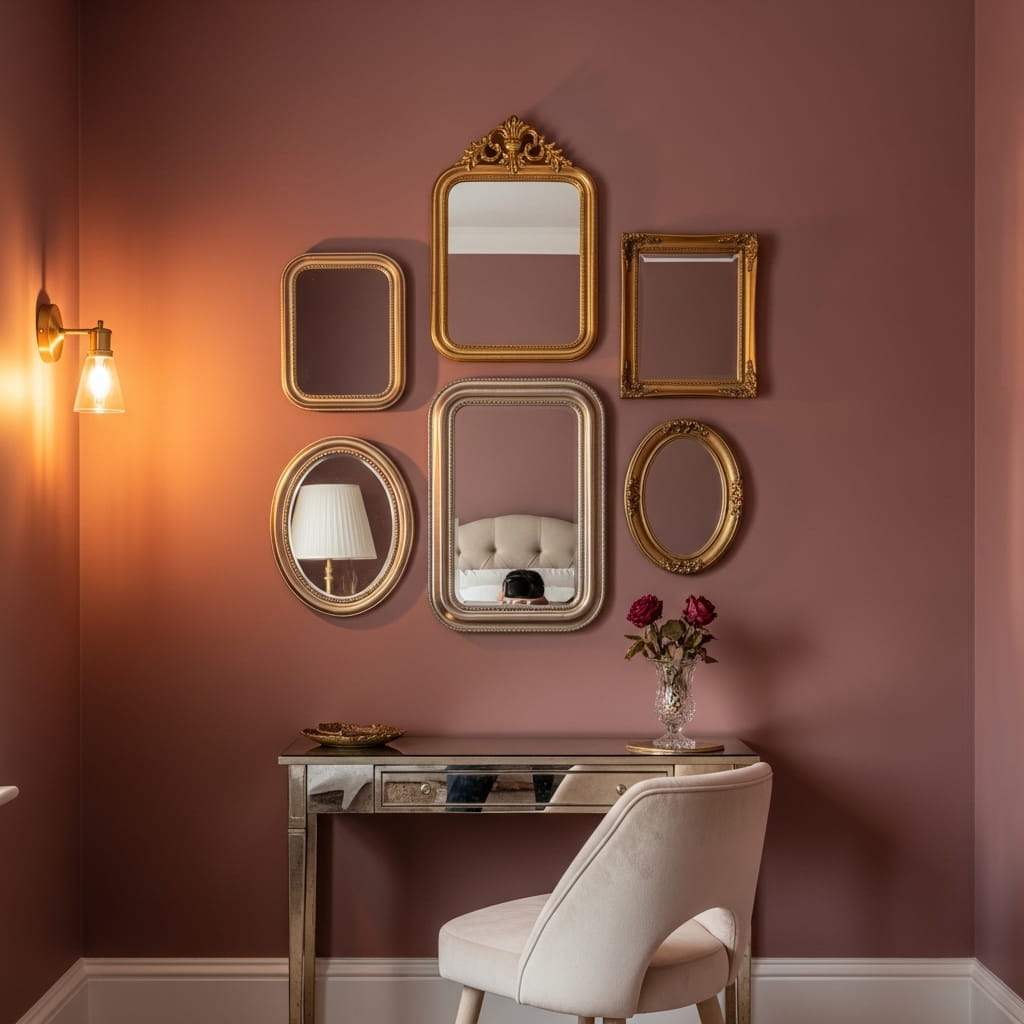
An antique mirror wall cluster creates one of the most romantically glamorous, visually layered, and light-amplifying wall displays possible in any bedroom or dressing area — and the effect is genuinely difficult to achieve with any other single decorating approach. Unlike a single large mirror, an asymmetric cluster of antique mirrors reflects light from multiple angles simultaneously, filling the room with a warm, multi-directional luminosity that feels deeply atmospheric in evening light. Furthermore, mixing ornate gold, aged silver, and antique bronze frames within the same cluster creates an eclectic, collected-over-decades aesthetic that looks far more interesting and personal than a perfectly matched set. I’ve seen this exact styling technique transform a completely plain bedroom wall into a room’s most photographed and most admired design feature. Additionally, thrift stores and estate sales consistently offer beautiful ornate mirror frames at deeply affordable prices for patient decorators.
- Multiple mirrors multiply light dramatically
- Thrift stores offer affordable ornate frames
- Mix metals for eclectic collected character
- Creates glamorous bedroom focal point instantly
- Asymmetric placement looks most authentic
Planning your antique mirror cluster layout carefully on the floor before mounting a single piece on the wall prevents the most common and frustrating installation mistake — uneven spacing that makes the grouping look scattered rather than cohesive. Moreover, tracing each mirror’s outline onto newspaper, cutting the templates out, and taping them to the wall gives you a completely accurate, commitment-free preview of the final arrangement. Therefore, spend at least twenty minutes adjusting template positions on the wall before picking up a single nail or drill. In my experience, keeping two to four inches of consistent space between each mirror in the cluster creates a tight, intentional grouping that reads as a unified composition from across the room. Additionally, anchoring the entire cluster with the largest, most ornate mirror positioned slightly off-center adds the organic, natural asymmetry that makes a vintage mirror wall feel genuinely collected and curated rather than rigidly staged.
Wainscoting Panel Wall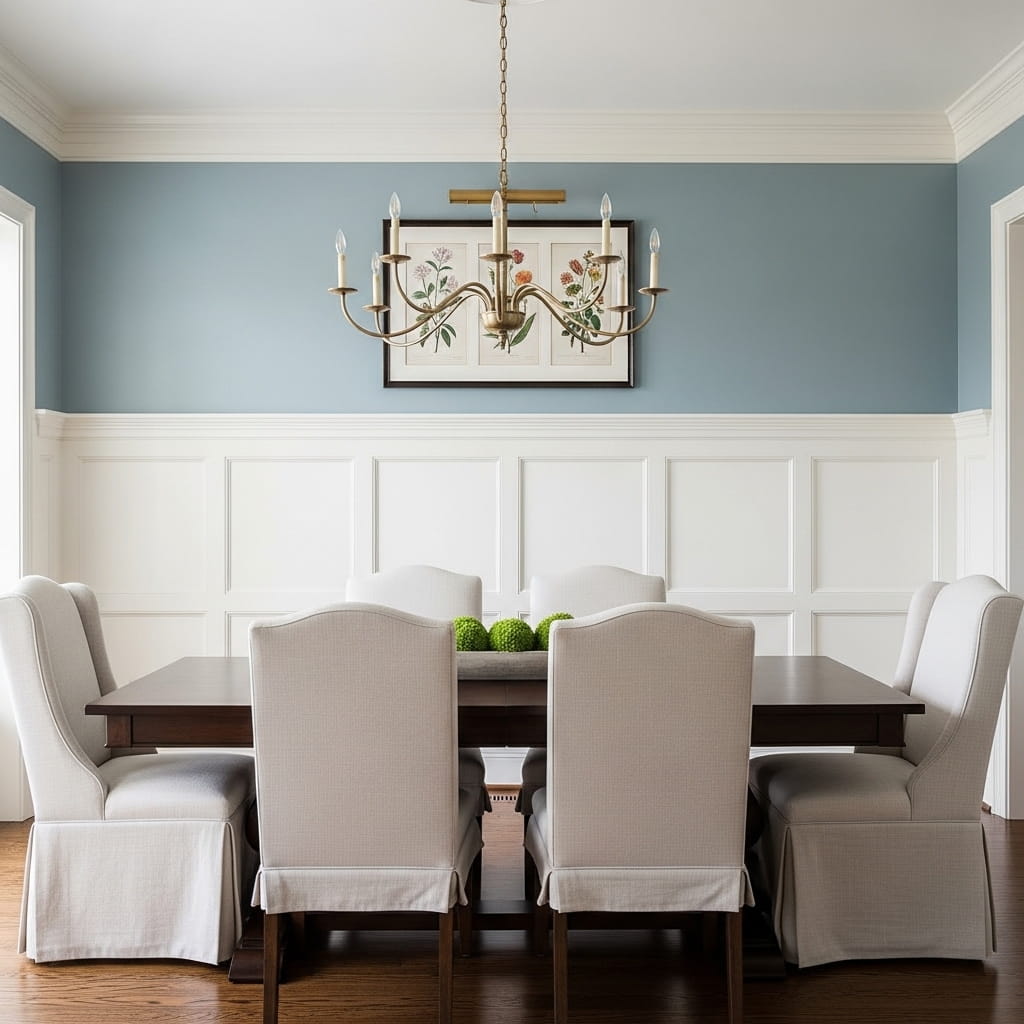
Wainscoting panel walls instantly elevate any room’s architectural quality, adding a sense of craftsmanship, elegance, and timeless structure that no paint color or wall art achieves alone. This classic wall treatment — covering the lower third to half of each wall with decorative paneling — has defined well-designed American homes for over two centuries and continues leading interior design trends confidently in 2026. Furthermore, modern MDF wainscoting kits available at major home improvement stores make this traditionally carpentry-intensive project genuinely accessible for motivated DIY homeowners without professional skills. I’ve seen a simple board-and-batten installation completely transform a plain dining room into a space that feels custom-built and architect-designed. Additionally, painting wainscoting crisp white against a colored upper wall creates a beautifully classic two-tone effect that photographs exceptionally well for Pinterest.
- Adds instant architectural elegance to rooms
- DIY wainscoting kits simplify installation
- Classic two-tone effect photographs beautifully
- Transforms dining rooms and entryways dramatically
- Works in both traditional and modern homes
Choosing the correct wainscoting height for your specific room proportions is the most important design decision in this entire project. Moreover, standard wainscoting typically sits between 32 and 36 inches from the floor, which suits rooms with standard 8-foot ceilings comfortably and proportionally. Therefore, in rooms with taller 9 or 10-foot ceilings, raising the wainscoting height to 42 or even 48 inches creates better visual balance and prevents the paneling from appearing stubby and disconnected from the room’s scale. In my experience, painting wainscoting the same crisp white as the ceiling while applying a deeper color on the upper wall creates the most sophisticated and classically correct result. Additionally, adding simple chair rail molding along the top edge of the wainscoting gives the paint-to-panel transition a clean, deliberate finish that elevates the entire installation significantly.
Terracotta Paint Wall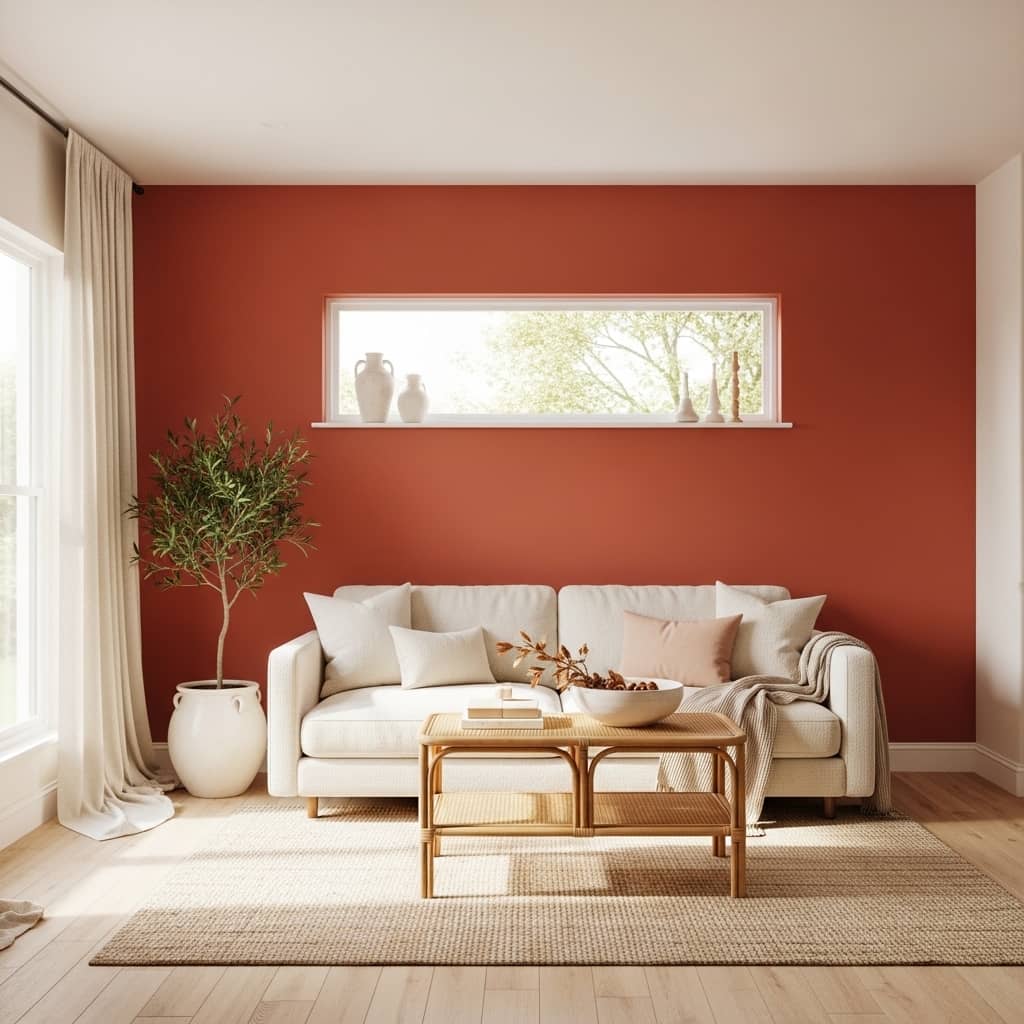
Terracotta wall paint delivers one of the warmest, most sun-drenched, and most visually grounding color transformations possible for living rooms and bedrooms heading into 2026. This deeply earthy orange-clay tone sits at the intersection of Mediterranean warmth and organic minimalism — creating a room atmosphere that feels simultaneously bold and deeply calming. Furthermore, terracotta pairs effortlessly with cream boucle, natural rattan, aged brass accessories, and linen textiles for a cohesive, nature-rooted color palette that requires almost no additional styling effort. I’ve noticed that north-facing rooms — which typically feel cold, flat, and lifeless — respond most dramatically and beautifully to terracotta paint, gaining an instant vitality that no neutral color achieves. Additionally, terracotta works powerfully as both a single accent wall and a full four-wall room treatment depending on your confidence level.
- Instantly warms cold north-facing walls
- Pairs beautifully with cream and rattan
- Works as accent wall or full room
- Earthy tone connects rooms to nature
- Matte finish looks most refined
Selecting the exact right terracotta shade for your specific room lighting conditions is the most critical step before purchasing a single paint can. Moreover, terracotta shades vary enormously — from pale peachy clay to deep burnt sienna — and the same paint chip looks completely different under natural daylight versus warm evening lamp glow. Therefore, always test at least three different terracotta samples painted as large swatches directly on your wall and observe each swatch across morning light, afternoon sun, and evening lighting before committing. In my experience, shades with slightly warm yellow-green undertones perform most beautifully in rooms with limited natural light, while cooler red-clay tones suit bright, generously lit spaces more naturally. Additionally, pairing terracotta walls with white linen curtains that pool softly on the floor adds a romantic, editorial contrast that feels effortlessly styled and genuinely luxurious.
Pegboard Styled Display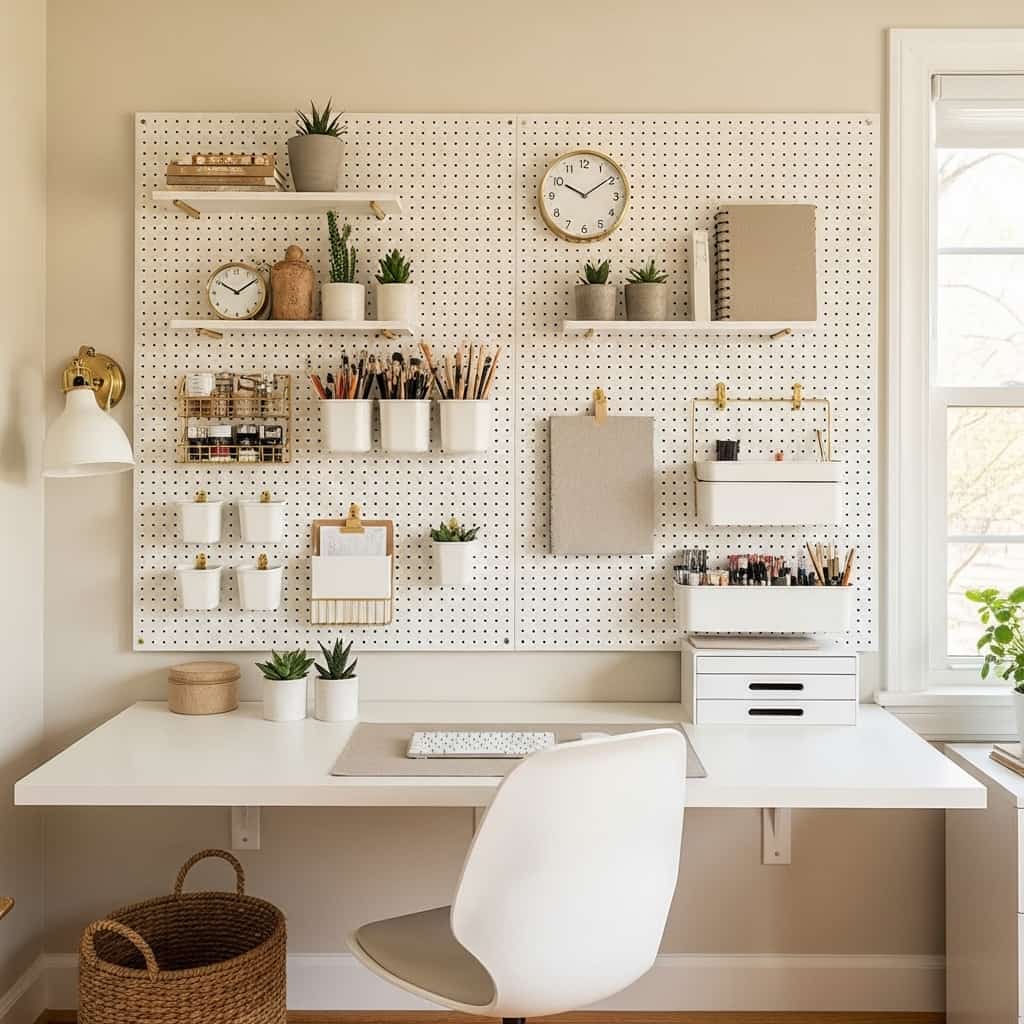
A styled pegboard wall is one of the most brilliantly functional and endlessly flexible wall systems available for home offices, craft rooms, kitchens, and creative studio spaces in 2026. The modular hook-and-shelf system allows your entire wall layout to evolve continuously as your needs, tools, or decorative preferences shift — without ever requiring a new wall hole or permanent modification. Furthermore, painting a pegboard in white, sage green, or matte black before installation transforms it from a utilitarian workshop accessory into a genuinely stylish, Pinterest-worthy design feature. I’ve used a white pegboard wall in a compact home office and the transformation was remarkable — every supply had a designated, visible, and accessible place, while the room simultaneously felt organized, calm, and creatively energized. Additionally, mixing small potted plants, framed art prints, and decorative objects among the functional hooks elevates the pegboard well beyond pure utility.
- Endlessly adaptable without new wall holes
- Combines practical storage with visual display
- Paint white or sage green for style
- Mix hooks with plants and decorative objects
- Transforms small offices and craft rooms
Installing a pegboard wall correctly requires mounting it slightly away from the wall surface — not flush against it — which creates the clearance necessary for hooks to insert properly into the board’s holes. Moreover, a pegboard mounted completely flat against the wall surface makes hook insertion impossible and renders the entire organizational system completely non-functional from day one. Therefore, use small wooden spacer blocks — approximately half an inch thick — between the pegboard’s back surface and the wall at every mounting screw location before final installation. In my experience, planning your entire pegboard layout on graph paper before installation — mapping exactly which zones will hold tools, plants, shelves, and art — prevents a frustrating process of constant rearrangement after the board is already mounted. Additionally, grouping similar items into dedicated zones creates a visually balanced and functionally logical wall system that genuinely improves daily creative workflow.
Peel-and-Stick Wallpaper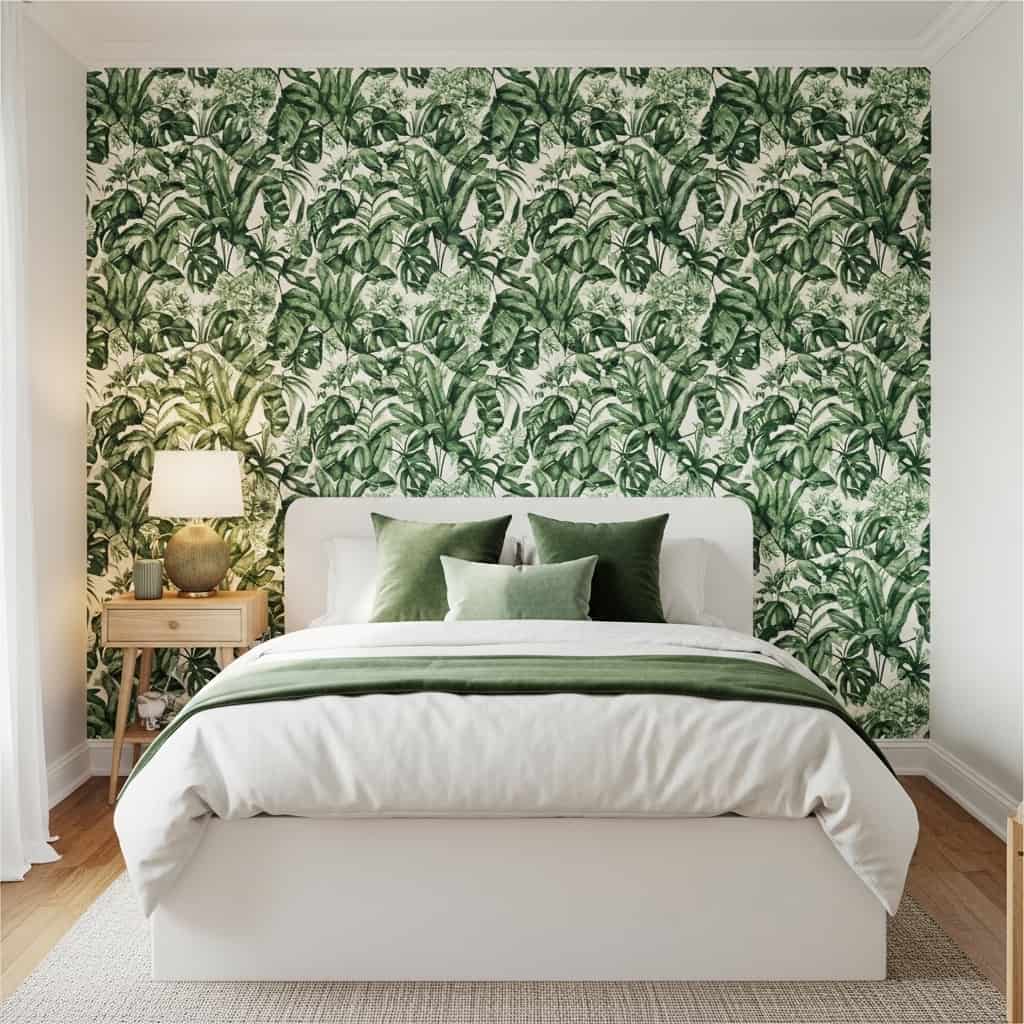
Peel-and-stick wallpaper has completely revolutionized wall decorating for renters, students, and anyone wanting dramatic pattern and color without permanent commitment or professional installation costs. Modern peel-and-stick options available in 2026 feature photorealistic textures — grasscloth weave, linen, marble, and botanical illustrations — that look virtually indistinguishable from traditional wallpaper at a fraction of the cost and effort involved. Furthermore, quality peel-and-stick wallpapers remove cleanly from painted walls without leaving adhesive residue or causing any paint damage, making them genuinely ideal for rental properties across the United States. I’ve installed botanical peel-and-stick wallpaper in a bedroom entirely alone and the process took under three hours with no professional tools whatsoever. Additionally, the sheer variety of available patterns — dark florals, soft Scandi geometrics, and textured grasscloth — means this option suits virtually every personal aesthetic.
- Renter-friendly with zero wall damage
- Removes cleanly without adhesive residue
- Realistic textures mimic traditional wallpaper
- Full installation possible in under three hours
- Hundreds of patterns suit every room style
Achieving perfectly aligned, bubble-free peel-and-stick wallpaper requires a patient, methodical approach rather than rushing through the application process. Moreover, peeling the entire backing sheet at once creates alignment errors and stubborn air bubbles that become extremely difficult to remove once the adhesive bonds to the wall surface. Therefore, peel the backing only three to four inches at a time, smoothing each newly exposed section firmly with a flat plastic squeegee tool before exposing the next portion below. In my experience, starting every panel from the same vertical plumb line — carefully checked with a bubble level — prevents the entire pattern from gradually drifting off alignment across a wide wall. Additionally, trimming edges cleanly at ceiling lines, baseboards, and window frames using a sharp craft knife pressed against a metal straight-edge ruler creates a crisp, professional finish that clearly separates a polished DIY result from an obviously amateur one.
Neon Sign Accent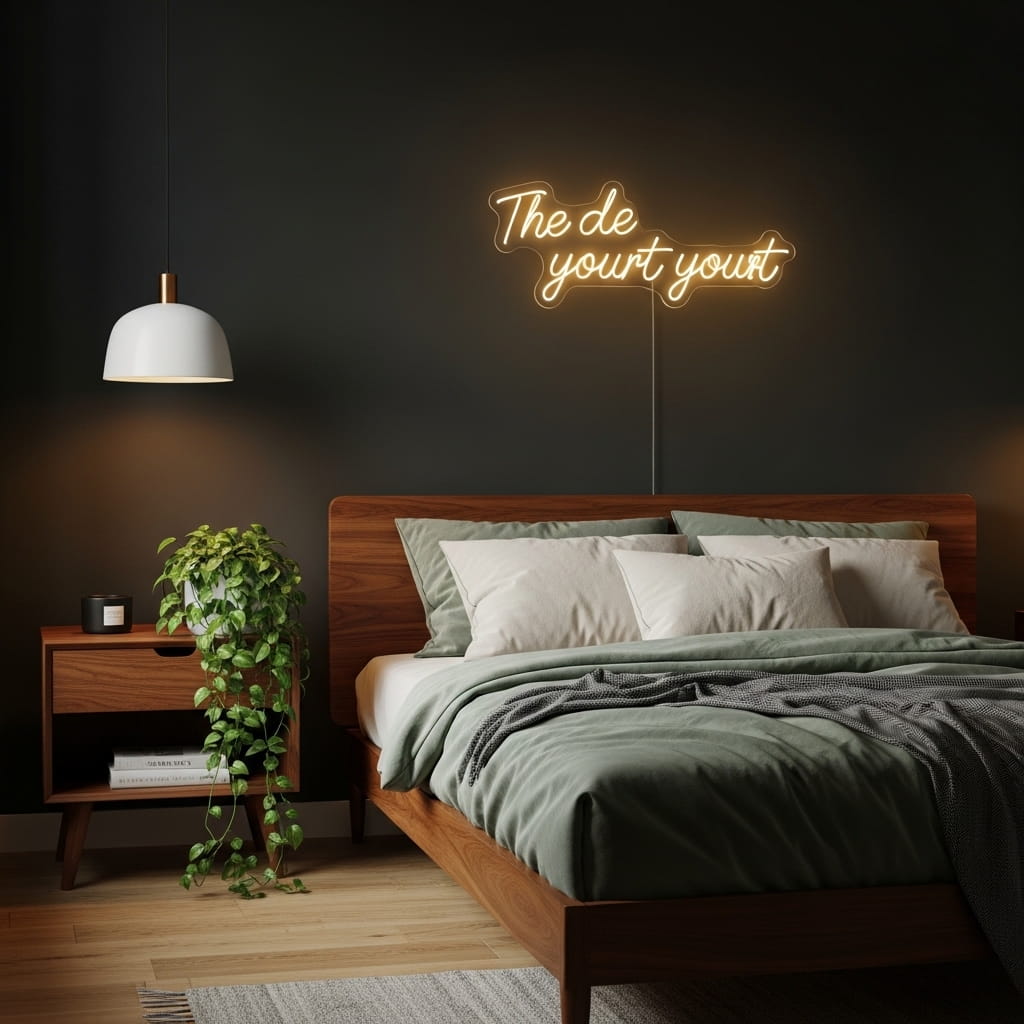
A neon sign accent wall transforms a plain, personality-free bedroom or home office into a space with immediate mood, character, and visual energy that guests notice the moment they enter the room. Modern LED neon signs consume very little electricity, produce minimal heat, and last up to 50,000 hours — making them a genuinely practical and visually compelling room addition for everyday living. Furthermore, fully custom neon signs let you display your name, a favorite motivational word, a meaningful phrase, or a simple shape that reflects your personality authentically and specifically. I’ve seen this single addition completely change the atmosphere of a compact home office, a photography studio, a teen bedroom, and even a sophisticated home bar setup. Additionally, the warm amber or soft white glow of a well-placed neon sign creates an inviting, editorial ambiance that photographs strikingly well for social media sharing.
- Creates instant mood and personal character
- LED versions last up to 50,000 hours
- Fully customizable with words and shapes
- Works in bedrooms, offices, and home bars
- Warm glow adds cozy evening ambiance
Mounting your neon sign against a dark painted wall amplifies its visual impact dramatically compared to placing it on a standard white surface. Moreover, a deep charcoal, rich navy, or forest green wall makes the neon light glow with significantly more intensity and visual contrast than any light-colored background provides. Therefore, consider painting just one accent wall in a deep tone specifically to maximize the neon sign’s dramatic visual effect without committing to dark paint throughout the entire room. In my experience, dimming all overhead lights and allowing the neon sign to serve as the primary ambient light source in the evening creates an incredibly cozy, atmospheric, and almost hotel-like bedroom environment. Additionally, pairing the neon sign with soft warm string lights draped along the same wall builds a layered, multi-source lighting scheme that feels genuinely luxurious rather than simply decorative.
Dried Botanical Display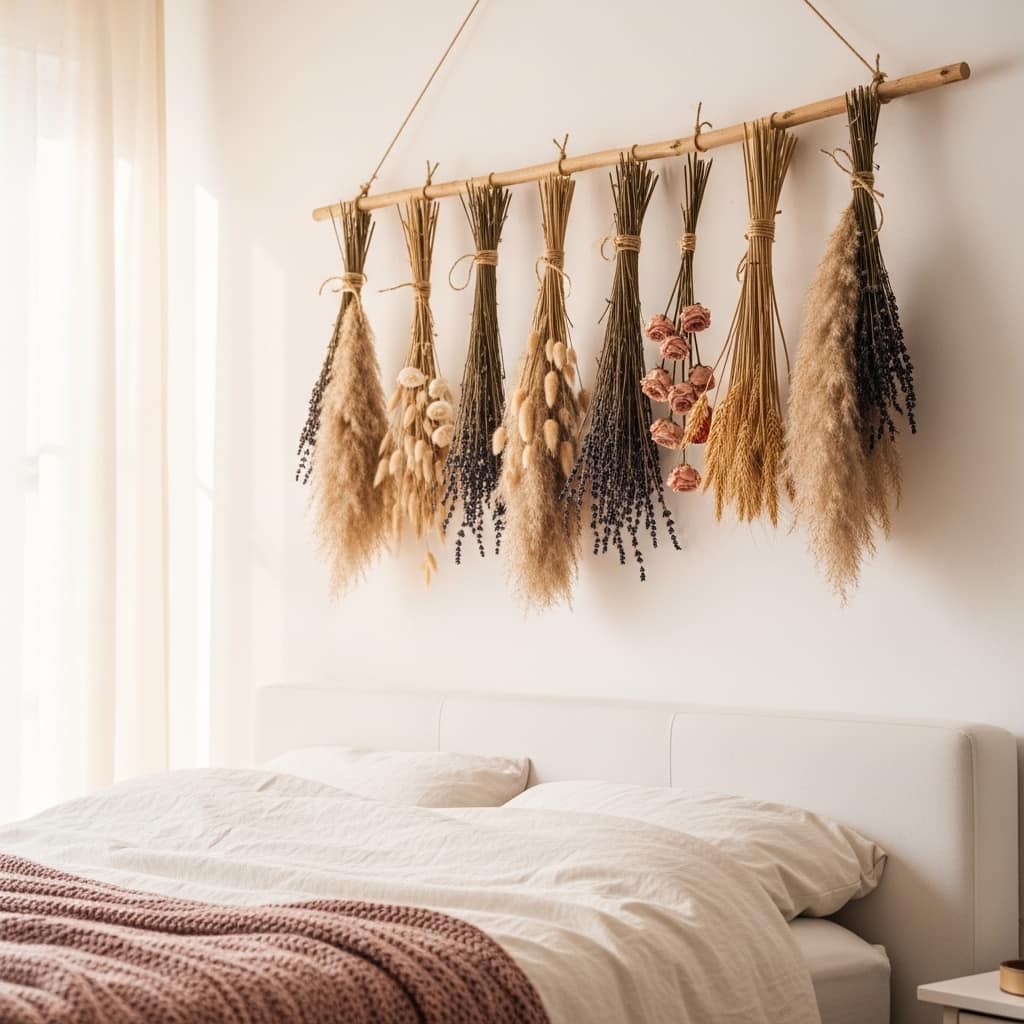
Dried botanical wall displays are one of the most romantically beautiful, organically textured, and effortlessly low-maintenance wall decor solutions surging in popularity for 2026 home interiors. Unlike fresh flowers, dried botanicals require absolutely zero watering, zero maintenance, and last between one and three years with minimal care — delivering ongoing visual beauty at a one-time cost. Furthermore, the muted, dusty tones of dried pampas grass, lavender, wheat stalks, and preserved roses complement almost every neutral interior color palette with a quiet, cottagecore sophistication. I’ve created a simple dried botanical wall display using a wooden dowel and natural twine from a local craft store — the total materials cost was under $25 and the result genuinely looked like a professionally styled editorial bedroom. Additionally, the gentle fragrance that dried lavender and roses retain for several months adds a sensory richness that no printed art ever provides.
- Zero maintenance after initial installation
- Lasts one to three years easily
- Cottagecore romantic aesthetic instantly
- Subtle fragrance adds sensory richness
- Budget-friendly DIY option under $25
Building a dried botanical wall display with genuine visual richness requires deliberate variety in the botanical types, heights, and textures you select and combine. Moreover, using a single botanical type throughout the entire display — only pampas grass, for example — creates a sparse, one-dimensional result that lacks the layered abundance the best dried botanical displays consistently achieve. Therefore, combine at least three to five distinctly different botanical varieties — feathery pampas, compact lavender bundles, delicate preserved rose stems, wispy wheat stalks, and trailing eucalyptus — for a display that feels genuinely lush and abundant. In my experience, gathering all selected botanicals into a cohesive, unified color story — blush, cream, and dusty sage — creates a far more sophisticated final display than mixing unrelated colors without a clear connecting palette. Additionally, refreshing one or two bundle varieties each season keeps the display feeling intentionally curated and perpetually current.
Wood Plank Accent Wall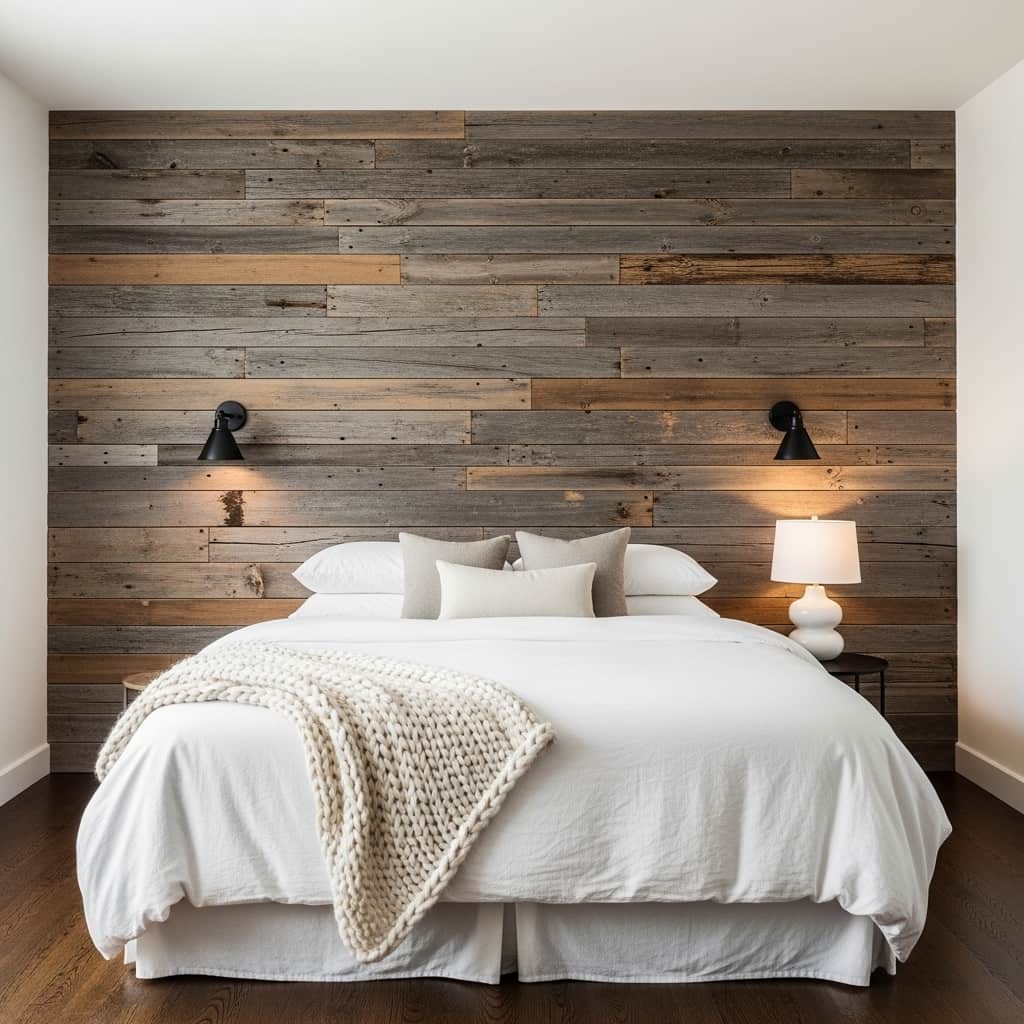
A reclaimed wood plank accent wall creates an immediate sense of warmth, history, and natural texture that transforms any plain bedroom or living room into a space with genuine soul and distinctive character. The weathered gray and warm brown tones of reclaimed lumber carry decades of natural aging that new wood simply cannot replicate — making every reclaimed wood wall entirely unique to the specific home it occupies. Furthermore, wood plank accent walls work powerfully behind beds, sofas, and fireplace mantels — wherever you want a strong textural focal point that commands immediate visual attention and anchors the entire room composition. I’ve seen this wall treatment work equally beautifully in rustic farmhouse bedrooms and in sleek modern industrial living rooms where natural wood provides essential warmth against otherwise cold, hard finishes. Additionally, pre-cut reclaimed wood accent wall kits now widely available online simplify the installation process significantly for DIY homeowners.
- Each reclaimed wood wall is completely unique
- Weathered tones add authentic warmth instantly
- Works in farmhouse and industrial styles
- Pre-cut kits simplify DIY wall installation
- Most impactful behind beds and sofas
Sealing your reclaimed wood plank wall with a clear matte or satin polyurethane finish protects the wood surface from moisture, dust accumulation, and everyday wear while fully preserving its natural weathered appearance and character. Moreover, unfinished reclaimed wood installed in humid rooms — particularly bathrooms and basement spaces — remains highly vulnerable to warping, splitting, and mold growth without adequate sealing protection applied promptly after installation. Therefore, always apply at minimum two full coats of clear sealer to reclaimed wood walls, paying careful attention to plank ends and any gaps between boards where moisture most easily penetrates and causes damage over time. In my experience, the spacing decision between individual planks is one of the most visually impactful aesthetic choices in the entire project — tight installation with minimal gaps creates a refined, contemporary look, while wider irregular gaps emphasize the rustic, handcrafted character more authentically.
Sculptural Wall Objects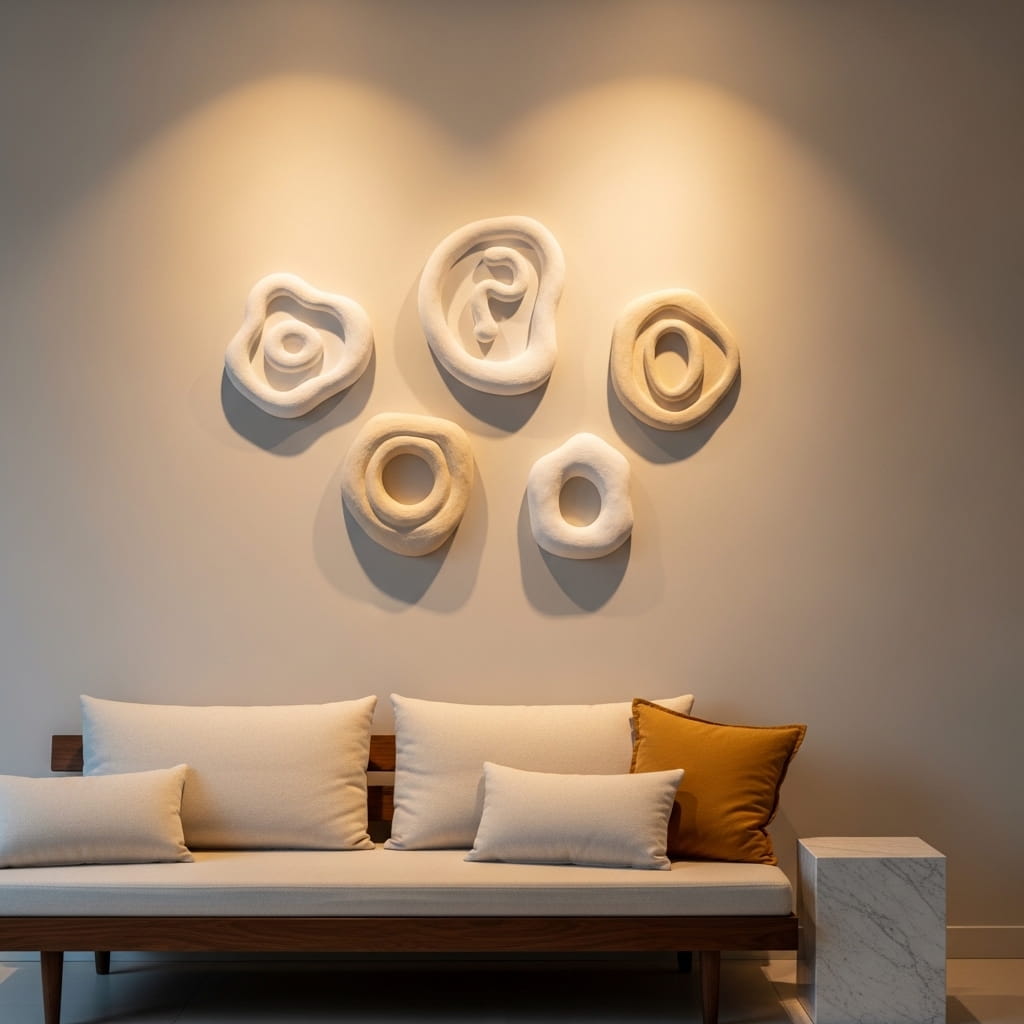
Three-dimensional sculptural wall objects represent the most exciting and elevated frontier in contemporary residential wall decorating — replacing flat printed art with organic, tactile pieces that cast their own shadows and change visual appearance as natural light moves across the wall throughout the day. These ceramic, plaster, resin, and woven sculptural wall pieces bring a genuine gallery-quality artistic sophistication to living rooms and bedrooms that conventional framed artwork simply cannot achieve. Furthermore, sculptural wall decor suits modern organic, Japandi, and minimalist interior styles where the emphasis falls entirely on material quality, texture, and considered simplicity rather than color and pattern. I’ve seen a small curated cluster of five abstract white plaster wall objects completely transform a plain greige living room wall into a genuine, conversation-starting art installation that guests consistently admire. Additionally, light and shadow across sculptural pieces change hourly throughout the day, giving the wall a living, dynamic quality.
- Three-dimensional pieces create beautiful shadow play
- Gallery-quality sophistication in residential spaces
- Light changes the wall’s appearance hourly
- Suits minimalist and modern organic styles
- Ceramic, plaster, and resin all work beautifully
Curating a sculptural wall object arrangement successfully requires thoughtful attention to the balance between the objects themselves and the negative space surrounding each individual piece. Moreover, overcrowding sculptural pieces too closely together eliminates the visual breathing room that makes each object’s unique silhouette and three-dimensional form legible and impactful from across the room. Therefore, allow at least six to eight inches of clear wall space between each sculptural piece so that every object’s individual shape reads clearly and completely against the wall background. In my experience, varying the size, projection depth, and silhouette shape of each piece within the arrangement — mixing shallow relief pieces with deeper, more projecting three-dimensional forms — creates a dynamic visual rhythm across the entire wall composition. Additionally, using matte wall paint rather than eggshell or satin finish eliminates distracting surface reflections and allows each sculptural piece’s three-dimensional quality to hold full visual attention.
Cane Webbing Panels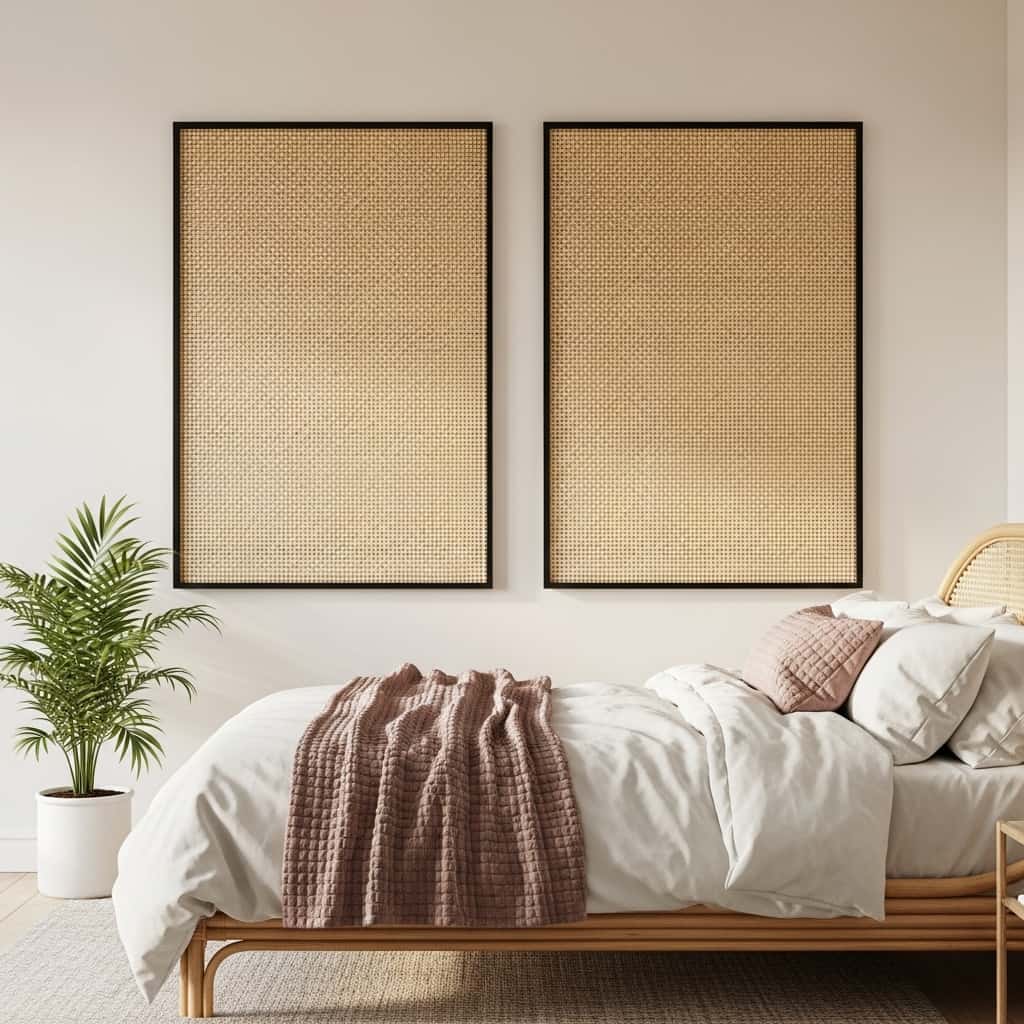
Framed cane webbing panels are one of the most quietly sophisticated and genuinely distinctive wall decor trends defining 2026 interiors — bringing a beautifully textural, nature-rooted warmth to bedrooms and living rooms that feels simultaneously modern and organically grounded. Cane webbing — the same woven rattan material used in classic mid-century furniture — stretched over a simple frame and mounted on the wall creates a three-dimensional textile art piece with remarkable visual depth and material richness. Furthermore, the natural honey tones of cane complement white, cream, sage, and terracotta walls equally well, making cane panels one of the most versatile textural wall additions available across different interior styles. I’ve noticed this style works particularly beautifully in Japandi-inspired interiors — the aesthetic blending Japanese minimalism with Scandinavian warmth — where natural materials and restrained simplicity form the primary design values. Additionally, cane panels pair seamlessly with rattan furniture and linen textiles.
- Adds dimensional natural texture to walls
- Honey tones suit most neutral color palettes
- Perfectly suited to Japandi styled interiors
- Pairs beautifully with rattan furniture
- Simple black frames keep the look refined
Building your own cane webbing panels is a highly approachable DIY project requiring only basic tools and supplies available at any home improvement or craft store. Moreover, pre-woven cane webbing sheets are widely sold by the yard online and at specialty furniture supply retailers, making material sourcing both straightforward and genuinely affordable for most budgets. Therefore, simply build or purchase a basic wooden frame, stretch the cane webbing tightly across the opening, staple it firmly to the back of the frame, and mount the finished panel exactly like conventional wall art. In my experience, creating two identical cane panels and hanging them symmetrically on either side of a bed creates a clean, designer headboard alternative that looks genuinely considered and refreshingly original. Additionally, staining the wooden frame in dark walnut or ebony finish creates a beautiful, high-contrast pairing against the natural light cane that feels confidently contemporary.
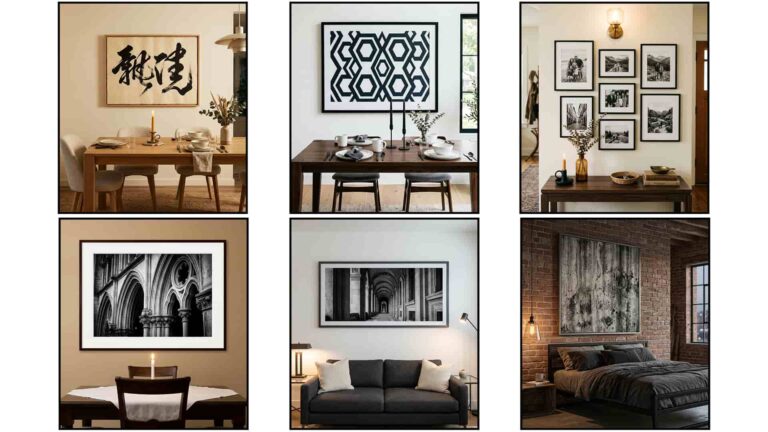
Vintage Map Art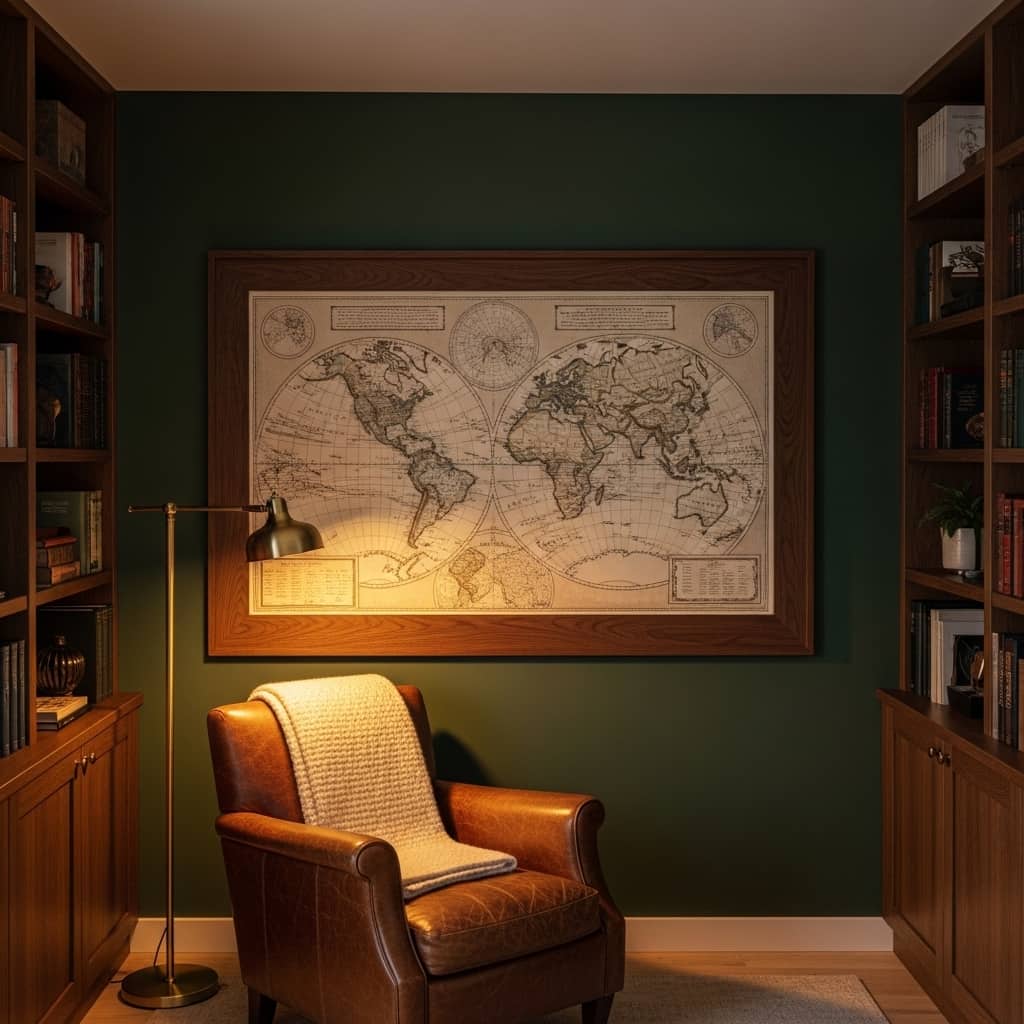
A vintage map as a primary wall art piece creates an immediate sense of worldly curiosity, intellectual sophistication, and warm historical character in any room it occupies. This wall art approach works particularly powerfully in home libraries, studies, living rooms, and masculine-leaning spaces where communicating depth, adventurousness, and intellectual personality through the room design matters greatly. Furthermore, a large antique world map in a wide walnut or aged black frame becomes an immediate, undeniable conversation starter for every guest who enters the room. I’ve seen this single piece completely anchor a dark, moody reading nook and give an otherwise ordinary corner a fully cohesive, deeply intentional personality. Additionally, vintage maps come in an enormous variety of forms — nautical charts, city street maps, botanical expedition records, and antique world atlases — each telling a completely different visual story.
- Adds worldly, intellectual character instantly
- Anchors dark moody reading nooks perfectly
- Multiple map styles tell different stories
- Sparks conversation among guests every time
- Sepia tones warm up modern interiors
Scaling your vintage map art correctly to your wall transforms it from a standard decorative print into a true architectural statement that defines the entire room. Moreover, a vintage map reproduction that fills the majority of a large wall creates the visual effect of a custom mural without the permanent commitment or installation cost. Therefore, look for high-quality reproductions printed at 36 by 48 inches or larger for maximum visual impact in medium to large rooms with significant wall space available. In my experience, pairing a vintage world map with a deeply colored painted wall — hunter green, navy, or rich charcoal — creates an exceptionally layered, atmospheric, and visually impressive look that feels both cozy and intellectually inspiring simultaneously. Additionally, mounting a small brass picture light directly above the map frame elevates the entire display to a near-gallery quality presentation. That’s why vintage cartography remains a consistent favorite among designers styling masculine and academic-influenced interiors.
String Light Wall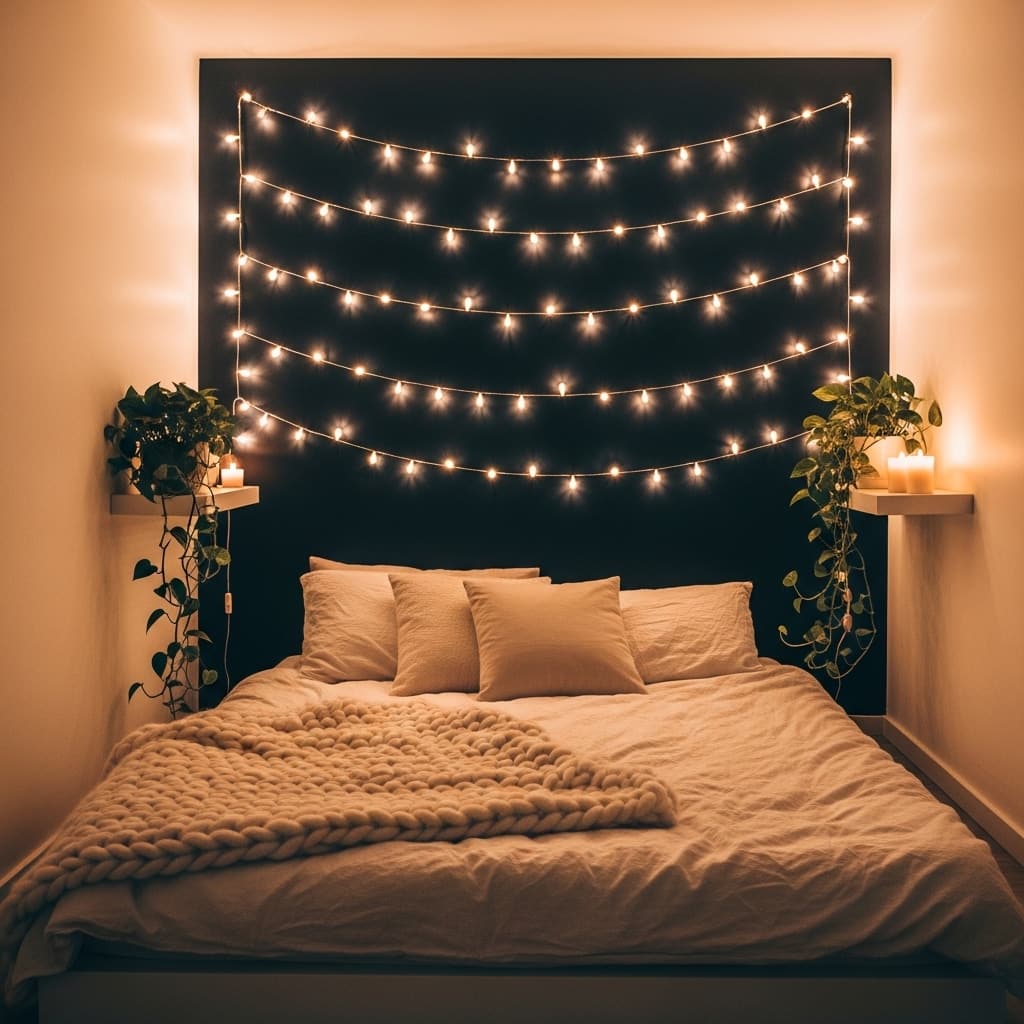
String lights draped artfully across a bedroom wall create one of the most instantly warm, dreamy, and emotionally atmospheric room transformations achievable at an almost impossibly accessible price point. A single quality set of warm white fairy lights — typically available for between $10 and $25 — completely changes the emotional atmosphere of a bedroom, reading nook, or small apartment living room during evening hours. Furthermore, string lights perform especially powerfully against dark accent walls where the warm glow creates a beautiful, luminous contrast that feels genuinely magical and deeply inviting. I’ve tried this in a compact bedroom and the transformation from harsh overhead lighting to soft layered fairy light ambiance was remarkable — the room suddenly felt calm, intentional, and warmly designed rather than simply furnished. Additionally, string lights mount entirely with small adhesive hooks that remove cleanly, making this approach completely renter-friendly.
- Transforms bedroom atmosphere for under $25
- Warm white glow suits every room aesthetic
- Adhesive hooks keep it fully rental-friendly
- Pairs beautifully with dark accent walls
- Creates cozy intimate evening ambiance
Creating a beautiful and intentional string light wall display requires thoughtful, consistent draping rather than simply pinning lights randomly across the surface without a plan. Moreover, consistent, evenly spaced horizontal loops create a clean, deliberate backdrop that looks genuinely designed rather than casually improvised with leftover holiday lights. Therefore, measure the full wall width carefully and divide it into equal horizontal sections before installing your first adhesive hook, ensuring all light loops fall at perfectly uniform intervals from ceiling to headboard. In my experience, combining a string light wall with two or three small floating shelves on the same surface — holding candles, trailing plants, and small framed photos — builds a fully layered, multi-dimensional bedroom wall feature with remarkable visual richness. Additionally, selecting string lights with a warm 2700K color temperature rather than cool white creates a noticeably more intimate, flattering, and genuinely cozy glow that transforms the bedroom atmosphere after dark.
Abstract Canvas Art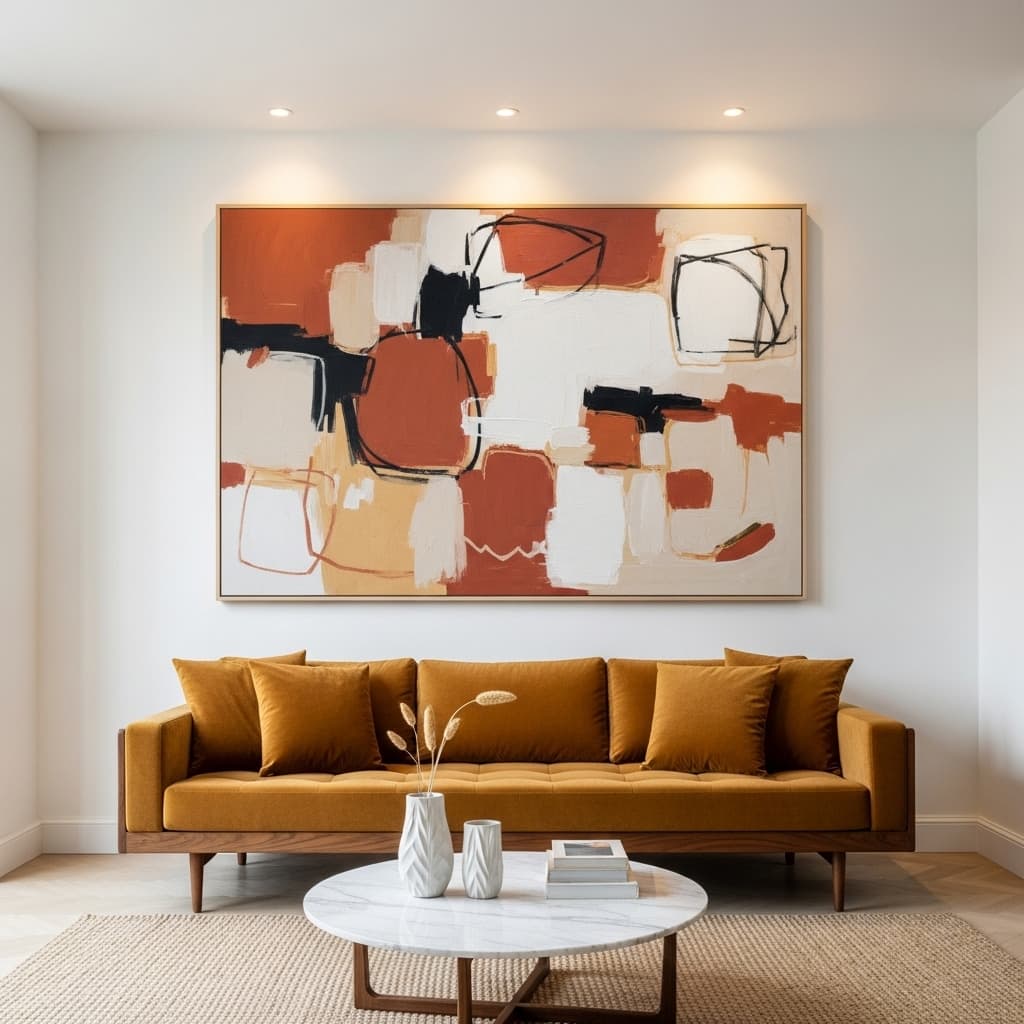
A single oversized abstract canvas instantly anchors an entire living room design scheme and communicates a confident, sophisticated aesthetic sensibility that elevates every other element in the room around it. Abstract art carries a unique power in interior design because it introduces color, movement, and emotional atmosphere into a space without being literal, decorative, or visually busy in a distracting way. Furthermore, an abstract canvas in warm terracotta, deep ochre, and cream tones bridges the gap between a neutral sofa and a room that still urgently needs personality, visual warmth, and a clearly defined focal point. I’ve noticed that choosing abstract art by deliberately pulling one or two of its dominant colors into your throw pillows or area rug creates a cohesive, considered room palette that looks genuinely and thoughtfully designed. Additionally, oversized canvases — 36 by 48 inches or larger — command immediate presence and transform any wall from backdrop into bold statement.
- One large piece anchors entire room schemes
- Introduces color and emotion without visual noise
- Pull canvas colors into pillows and rugs
- Oversized scale commands instant wall presence
- Suits modern, transitional, and eclectic styles
Hanging abstract canvas art at the correct wall height is essential for achieving the clean, gallery-quality result that makes this decor approach so visually powerful. Moreover, the single most common hanging mistake homeowners consistently make is positioning wall art too high, which disconnects the artwork visually from the furniture sitting below and makes the room feel unbalanced and oddly proportioned. Therefore, always hang the center of your canvas at approximately 57 to 60 inches from the floor — the universally accepted standard eye-level height used in professional galleries worldwide. In my experience, choosing one very large single abstract canvas rather than grouping several smaller ones together creates a dramatically more sophisticated, confident, and intentional result in any living room. Additionally, installing a small directional recessed spotlight or a slim picture light mounted above the canvas gives the painting a museum-quality illumination that genuinely transforms the room’s atmosphere after dark.
Geometric Wall Stencil
Geometric wall stencils deliver the bold visual impact of designer wallpaper at a tiny fraction of the cost — making them one of the smartest and most satisfying budget-friendly wall styling choices available for home offices, bedrooms, and dining rooms in 2026. A single reusable stencil paired with two small cans of paint can transform an entire accent wall for under $40 total — a result that regularly costs several hundred dollars when using premium peel-and-stick or traditional wallpaper options. Furthermore, geometric patterns add visual structure, rhythmic energy, and a sophisticated graphic quality to rooms that currently feel flat, underdeveloped, and without a clear design identity. I’ve seen a simple diamond stencil pattern in dusty blue on a white bedroom wall completely redefine the room’s personality from builder-basic to confidently and intentionally designed. Additionally, tone-on-tone stenciling using two closely related shades of the same color creates an elegant subtle textural effect that feels quietly luxurious.
- Designer wallpaper look at under $40
- One stencil creates unlimited pattern options
- Tone-on-tone creates subtle luxury texture
- Suits home offices and bedroom accent walls
- Fully reversible with fresh wall paint
Executing a clean, professional-looking stencil result requires patience and an extremely light hand with paint application at every single stage. Moreover, loading too much paint onto the stencil brush is consistently the most common beginner mistake — causing paint to bleed under the stencil edges and destroying the crisp geometric lines that make the pattern look sharp. Therefore, always off-load the majority of paint from your brush onto a paper towel before lightly pressing it against the wall using a gentle, controlled dabbing motion rather than brushing strokes. In my experience, securing the stencil firmly to the wall with low-tack painter’s tape before every single application prevents shifting and keeps each pattern repeat perfectly aligned across a large wall. Additionally, stepping back and checking overall alignment from a distance of at least six feet after every four to five repeats catches any cumulative pattern drift before it becomes visually noticeable. That’s why careful stenciling rewards patience with genuinely stunning results.
Oversized Wall Clock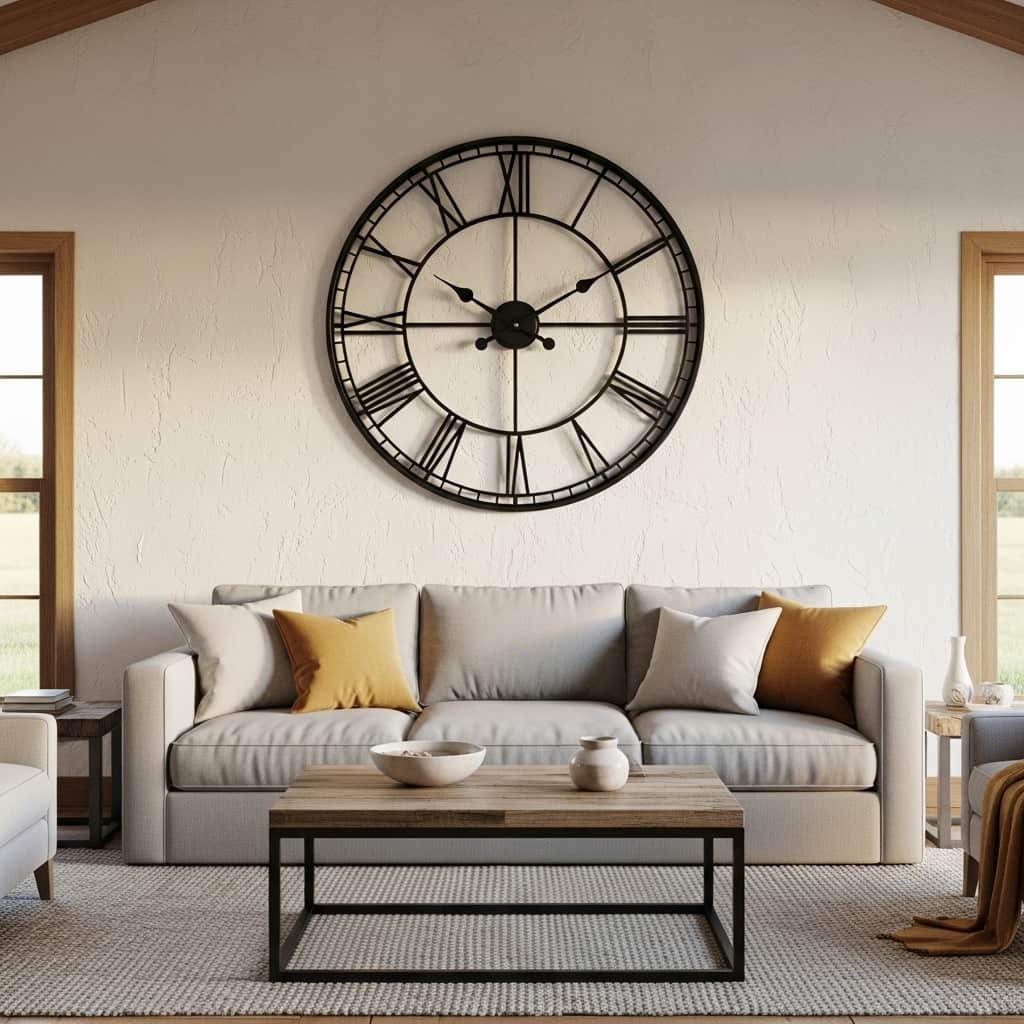
An oversized wall clock is one of the most functionally justified and visually commanding statement pieces you can introduce to any living room, kitchen, or entryway wall — delivering both practical purpose and genuine decorative impact from a single investment. A large clock measuring 30 inches or wider carries the full visual weight of a significant art piece while serving an everyday function that completely justifies its prominent placement on your most visible wall surface. Furthermore, the right oversized clock in a carefully chosen finish instantly anchors a room’s entire aesthetic direction and gives the space a polished, designer-curated quality that single art prints rarely achieve alone. I’ve noticed that large clocks work particularly powerfully in open-plan living areas where one commanding statement piece above the sofa is far more effective than a complex multi-piece gallery arrangement. Additionally, matte black metal frames suit industrial and modern farmhouse interiors beautifully.
- Functions as both art and practical timepiece
- 30-inch minimum creates true statement impact
- Matte black suits farmhouse and industrial styles
- Anchors open-plan living room walls effectively
- Silent quartz movement eliminates distracting ticking
Positioning your oversized wall clock at the correct height ensures it maintains strong visual connection to the furniture below rather than floating disconnected in the upper wall zone. Moreover, hanging the clock’s center point at approximately 57 to 60 inches from the floor — consistent with standard art hanging guidelines — keeps it grounded within the room’s overall visual composition and furniture relationship. Therefore, resist any temptation to push the clock higher simply because of its large circular size — the standard eye-level hanging rule applies regardless of a piece’s shape or dimensions. In my experience, pairing an oversized farmhouse clock with a simple arrangement of two or three small botanical prints flanking it symmetrically on either side creates a cohesive, layered wall composition without overcrowding the space. Additionally, selecting a clock with a silent quartz movement rather than a mechanical ticking mechanism eliminates the surprisingly distracting sound that older clockwork movements produce in quiet rooms and open-plan living spaces.
Tapestry Fabric Wall
A large fabric tapestry covering an entire bedroom wall is one of the fastest, most dramatically transformative, and most affordable room updates available — particularly for renters, students, and anyone decorating a temporary living space on a genuinely tight budget. A single large woven tapestry can completely conceal ugly painted walls, cover damaged plaster, or inject bold color and rich pattern into a room that currently feels depressingly plain and uninspiring. Furthermore, tapestries work especially powerfully in small apartments and dormitory rooms where wall art budget is minimal but the need for visual personality and warmth is urgent. I’ve noticed that hanging a tapestry using a slim wooden dowel rod along its top edge creates a clean, polished mounting solution that looks genuinely intentional rather than improvised. Additionally, globally inspired patterns — Moroccan geometric lattice, Indian block print, and Andean textile designs — add cultural richness and visual depth to minimally furnished rooms.
- Covers damaged walls and ugly paint instantly
- Affordable and completely rental-friendly solution
- Wooden dowel mounting looks polished and clean
- Global patterns add rich cultural character
- Bold color transforms plain rooms dramatically
Choosing the correct tapestry size for your bedroom wall prevents the most visually damaging and most common mistake: hanging a small decorative piece on a large wall where it reads as lost, tentative, and unintentional. Moreover, for a truly dramatic full-wall effect, measure your exact wall dimensions and order a tapestry that covers at minimum 80 percent of the total wall height and width for genuine visual impact. Therefore, most standard queen or king bedroom walls require a tapestry measuring at least 60 by 80 inches for adequate visual coverage and presence. In my experience, layering a tapestry wall with a small floating shelf mounted directly in front of it — holding candles, a small plant, and a decorative object — adds foreground depth and prevents the wall from reading as completely flat and one-dimensional. Additionally, using removable adhesive strips or tension curtain rod brackets to mount the tapestry ensures zero wall damage upon removal.
Pressed Flower Frames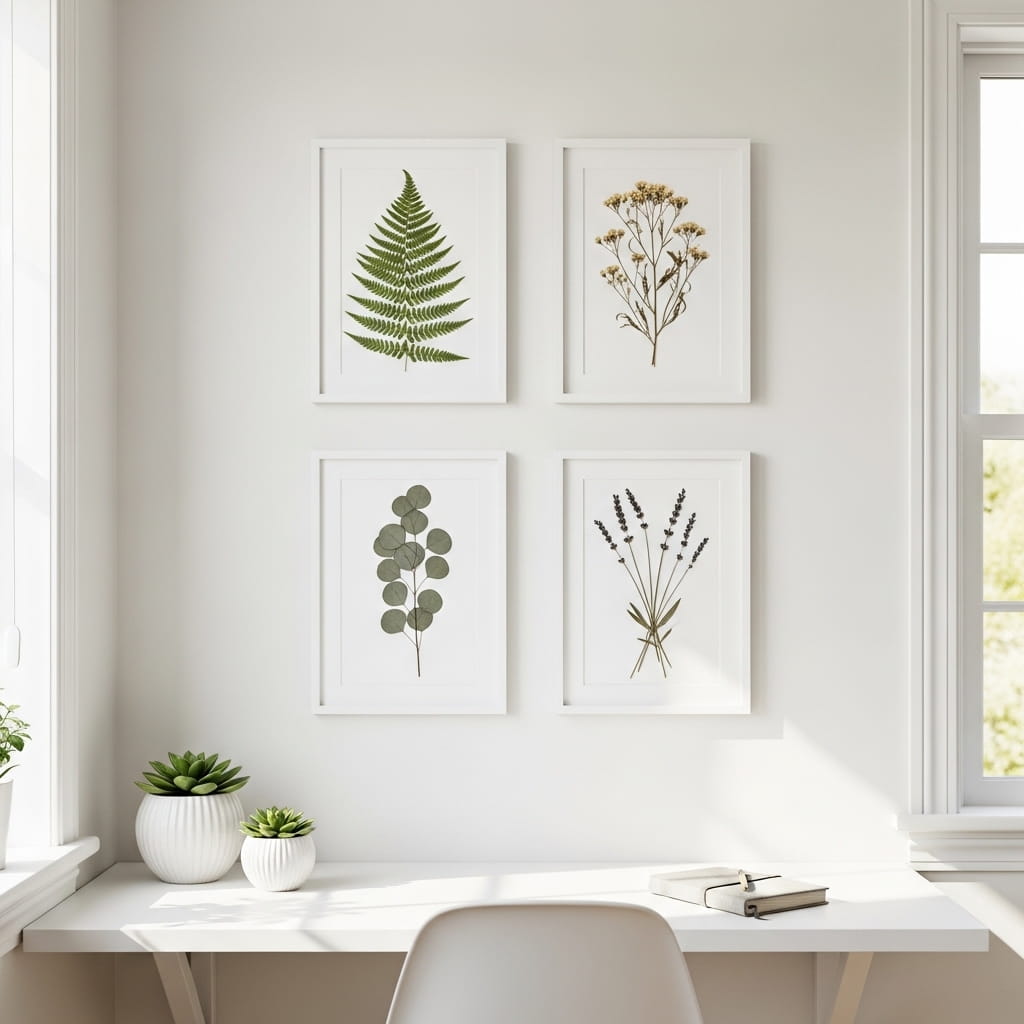
Pressed flower and botanical specimen frames bring a quiet, scientifically considered, and deeply personal beauty to home walls that feels simultaneously artistic, educational, and genuinely one-of-a-kind. This wall art style draws directly from the Victorian tradition of botanical specimen collection and translates its refined aesthetic into a contemporary, fresh approach that suits modern organic, Scandinavian, and cottagecore interiors with remarkable elegance. Furthermore, pressing and framing your own botanicals — gathered from your garden, a local park, or a weekend farmers’ market — creates wall art carrying personal meaning and memory that no commercially produced print can possibly replicate. I’ve made several pressed botanical frames using flowers gathered from my own garden, and the pressing process requires only two to three weeks of drying time between heavy books. Additionally, the natural color variation in pressed specimens creates a nuanced, muted palette that works harmoniously with almost every neutral room scheme.
- Creates deeply personal, meaningful wall art
- Press garden botanicals for free specimens
- Two to three weeks produces press-ready specimens
- Suits Scandinavian and cottagecore interiors beautifully
- Natural muted tones complement every neutral palette
Building a visually cohesive set of pressed botanical frames requires careful consistency in your framing choices that unifies the entire collection despite natural variation between individual pressed specimens. Moreover, selecting identical white or black frames with matching mat board color across every piece in the arrangement creates a clean, gallery-quality presentation that elevates even simple pressed wildflowers into genuinely elegant wall art. Therefore, decide on your frame finish, mat board color, and final arrangement layout before beginning the pressing process — so you can intentionally collect botanical specimens with the complete finished composition already in mind. In my experience, grouping pressed specimens by plant family — all ferns together, all wildflowers together — creates a more scientifically cohesive and visually sophisticated series than mixing entirely unrelated specimens without a connecting botanical theme. Additionally, UV-protective glass in each frame preserves delicate natural colors significantly longer than standard glass.
Ladder Blanket Display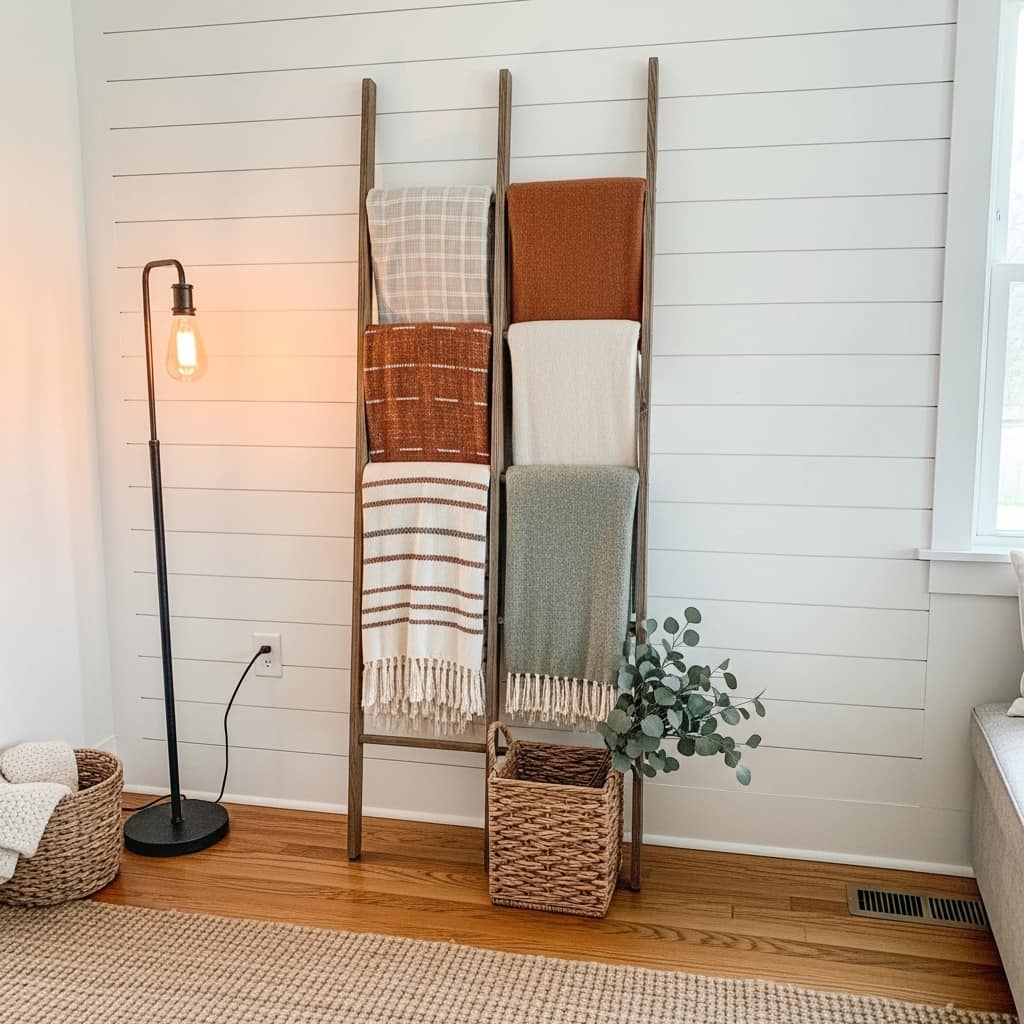
A rustic wooden ladder leaning casually against your wall creates an effortlessly stylish display that combines genuine decorative impact with practical everyday functionality in a single affordable piece. This versatile styling element works beautifully in living rooms, bedrooms, and bathrooms — holding blankets, towels, scarves, and decorative baskets while simultaneously acting as a warm sculptural accent against the wall. Furthermore, a natural wood ladder introduces organic texture and warmth to spaces that feel overly sleek, cold, or sparsely furnished without adding any visual bulk or weight to the floor plan. I’ve noticed this styling trick works especially powerfully in awkward room corners that feel empty and purposeless — instantly converting dead zones into cozy, intentional vignettes with real decorative personality. Additionally, many beginners successfully build their own blanket ladders using basic lumber and sandpaper for under $25 total.
- Turns awkward corners into cozy vignettes
- Holds blankets, towels, and decorative baskets
- Adds warm organic wood texture instantly
- Easy DIY build for under $25
- Works equally in bedrooms and bathrooms
Styling your wooden ladder with genuine visual intentionality creates a far richer and more considered result than simply draping random blankets over the rungs without a clear plan. Moreover, varying the texture, weight, and tone of each draped textile — a chunky ivory knit on the top rung, a lighter linen weave in the middle, and a woven cotton throw at the bottom — builds beautiful layered visual contrast from top to bottom. Therefore, limit your textile color palette to two or three closely complementary tones so the overall display reads as cohesive and deliberately styled rather than randomly assembled. In my experience, adding a small trailing plant, a dried eucalyptus bundle, or a single pillar candle positioned at the ladder’s base completes the entire vignette and anchors it naturally to the floor. Additionally, leaning the ladder at a consistent slight angle rather than completely flush against the wall creates a more relaxed, lived-in aesthetic that feels effortlessly styled.
Mural Wallpaper Wall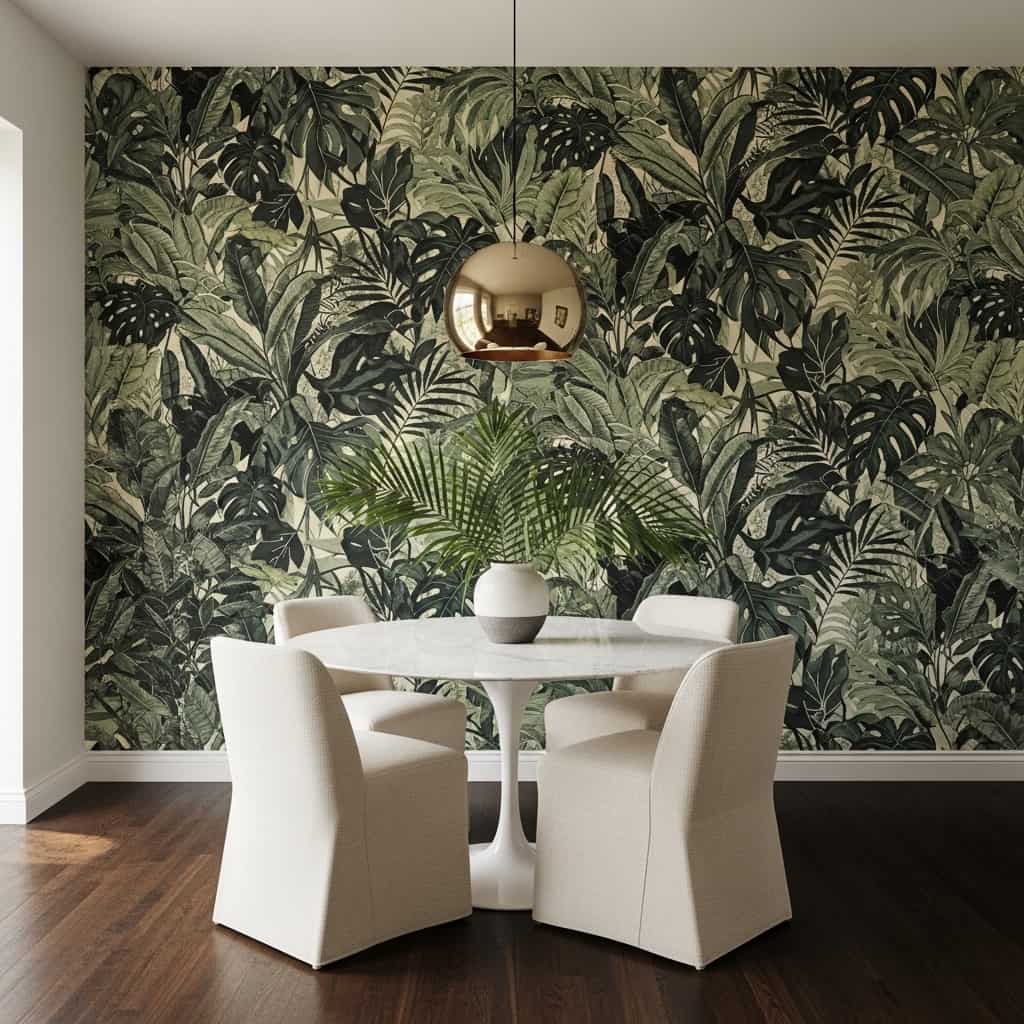
A full wall mural wallpaper installation is the single most dramatically transformative home wall decor choice available in 2026 — capable of turning a standard dining room, bedroom, or entryway into a breathtaking, fully immersive environment that feels like a completely different world. Modern mural wallpapers are available in photographic quality, hand-painted illustration style, and watercolor art finishes across thousands of subject types — from dense tropical botanicals to abstract ink washes to vintage European street scenes. Furthermore, custom sizing options mean any mural prints precisely to your exact wall dimensions, eliminating awkward pattern breaks or misaligned repeats. I’ve noticed that mural wallpaper in a dining room creates the most impactful result of all rooms — guests enter and their reaction is immediate, visceral, and consistently enthusiastic. Additionally, peel-and-stick mural options make this dramatic transformation fully accessible to renters.
- Single most transformative wall treatment available
- Photographic quality creates immersive environments
- Custom sizing fits any wall perfectly
- Dining rooms deliver the most dramatic impact
- Peel-and-stick versions suit rental apartments
Choosing the correct mural subject and dominant color palette for your specific room is the most important creative decision in this entire project. Moreover, a mural that clashes with your existing furniture colors, flooring tone, or ceiling height creates visual chaos rather than the cohesive, commanding statement you are working toward. Therefore, select a mural whose two or three dominant colors echo tones already present in your furniture upholstery, area rug, or flooring for a result that feels harmoniously designed rather than arbitrarily bold. In my experience, botanical and nature-inspired murals are the most universally successful subject choice because organic forms and natural color palettes integrate harmoniously with the widest variety of furniture styles and existing room color schemes. Additionally, installing your mural on the wall directly opposite the room’s main entrance — the first surface the eye lands on — maximizes the dramatic first impression impact every single time.
Arched Bookcase Wall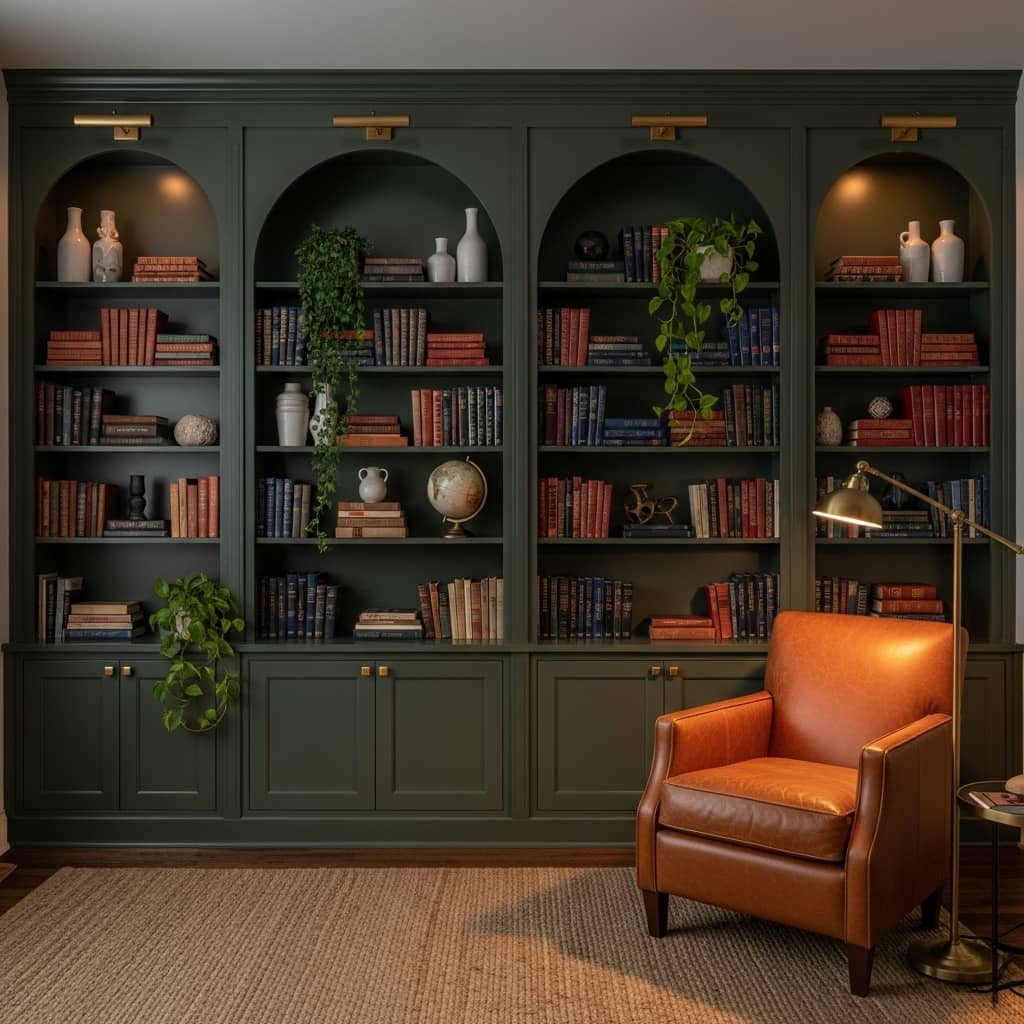
A full floor-to-ceiling arched bookcase wall is one of the most dramatically aspirational and intellectually rich home design statements possible — transforming an ordinary living room or study into a genuine personal library that communicates curiosity, depth, and sophisticated, considered taste. This approach uses the wall itself as the primary design element, converting dead vertical space into a functional, beautiful, and deeply personal display of books, collected objects, and carefully chosen decorative accents. Furthermore, painting the bookcase interior in a deep, moody tone — forest green, navy, or rich charcoal — while keeping the shelving structure itself in a complementary finish creates an incredibly layered visual depth that feels genuinely architect-designed. I’ve seen a single floor-to-ceiling arched bookcase completely redefine a previously unremarkable living room into the most impressive and memorable space in the entire home. Additionally, organizing books by spine color creates a graphic, intentional rhythm.
- Floor-to-ceiling scale creates dramatic impact
- Deep interior paint adds moody sophistication
- Organizing books by spine color looks intentional
- Combines personal library with room focal point
- Brass hardware elevates the entire installation
Styling a large bookcase wall beautifully requires a disciplined, consistent balance between books and decorative objects that prevents the display from feeling either overwhelmingly crowded or strangely sparse. Moreover, the most visually successful bookcase styling follows a reliable ratio — approximately 70 percent books to 30 percent decorative objects — distributed rhythmically and intentionally across all shelves in the unit. Therefore, break up solid rows of books with small ceramic vases, framed personal photos, trailing plants, and sculptural objects placed at irregular intervals to create visual breathing room and natural focal points throughout the display. In my experience, pulling books forward flush to the shelf edge — rather than pushing them to the back wall — creates a cleaner, more deliberate front face to each shelf that looks significantly more professionally styled. Additionally, including one dramatically oversized coffee table book laid horizontally as a display object adds valuable scale variation and editorial quality to the overall arrangement.
Woven Wall Textile
A large handwoven wall textile brings a level of tactile richness, organic warmth, and artisanal authenticity to a living room or bedroom wall that mass-produced art prints simply cannot replicate at any price point. Handwoven textiles incorporate complex interlacing of cotton, wool, jute, and natural dye yarns — creating surface patterns and color gradations that reveal new details as natural light shifts throughout the day. Furthermore, woven wall textiles work beautifully in modern organic, earthy boho, and even transitional interiors where natural materials and handcrafted quality form the foundation of the entire room’s design language. I’ve seen this single piece transform a plain living room wall into a warm, textured focal point that anchors the entire room’s color palette and sets the tonal direction for every other furnishing in the space. Additionally, woven textiles absorb sound modestly, improving a room’s acoustic comfort in a subtle but genuinely noticeable way.
- Tactile richness mass-produced art cannot replicate
- Reveals new details as daylight shifts
- Suits modern organic and boho interiors
- Anchors entire room color palette powerfully
- Modest sound absorption improves room acoustics
Selecting a woven wall textile that correctly proportions to your sofa or bed width below it is the single most important sizing decision for achieving a balanced, intentional result. Moreover, a textile that is significantly narrower than the furniture below it looks visually disconnected and too small for the space rather than deliberately chosen. Therefore, choose a woven piece that spans at minimum two-thirds the total width of the sofa or bed frame directly beneath it for proper visual relationship and proportional balance. In my experience, mounting a woven textile on a slim natural driftwood or dowel rod rather than directly stapling it to the wall creates a more refined, gallery-quality presentation that honors the handcraft quality of the piece. Additionally, pairing a large cream and rust woven textile with terracotta or warm sage painted walls creates one of the most cohesive and visually satisfying modern organic room aesthetics achievable in any home.
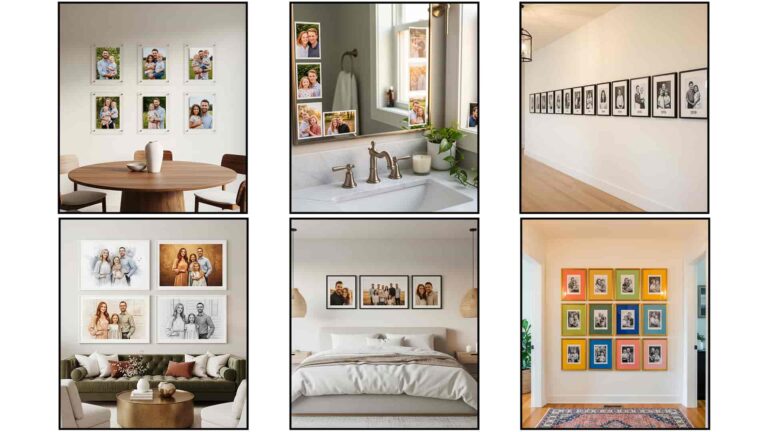
Photo Memory Wall
A curated photo memory wall is the most deeply personal, emotionally resonant, and genuinely irreplaceable wall decor approach available — filling your home with real faces, real moments, and real stories that mass-produced art can never provide. Unlike generic prints, a thoughtfully arranged collection of personal photographs transforms a plain living room or hallway wall into a daily visual celebration of the people, places, and memories that matter most to you. Furthermore, mixing candid snapshots with travel photos, printed quotes, and small art prints within a unified frame collection creates a rich, layered wall story with genuine emotional depth and visual variety. I’ve noticed that families who invest time in creating a dedicated photo memory wall consistently report feeling a stronger emotional connection to their home and a greater daily sense of warmth and belonging within it. Additionally, natural wood and black frame mixes create a cohesive look across varied photo subjects.
- Most personal and emotionally resonant wall idea
- Mixes photos, quotes, and art prints naturally
- Creates daily celebration of meaningful memories
- Natural wood and black frames complement perfectly
- Works beautifully in living rooms and hallways
Building a beautiful photo memory wall requires careful pre-planning of the layout on the floor before a single nail enters the wall surface. Moreover, arranging all frames flat on a large rug or open floor space allows you to experiment freely with balance, spacing, and composition without making any irreversible decisions. Therefore, trace each frame onto brown paper, cut the templates out precisely, and tape them to the wall for a completely accurate, commitment-free full-size preview of the final arrangement. In my experience, anchoring the entire composition with the largest or most emotionally significant photo frame positioned slightly off-center creates a natural, organic asymmetry that feels collected and genuinely personal rather than rigidly geometric and staged. Additionally, keeping consistent two-inch spacing between every frame in the arrangement creates a tight, unified grouping that reads as a single cohesive wall composition from across the room rather than a scattered collection of individual pictures.
Illuminated Shelf Wall
LED-illuminated floating shelves represent the most sophisticated fusion of practical storage, decorative display, and atmospheric lighting available in modern home wall styling for 2026. Warm LED strip lights mounted beneath each shelf cast a gentle, diffused downward glow that simultaneously illuminates the objects on the shelf below, creates a warm ambient pool of light in the room, and gives the entire wall display a luxurious, high-end boutique hotel quality. Furthermore, illuminated shelves work particularly powerfully in bedrooms and living rooms where layered, multi-source lighting creates the intimate, cozy atmosphere that flat overhead lighting never achieves alone. I’ve tried under-shelf LED lighting in a compact bedroom and the transformation from flat ceiling light to warm, layered ambient glow was genuinely remarkable — the room instantly felt like a designed, considered space. Additionally, smart LED strips allow full color temperature and brightness control from a phone app.
- Fuses storage, display, and atmospheric lighting
- Creates boutique hotel quality at home
- Smart LED strips offer app-based control
- Warm glow layers beautifully with room lighting
- Works powerfully in bedrooms and living rooms
Installing under-shelf LED strip lighting correctly requires careful attention to the color temperature and brightness level you select before purchasing your strips. Moreover, choosing LED strips with a warm 2700K color temperature rather than cool daylight 5000K produces a noticeably more intimate, flattering, and genuinely cozy ambient glow that suits residential bedroom and living room environments perfectly. Therefore, always check the Kelvin rating on LED strip packaging before purchasing — this single specification determines whether your shelf lighting feels warmly atmospheric or harshly clinical. In my experience, concealing the LED strip hardware behind a slim front lip of wood trim attached to the shelf’s leading edge creates a clean, professional finish where only the warm glow is visible rather than the strip itself. Additionally, using a dimmer switch or smart controller with your LED strips gives you complete atmosphere control — bright for evening reading and dimmed low for a deeply cozy nighttime ambiance. That’s why illuminated shelf walls consistently rank among the most aspirational and most-saved bedroom wall ideas across every major home design platform.
Conclusion
Your walls hold more decorating power than any single furniture piece in your home. Furthermore, as these 30 ideas prove, you do not need a renovation budget or a professional designer to make a stunning transformation happen. One well-chosen home wall decor update — a gallery arrangement, a bold paint color, a woven textile, or an illuminated shelf display — can completely redefine how a room looks and feels every single day. I’ve seen this single shift change not just rooms but the way people feel living inside them. Therefore, pick one idea that excites you most and start this weekend. Additionally, save this article to your Pinterest boards for your next room refresh. Share it with a friend whose walls need some love too.
Frequently Asked Questions
What is the easiest home wall decor idea for beginners?
A picture ledge shelf display is the most beginner-friendly option available. Mount two simple ledges, then lean and layer art prints, small plants, and ceramics freely. Nothing needs precise measuring. You adjust and restyle everything instantly without adding a single new nail hole each time.
How do I decorate a large blank wall on a small budget?
Start with a DIY painted arch using one small can of paint. Additionally, free printable botanical art in thrifted frames creates a beautiful gallery wall for under $30. Peel-and-stick wallpaper and string light backdrops both deliver dramatic visual impact for under $40 total.
What wall decor works best in a rental apartment?
Peel-and-stick wallpaper, adhesive string lights, fabric tapestries, and picture ledge shelves all work perfectly in rentals. Furthermore, these options cause zero permanent wall damage. They remove completely cleanly without leaving residue or damaging paint on any standard rental wall surface.
How high should wall art be hung?
Hang the center of any wall art at approximately 57 to 60 inches from the floor. This is the standard eye-level height used in professional galleries worldwide. Furthermore, this rule applies regardless of the artwork’s size, shape, or the specific room it occupies.
How do I make my bedroom wall look more expensive?
Use one oversized canvas or framed fabric panel as your primary focal point. Additionally, add matching wall sconces symmetrically on either side for a designer-quality result. Matte paint finishes, consistent frame colors, and deliberate negative space between pieces elevate the final appearance significantly and affordably.
Can I mix different wall decor styles in the same room?
Yes — mixing styles works beautifully when you maintain one consistent color palette across all pieces. Furthermore, shared tones like cream, black, warm wood, or aged brass create visual cohesion even within an eclectic display. I’ve noticed one unifying material or finish ties even very different styles together effectively.
What wall decor ideas work best for small rooms?
Focus on vertical arrangements that draw the eye upward rather than wide horizontal displays. Additionally, mirrors, light-toned art, and floating shelves visually expand small rooms without adding furniture bulk. Avoid overcrowding the wall — two or three intentional pieces always look stronger than many small competing ones.
How do I choose a wall color that makes my room feel bigger?
Choose muted, warm neutral tones in soft white, warm greige, or pale sage green. Furthermore, matte finishes absorb light softly and make walls recede visually. Additionally, painting the ceiling the same tone as the walls eliminates visual boundaries and makes the entire room feel noticeably taller and more open.