26 Cheap Wall Decor Ideas That Look Stylish 2026
Your walls are telling the wrong story — and a tight budget should never be the reason. Blank walls make even the most carefully furnished room feel unfinished, cold, and forgettable. The good news is that the best cheap wall decor ideas available right now cost between $0 and $20, and many of them look genuinely expensive at first glance.
Decorating your walls on a budget is one of the most common real-life home styling challenges people face, especially in rental apartments, first homes, and compact spaces where both money and available wall area are limited. I’ve noticed that most people assume stylish walls require a significant financial investment, but the opposite is consistently true. Some of the most visually compelling home interiors I’ve ever seen were built almost entirely from thrifted frames, DIY textile hangings, foraged natural materials, and free printable downloads.
This article covers 30 specific, actionable, and genuinely beautiful wall decor ideas designed for real budgets in 2026. Each idea suits apartments, rentals, bedrooms, living rooms, kitchens, and home offices across the USA. Experienced home decorators and interior stylists consistently point to creative resourcefulness as the defining quality of the most inspiring budget home transformations they encounter. You will find ideas here ranging from completely free nature collages to under-$15 DIY statement pieces. Pick one idea, start this weekend, and watch your room change completely.
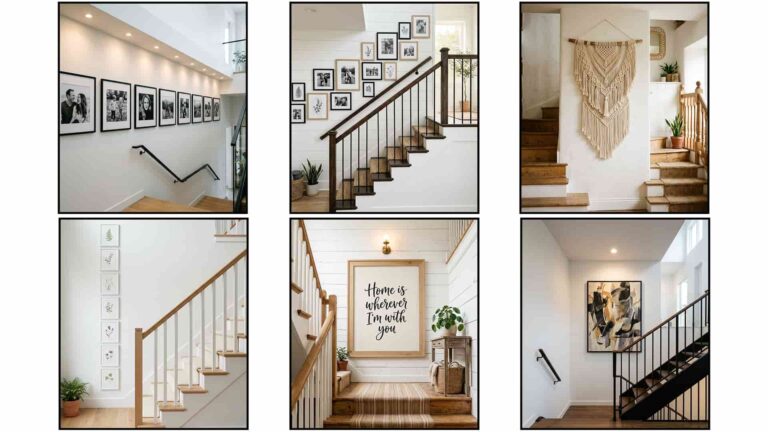
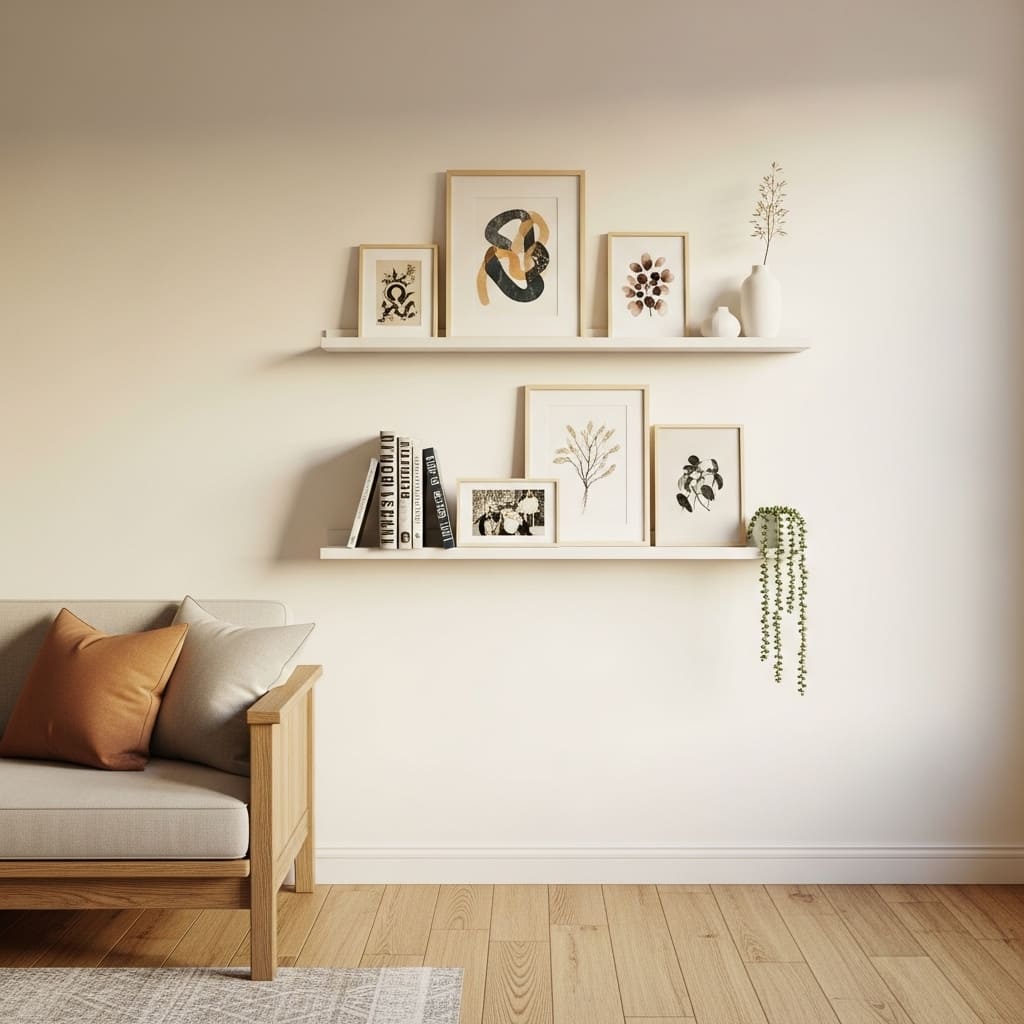
Dollar Store Frame Gallery
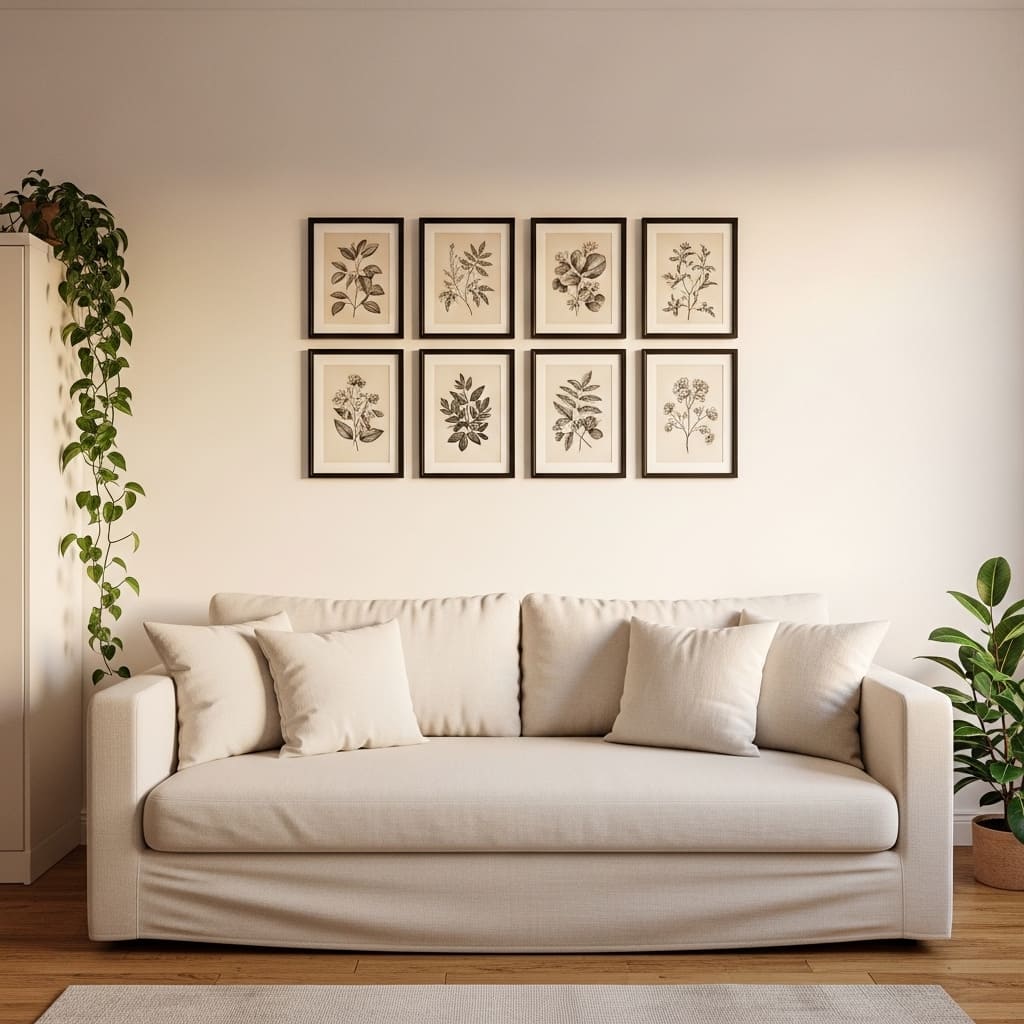
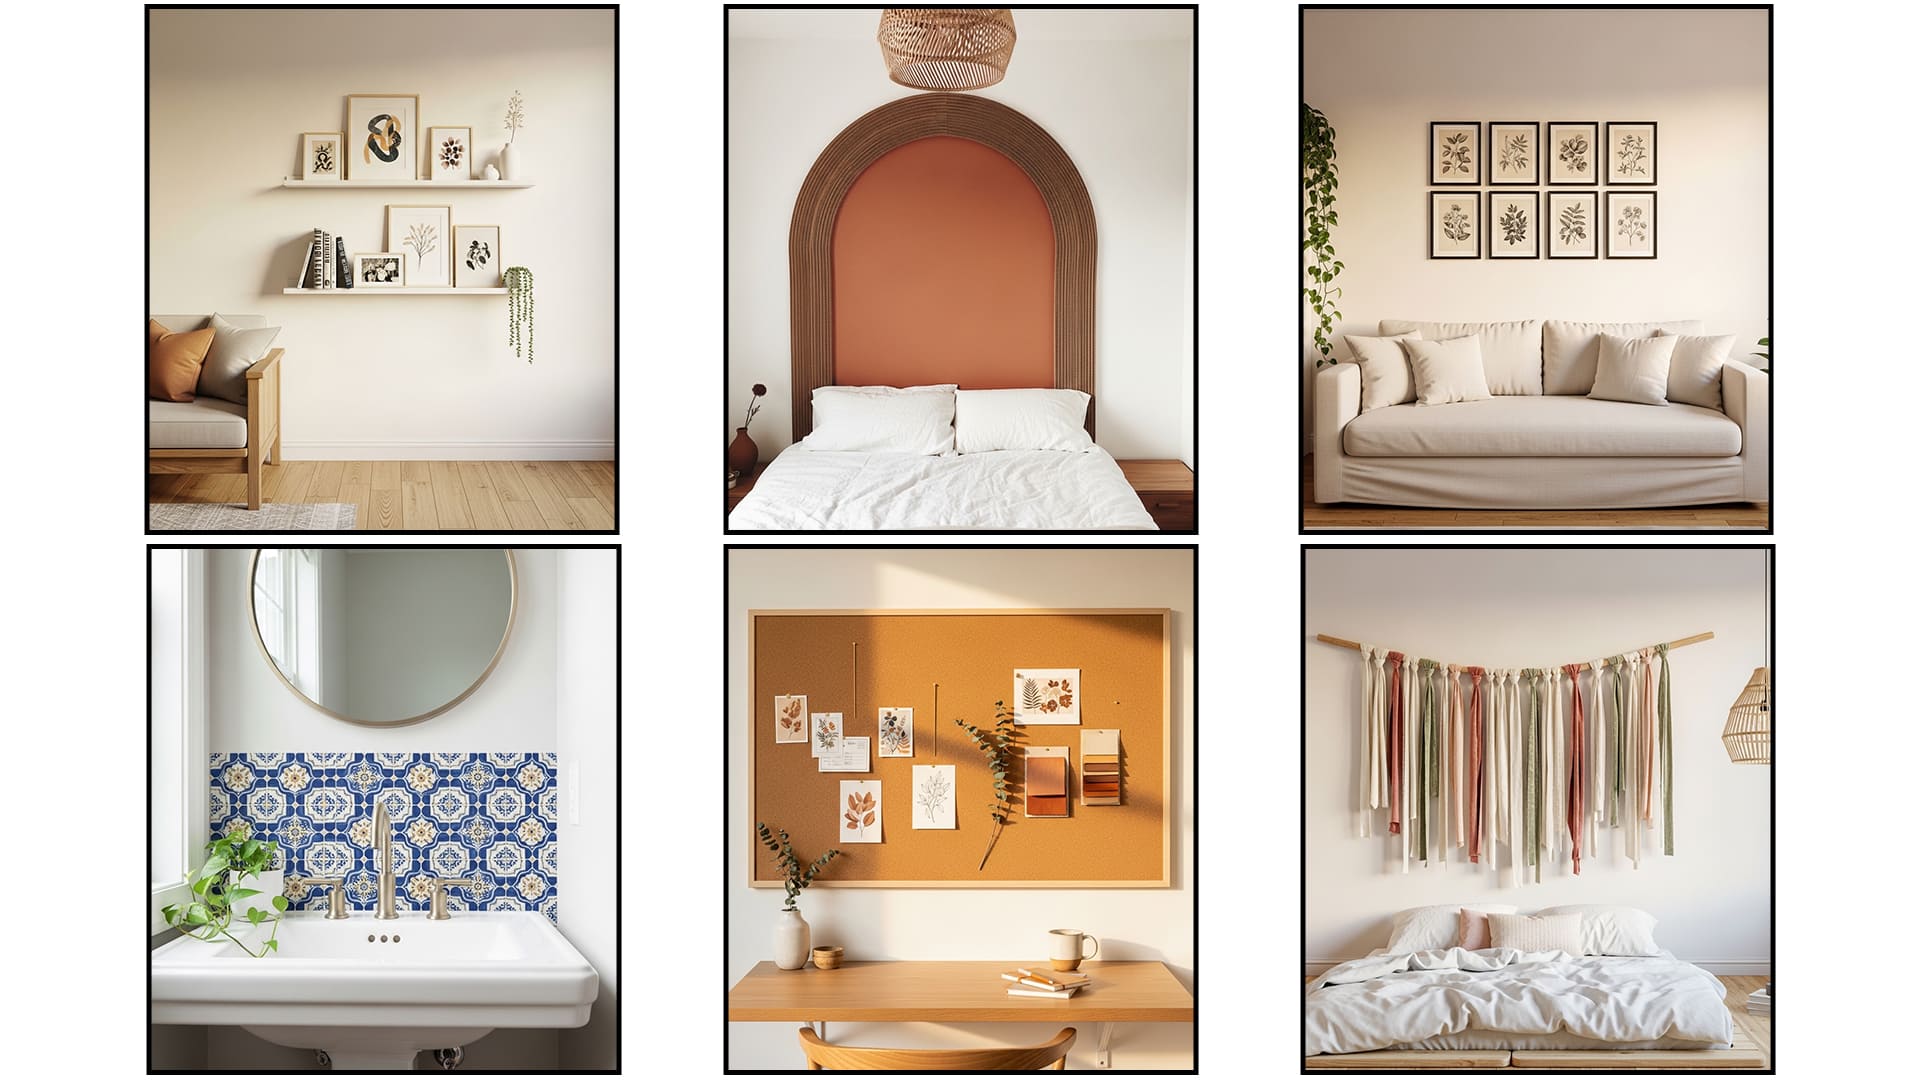
Dollar store frames look genuinely expensive when you use them with intention and consistency. Buying 6 to 8 matching frames from the same store and filling them with free downloadable botanical prints creates a cohesive gallery wall for under $16 total. I’ve seen this exact approach produce living room walls that guests genuinely assumed cost hundreds of dollars. The secret lies entirely in the matching frame finish and the consistent print palette, not the frame price itself.
Choosing all-black or all-white frames from a dollar store and printing botanical or line art designs on cream paper creates a wall display that looks like a curated gallery installation. The consistency of frame color does more visual work than the quality of any individual frame. That’s why many budget decorators recommend buying every frame from the same dollar store visit to guarantee a perfect color match across every piece in the gallery arrangement.
- Under $16 total for a full gallery wall
- Matching frames create high-end gallery look
- Free botanical prints downloadable online now
- Works beautifully above sofas and console tables
- Affordable wall art styling for rental apartments
Printing black-and-white botanical designs at 4×6 or 5×7 size at a home printer costs almost nothing per sheet. Free public domain botanical illustrations from sites like Rawpixel, Unsplash, and the Smithsonian Open Access archive provide hundreds of high-resolution options at zero cost. Selecting 6 to 8 prints from the same botanical illustration series creates a cohesive, matched set that reads as a deliberate, professional-quality art collection despite the minimal investment in both time and money.
Arranging all eight frames in a tight three-across, three-down grid with 2-inch gaps between each frame produces the cleanest, most intentional gallery wall composition. Larger gaps make the arrangement look scattered and unfinished. In my experience, the tight grid approach consistently photographs better and impresses visitors more than any loose, organic gallery arrangement, especially when working with small, inexpensive frames that need visual unity to read as a strong, composed wall feature.
Washi Tape Geometric Design
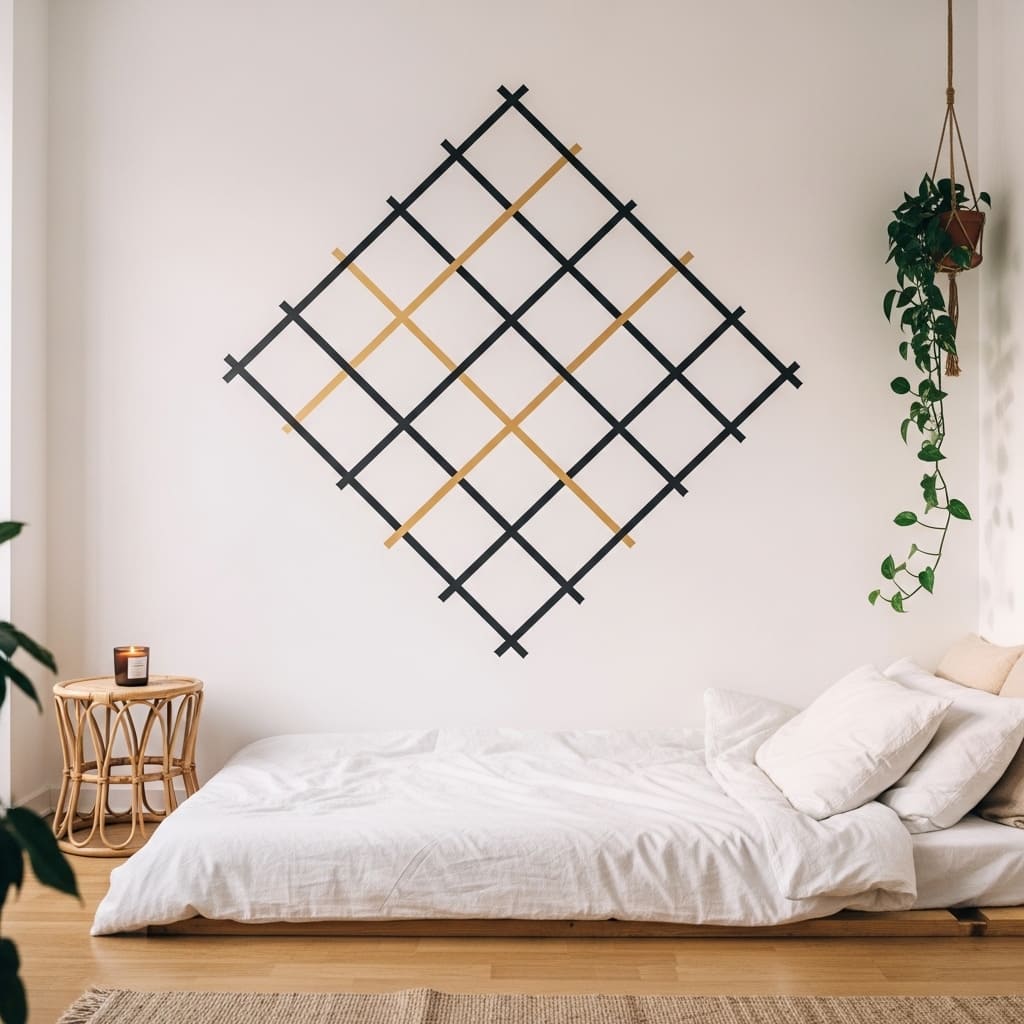
Washi tape wall art costs under $8 for a full bedroom feature wall and removes completely without damaging a single inch of paint underneath. The graphic impact of a large geometric diamond grid in matte black and gold tape above the bed creates a designer-quality focal point that looks intentional, bold, and genuinely stylish. This cheap wall decor idea suits renters especially well because the entire design peels off cleanly in minutes when moving day arrives, leaving zero residue on the wall surface.
Using two complementary tape colors, like matte black for the structural grid lines and warm gold for accent diagonal details within the pattern, creates a layered geometric design with far more visual depth than a single tape color alone. Standard washi tape rolls at craft stores and Amazon cost between $3 and $6 per roll. One roll of each color covers a full queen-bed-width design with tape left over for future touch-ups or seasonal redesigns. The low cost makes this one of the most genuinely affordable wall decor upgrades available for any budget level.
- Under $8 total for full wall coverage
- Zero wall damage, perfect for renters
- Matte black and gold tape create graphic depth
- Easy to redesign or remove each season
- Works beautifully above beds and desks
Planning the geometric design on grid paper before touching the wall prevents misalignment and wasted tape. Drawing the pattern to scale on paper first takes about 15 minutes and saves at least an hour of frustrating mid-installation adjustments. Using a ruler and a small level to guide each tape strip keeps the diagonal and horizontal lines straight and crisp. The precision of clean, straight tape edges is what separates a professionally styled washi tape design from a hastily applied amateur attempt that looks untidy up close.
Applying tape strips slowly from one end to the other, pressing firmly along the full length with a credit card edge, prevents air bubbles and ensures clean adhesion across the full strip length. Pulling the tape at a 45-degree low angle if repositioning avoids paint surface lifting. I’ve tried this technique in three different rental apartments and found that washi tape consistently removes cleanly from standard latex-painted walls when pulled slowly and carefully, regardless of how long the tape has been in place.
3. Thrifted Frame Makeover
Thrift store frames in any color or condition become completely unrecognizable after a single coat of spray paint in a unified finish. Three mismatched thrift store frames that cost $1 to $3 each transform into a beautifully cohesive gallery set after a $5 can of matte white spray paint. I’ve used this exact technique to build bedroom gallery walls for under $12 total, and the finished result consistently looks like a curated set purchased from a home decor boutique rather than assembled from individual secondhand finds.
Choosing frames of three slightly different sizes, like 8×10, 5×7, and 4×6, and painting all three the same color creates a vertical column display with natural visual rhythm. The size variation adds movement to the arrangement while the matching paint finish holds all three pieces together as a unified set. That’s why many budget-savvy interior stylists describe the spray-painted thrift store frame technique as the single highest-return investment available in the affordable wall styling category.
- Under $12 total for a three-frame gallery set
- Spray paint unifies mismatched thrift store finds
- Mixed sizes create visual rhythm in the column
- Works beside beds in compact bedroom wall decor
- Budget-friendly wall art solution for any room
Matte white or matte black spray paint works best for this technique because flat finishes look genuinely premium and never show the brush or spray texture that glossy paints reveal under directional light. A light sanding of the original frame surface before spraying ensures better paint adhesion and a smoother final finish. Two light coats with 20 minutes drying time between each coat deliver a more durable, professional result than one thick coat applied all at once.
Filling the painted frames with soft watercolor prints in a coordinated color palette, such as blush, sage, and ivory, creates a cohesive display that looks like a limited-edition art set. Free watercolor print downloads on Canva, Unsplash, and Pinterest consistently provide high-quality botanical, abstract, and landscape options in these popular color combinations. Printing at the exact frame size ensures the art fills the display area completely without awkward white borders from size mismatches between the print and the frame backing.
4. Fabric Scrap Wall Hanging
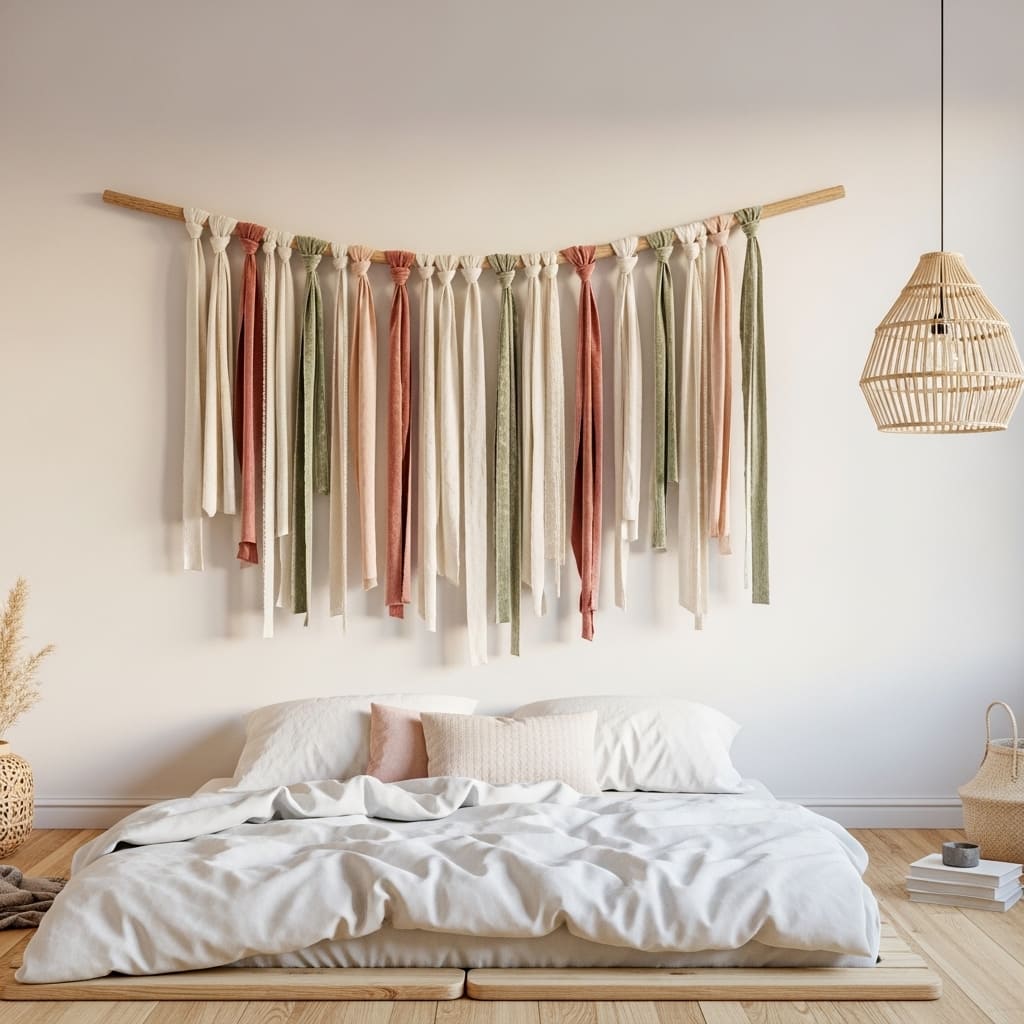
Leftover fabric scraps from a sewing project or $3 worth of fabric remnants from a craft store create a genuinely beautiful DIY wall hanging that adds rich textile texture to any bedroom wall. Cutting fabric into 1 to 2 inch strips and knotting them along a natural wood dowel in a loose, layered arrangement produces a piece that looks handmade, intentional, and deeply personal. This budget wall decor approach costs almost nothing when using fabric you already have at home, making it one of the most accessible DIY wall art ideas available to anyone regardless of crafting skill level.
Mixing three fabric types, like smooth cotton, soft linen, and a small amount of velvet or knit, within the same warm neutral color palette creates a visually rich surface with varied texture that reads beautifully from across the room. Varying the strip lengths from 8 to 18 inches adds depth and movement to the hanging. I’ve noticed that fabric wall hangings with varied strip lengths and mixed material types consistently look more professionally crafted and expensive than uniform-length, single-material versions that lose the organic, layered quality that makes textile wall art compelling.
- Near-zero cost using existing fabric scraps
- Mixed fabric textures create rich visual depth
- Varied strip lengths add movement and dimension
- Works beautifully in boho bedroom wall decor
- DIY-friendly with zero special crafting skills needed
Natural wood dowels at craft stores cost between $1 and $3 for a 12 to 18 inch length. Hanging the dowel using a simple looped jute cord creates an organic, intentional display method that suits the handmade quality of the fabric strips perfectly. The visible hanging cord becomes part of the overall aesthetic story rather than something to conceal, which aligns with the 2026 design direction toward honest, exposed natural materials throughout the home.
Spacing the fabric strips approximately 0.5 inches apart along the full dowel length creates the fullest, most textured visual coverage. Knotting each strip with a simple overhand knot at the top, just above the dowel, keeps each strip securely attached and slightly raised from the dowel surface for a more three-dimensional finished appearance. Trimming the bottom edges of all strips at a slight diagonal or uneven fringe creates a relaxed, organic silhouette that suits the handmade boho character of the wall hanging far better than perfectly straight, ruler-cut bottom edges.
5. Printable Quote Frame
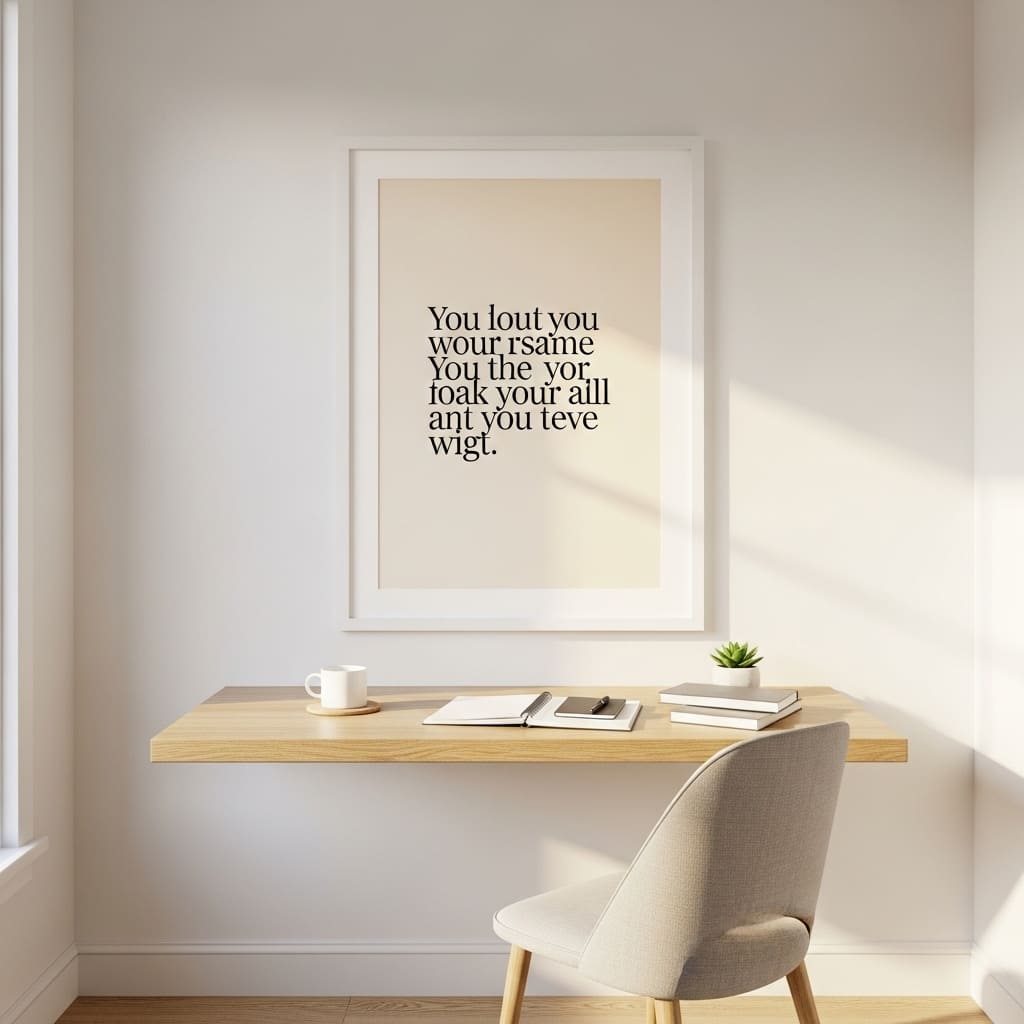
A single well-designed printable quote framed above a desk or bed instantly personalizes a wall at almost zero cost and creates a daily source of visual inspiration in a home office or bedroom. Free and premium printable quote designs on Canva, Etsy, and Creative Market cover every typography style, from clean modern serif to hand-lettered script, at price points ranging from completely free to $5 per file. Printing at 8×10 or 11×14 size at a home printer or local shop costs between $1 and $4, making this one of the most genuinely cheap wall decor ideas that still looks polished and considered.
Choosing a quote in clean, modern typography on a warm cream or soft white background suits almost every interior color scheme without competing visually with the surrounding room palette. Short quotes of 5 to 10 words read more powerfully as wall art than long multi-line passages that require the viewer to stand close to the wall to read completely. That’s why typography-focused interior stylists consistently recommend single-line or two-line quotes for wall display purposes, because the visual impact of the text as a graphic element depends heavily on legibility from normal room viewing distances.
- Free Canva designs print at home for under $2
- Clean serif typography suits any interior style
- Short quotes create stronger visual impact
- Works in home office and bedroom wall styling
- One framed quote adds daily personal inspiration
A wide white mat inside the frame adds a gallery-quality presentation that makes a basic home-printed quote look genuinely professional and expensive. Matting a simple 8×10 print inside an 11×14 frame costs nothing extra beyond the slightly larger frame size and creates a visual breathing space around the text that enhances both the typography and the perceived value of the finished piece. The mat transforms a printed sheet of paper into a proper, matted artwork that holds its own on any wall surface.
Aligning the quote frame with a small styled surface directly below it, like a desk with one ceramic mug and a neat notebook, creates a complete, purposeful wall vignette rather than a single isolated print floating on an otherwise empty wall. The connection between the wall art above and the styled surface below ties both elements into one cohesive zone that makes the room corner feel genuinely designed and intentionally composed from floor to wall surface.
6. Nature Collage Wall
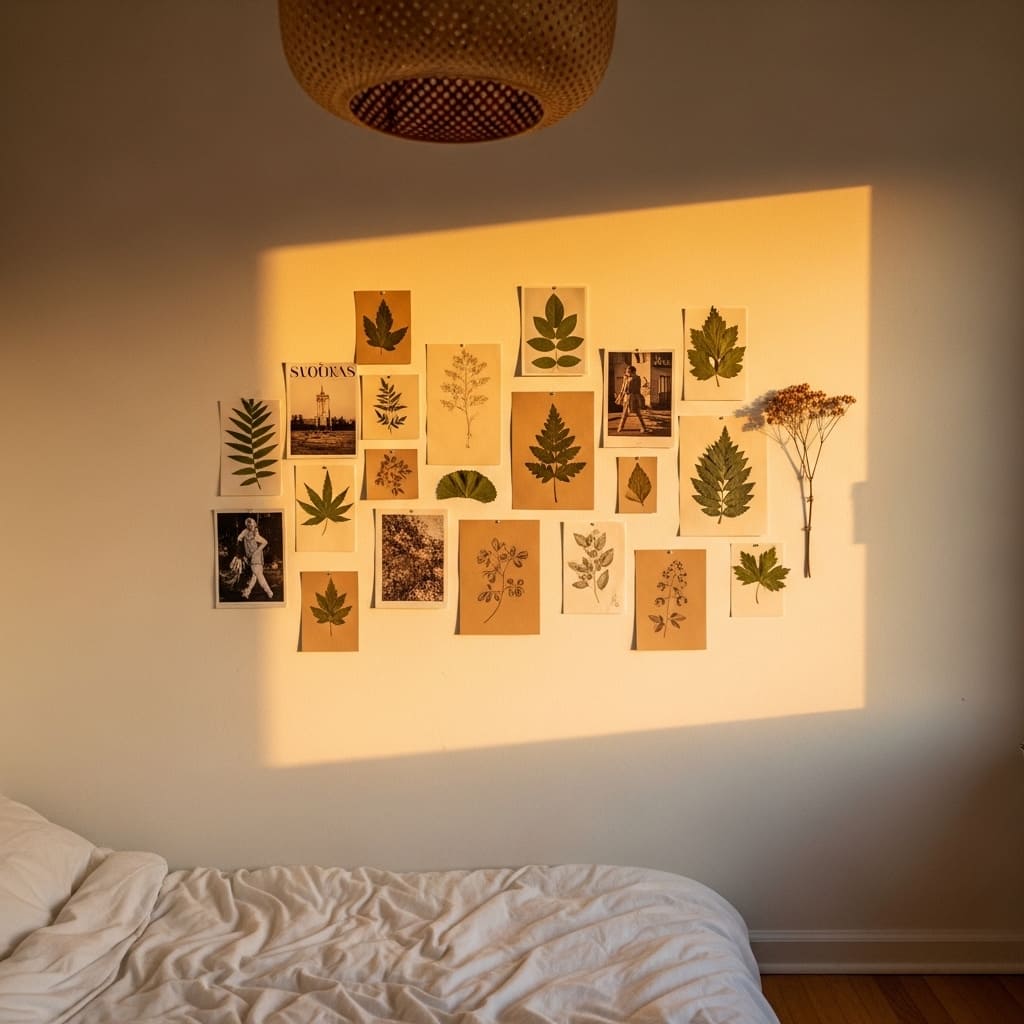
A nature-inspired wall collage made from pressed leaves, magazine clippings, hand-drawn sketches, and small dried flower clusters costs virtually nothing and creates the most personally expressive wall display possible in a small bedroom or creative space. The organic, scattered arrangement of mixed natural and paper materials produces an artsy, curated quality that feels genuinely unique because no two people ever assemble exactly the same collection. This zero-budget wall decor approach suits creative personalities, students, and anyone who wants their bedroom wall to tell a genuinely personal visual story.
Sticking to a cohesive color palette across all collage materials, like earth tones in warm brown, cream, dusty green, and muted terracotta, prevents the scattered arrangement from looking chaotic. Every leaf, page, and sketch within the same tonal family reads as a connected collection rather than random items pinned haphazardly to a wall. I’ve seen nature collage walls in small studio apartments become the most visually compelling feature in the entire room simply because the personal, organic quality of the assembled materials communicates a genuine sense of the person who curated and created the display.
- Near-zero cost using natural found materials
- Personal and expressive creative bedroom wall art
- Earth tone palette keeps the collage cohesive
- Mix leaves, sketches, and magazine pages together
- Works beautifully in artistic small room decor
Using low-tack washi tape or removable adhesive putty to attach collage materials to the wall keeps the display fully renter-friendly and adjustable over time. New materials can be added, moved, or removed without creating holes or residue marks on the painted wall surface. Refreshing the collage with new seasonal finds, like autumn leaves in October or dried wildflowers in spring, keeps the wall feeling current and alive throughout the year without any additional cost or significant effort.
Building the collage outward from one central anchor piece, like a single large pressed maple leaf or a striking magazine photograph, creates a more visually organized arrangement than starting from the edges and filling inward. The central anchor gives the eye a clear starting point and allows the surrounding smaller pieces to orbit naturally around it. This radiating composition method produces a collage that looks deliberately considered rather than randomly accumulated over time across the full wall surface.
7. Rope Knot Wall Art
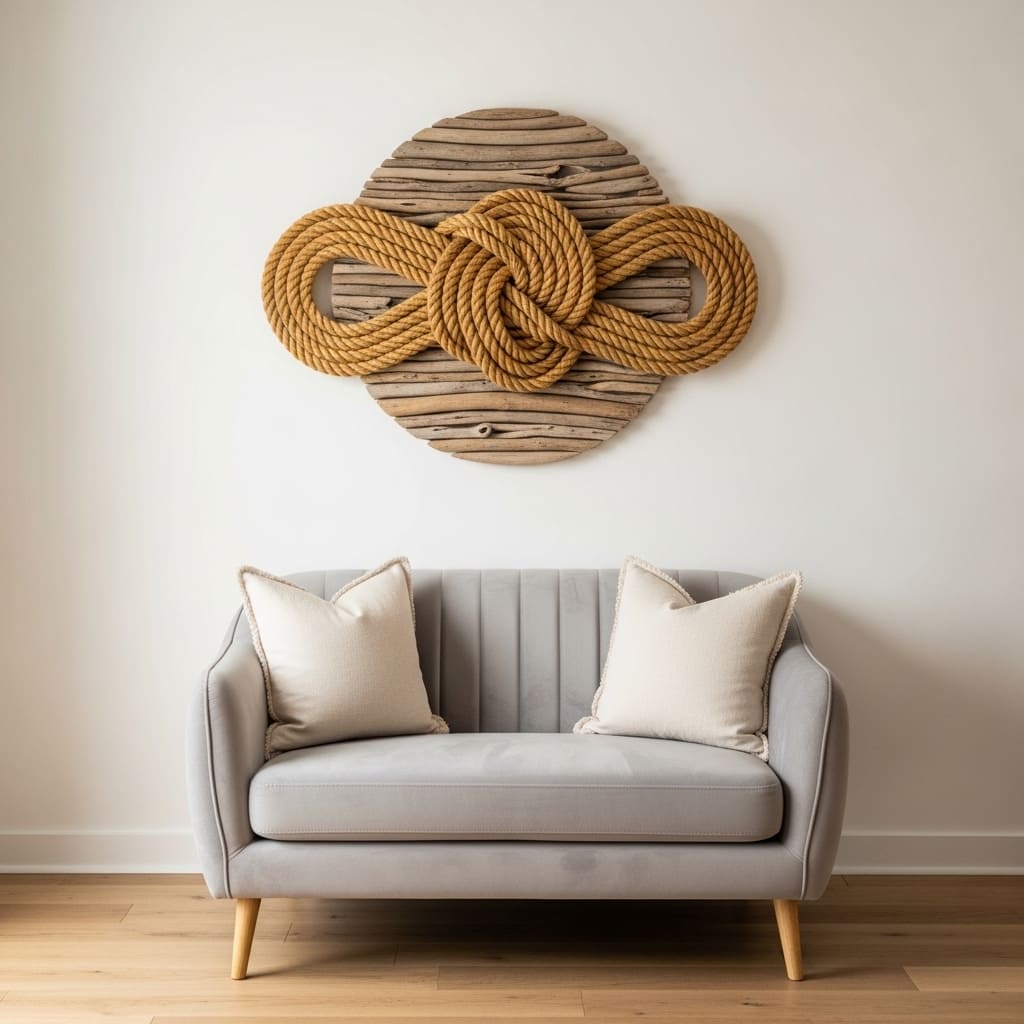
A large decorative rope knot wall piece costs under $10 in jute cord from a hardware store and creates a genuinely striking, three-dimensional wall display with natural texture that photographs beautifully and impresses every visitor. Jute rope in warm honey tones adds rich, organic warmth to a white or neutral wall without introducing color, pattern, or visual noise. The dimensional quality of a knotted rope arrangement casts subtle shadows on the wall behind it, creating a quietly dynamic display that changes its appearance as the room’s light shifts throughout the day.
Large sailor knots, square knots, and loose macramé-inspired rope arrangements all work effectively as standalone wall art pieces when mounted on a round driftwood or natural wood backing circle. The backing gives the rope arrangement a clean, contained boundary that helps it read as a deliberate artwork rather than simply a length of rope attached to the wall. That’s why many boho and coastal minimal interior stylists include rope wall art as one of their standard low-budget wall styling recommendations for living rooms, entryways, and compact bedrooms alike.
- Under $10 in jute rope from hardware stores
- Three-dimensional texture adds wall depth naturally
- Rope shadows shift beautifully with changing light
- Suits coastal, boho, and organic minimal rooms
- DIY-friendly with basic knotting skills required
Standard 3-ply natural jute rope at 6mm thickness creates the most visually substantial knot patterns for wall display purposes. Thinner rope at 3mm or below loses its tactile impact and produces knot shapes that look delicate and small rather than bold and sculptural on a living room wall. The 6mm thickness provides enough physical weight and visual presence to make a 12 to 16 inch rope knot piece read clearly as a genuine decorative wall object from across a standard-sized living room.
Sealing the finished rope knot piece with a light spray of clear matte fixative prevents the natural jute fibers from fraying at cut ends and extends the life of the wall piece significantly in rooms with normal air circulation. The fixative spray costs about $6 at any craft store and adds months to the display’s clean appearance. Without sealing, raw jute rope ends begin to fray and shed loose fibers after several weeks of hanging, which gradually reduces the piece’s visual crispness and overall quality.
8. Magazine Page Art
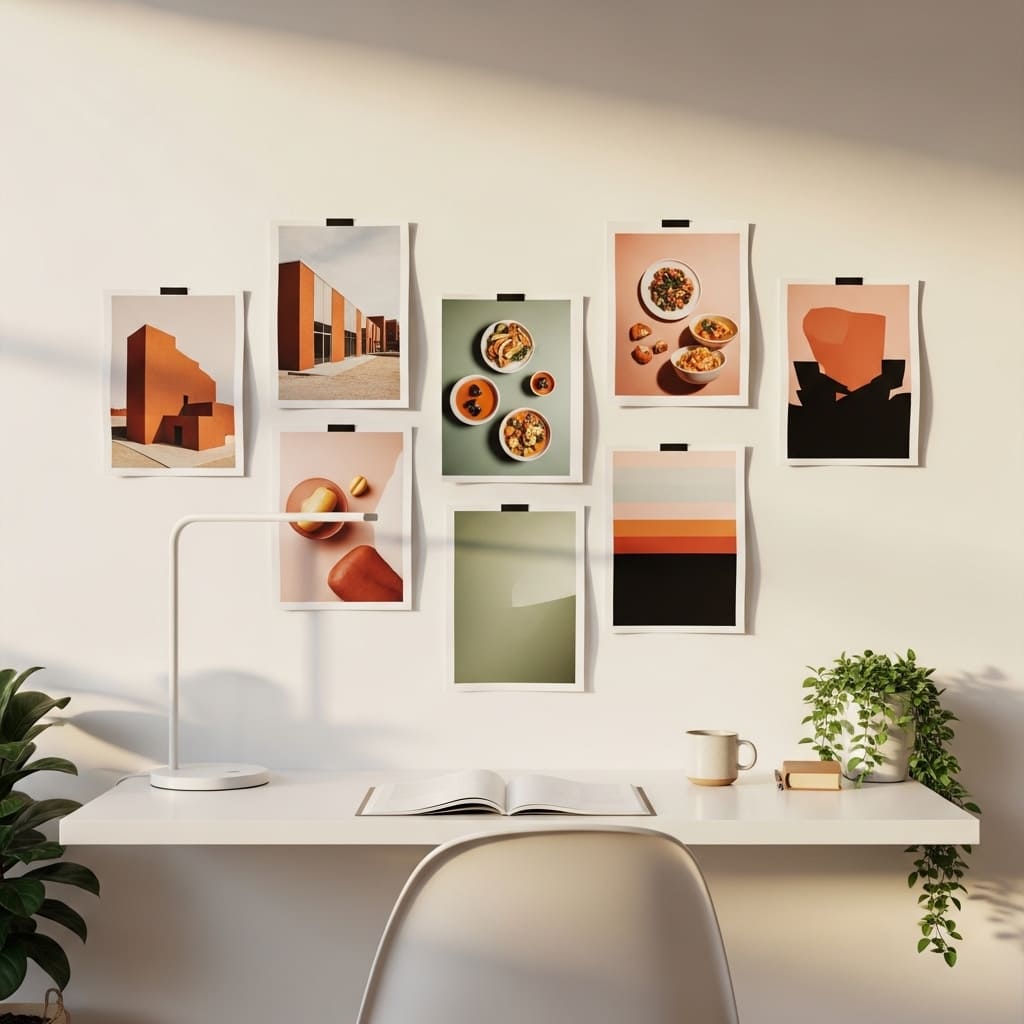
Torn or cut magazine pages pinned directly to a wall create one of the most genuinely free wall art displays available, and when curated with a consistent color palette, the result looks deliberately styled and editorially compelling. Selecting 4 to 6 pages from the same magazine issue or from issues sharing a consistent tonal palette, like warm terracotta and sage, and arranging them in a loose horizontal row above a desk produces an editorial wall display that feels intentional and creative rather than casual and thrown together.
Architecture, food, travel, and fashion magazines contain stunning photography and bold graphic design that rivals any purchased print when removed from the magazine context and displayed in isolation on a wall. A single high-quality full-page photograph from a Kinfolk, Architectural Digest, or Bon Appétit magazine issue, pinned cleanly to a cream wall with four small brass push pins, looks genuinely gallery-quality from a normal viewing distance. I’ve noticed that the photography in premium lifestyle magazines consistently outperforms most affordable purchased prints in terms of compositional quality, color depth, and visual impact per page.
- Completely free using existing magazine pages
- Editorial photography looks gallery-quality on walls
- Warm tonal curation keeps the display cohesive
- Works in home office and bedroom wall styling
- Brass push pins create a clean, minimal mounting
Choosing pages with strong visual compositions, clear subjects, and warm earthy tones creates the most cohesive and visually satisfying magazine wall display. Avoiding pages with heavy text, cluttered layouts, or multiple competing advertisements keeps the wall display looking like selected artwork rather than removed magazine content. The curation process of choosing only the strongest visual pages from the entire magazine is what separates a genuinely beautiful magazine wall display from a random collection of printed pages assembled without visual judgment or editorial intent.
Changing the magazine page display every 4 to 6 weeks refreshes the wall completely at zero cost and keeps the room feeling current and seasonally relevant throughout the year. Swapping terracotta and sage summer pages for deep navy and amber autumn selections in September instantly shifts the entire room’s mood without moving a single piece of furniture or spending a single dollar. This seasonal rotation quality makes the magazine page wall display one of the most dynamically adaptable cheap wall decorating strategies available for any room type or interior style preference.
9. Painted Wooden Plank Sign
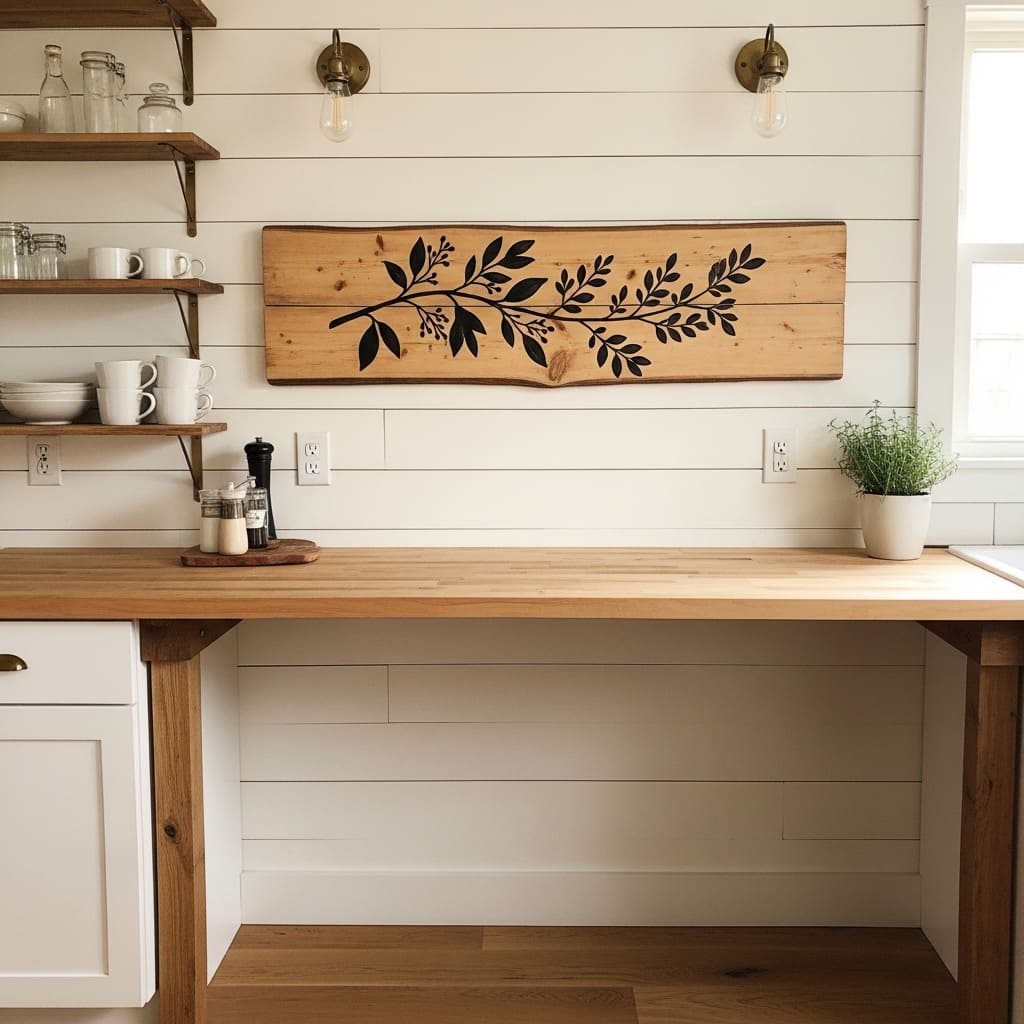
A hand-painted wooden plank sign adds instant farmhouse warmth and handcrafted character to a kitchen wall for under $5 in total materials. A rough-cut pine plank from a hardware store costs $2 to $4 for a standard 6×24 inch size. Painting a simple botanical branch, a single word, or a loose floral motif in black craft paint on the raw wood surface creates a genuinely charming wall piece that looks like it came from an artisan market rather than a DIY Saturday afternoon project with basic supplies.
Raw wood planks with visible grain texture add a natural, organic quality to the painted design that pre-primed canvas or paper simply cannot replicate. The wood grain shows softly through thin areas of craft paint and creates a layered, aged appearance that suits farmhouse, rustic minimal, and earthy Japandi kitchen aesthetics equally well. That’s why many budget home decor creators on Pinterest consistently include the hand-painted wood plank sign among their top 5 most-shared affordable wall art ideas for kitchen and dining room styling.
- Under $5 in hardware store pine plank
- Raw wood grain adds natural aged character
- Simple botanical motifs suit any skill level
- Works beautifully in farmhouse kitchen wall decor
- Black craft paint on wood looks artisan-quality
Sealing the finished painted plank with one coat of clear matte wax or a water-based matte varnish protects the painted surface from kitchen moisture and everyday handling. The sealant keeps the black paint looking crisp and prevents the raw wood from absorbing cooking grease or steam over time. A standard small can of clear matte wax from a craft store costs about $6 and seals at least 10 to 15 similar plank projects, making the per-plank sealant cost essentially negligible within the overall project budget.
Mounting the finished plank using two small sawtooth picture hangers nailed into the back edge creates a clean, flush wall installation with no visible hardware on the front face. Alternatively, drilling two small holes near the top edge and threading a length of natural jute twine through both holes creates a decorative hanging cord that suits the rustic, handmade aesthetic of the painted wood sign perfectly. The jute hanging cord adds one more natural material element to the display and reinforces the organic, artisan quality of the finished wall piece.
10. Pressed Leaf Frame Set
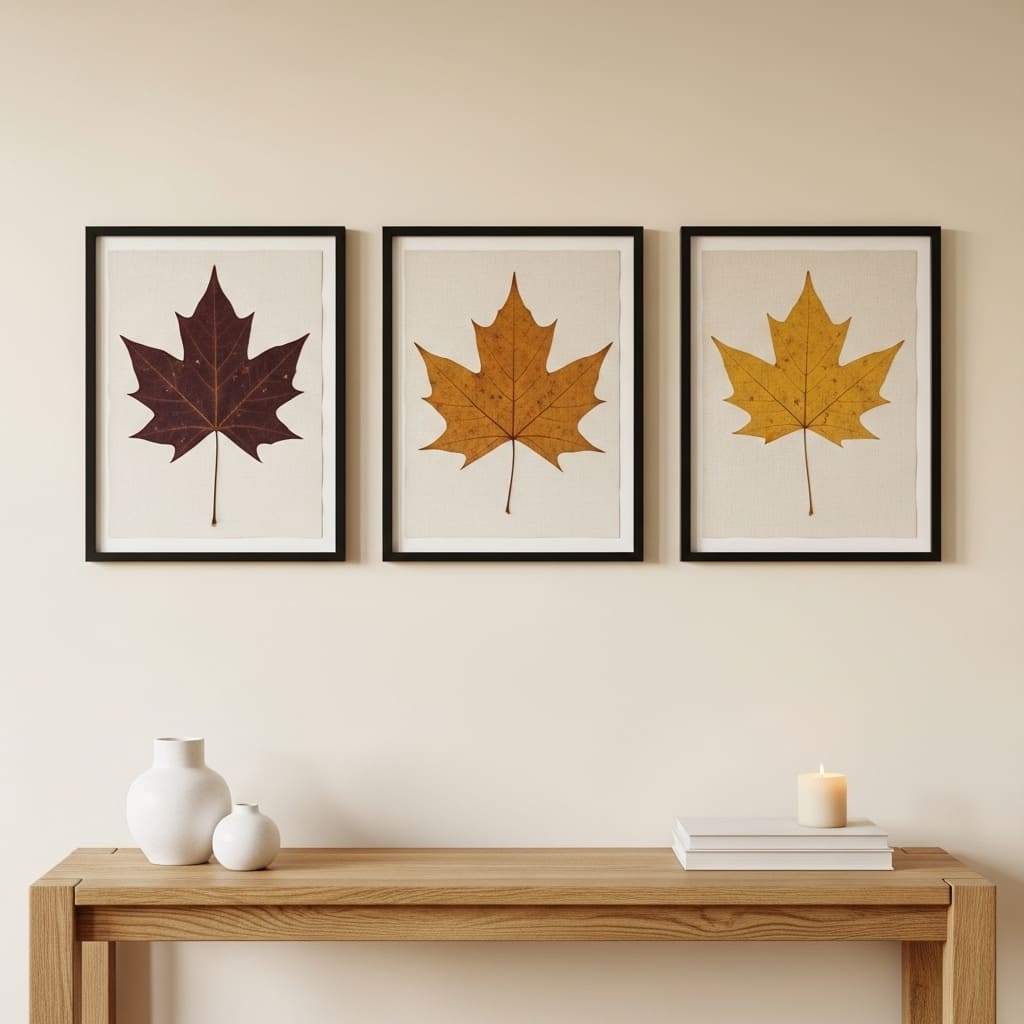
Three pressed leaves from your own backyard or a nearby park, framed in matching slim black frames, create a genuinely stunning seasonal wall display for under $10 total. Pressing large maple, oak, or ginkgo leaves between heavy books for two weeks produces flat, beautifully preserved specimens that retain their rich autumn colors in burgundy, amber, and golden yellow. Mounting each pressed leaf on a cream linen paper backing inside a standard 5×7 frame creates a display that looks like expensive botanical art sourced from a high-end home decor boutique.
The natural variation in leaf shape, vein pattern, and color gradient across three different specimens creates visual interest and organic variety within a cohesive, single-material display. Choosing three leaves from the same tree species keeps the display unified while the natural color differences between individual specimens add subtle variety that makes the arrangement feel collected and considered rather than artificially matched or manufactured. I’ve noticed that pressed leaf wall sets consistently generate the strongest positive reactions from guests of any inexpensive wall art idea I have personally tried or recommended.
- Under $10 total using backyard leaves
- Autumn leaf colors create rich seasonal displays
- Three matching frames unify the horizontal row
- Works beautifully in living room and entryway walls
- Free natural materials available every autumn season
Selecting leaves at their peak autumn color, when the red, orange, and gold tones are most intense, and pressing them immediately within 24 hours of collection preserves the richest color saturation in the finished dried specimen. Leaves collected after they have fallen to the ground and begun to dry naturally lose their color vibrancy quickly and produce dull, brown pressed specimens that lack the visual impact of freshly collected, vividly colored autumn leaves. Timing the collection to the early color change phase in late September or early October captures the most visually striking specimens for framing.
Refreshing the pressed leaf display each autumn with a newly collected set keeps the wall art feeling current, seasonal, and genuinely connected to the natural world outside the home. The old frames reuse perfectly with new specimens year after year, meaning the only recurring cost is the occasional sheet of cream linen paper for the backing mount. This annual refresh quality makes the pressed leaf frame set one of the most sustainably renewable and seasonally responsive cheap wall decorating ideas available to any homeowner or apartment dweller.
11. Cardboard Arch Wall Panel
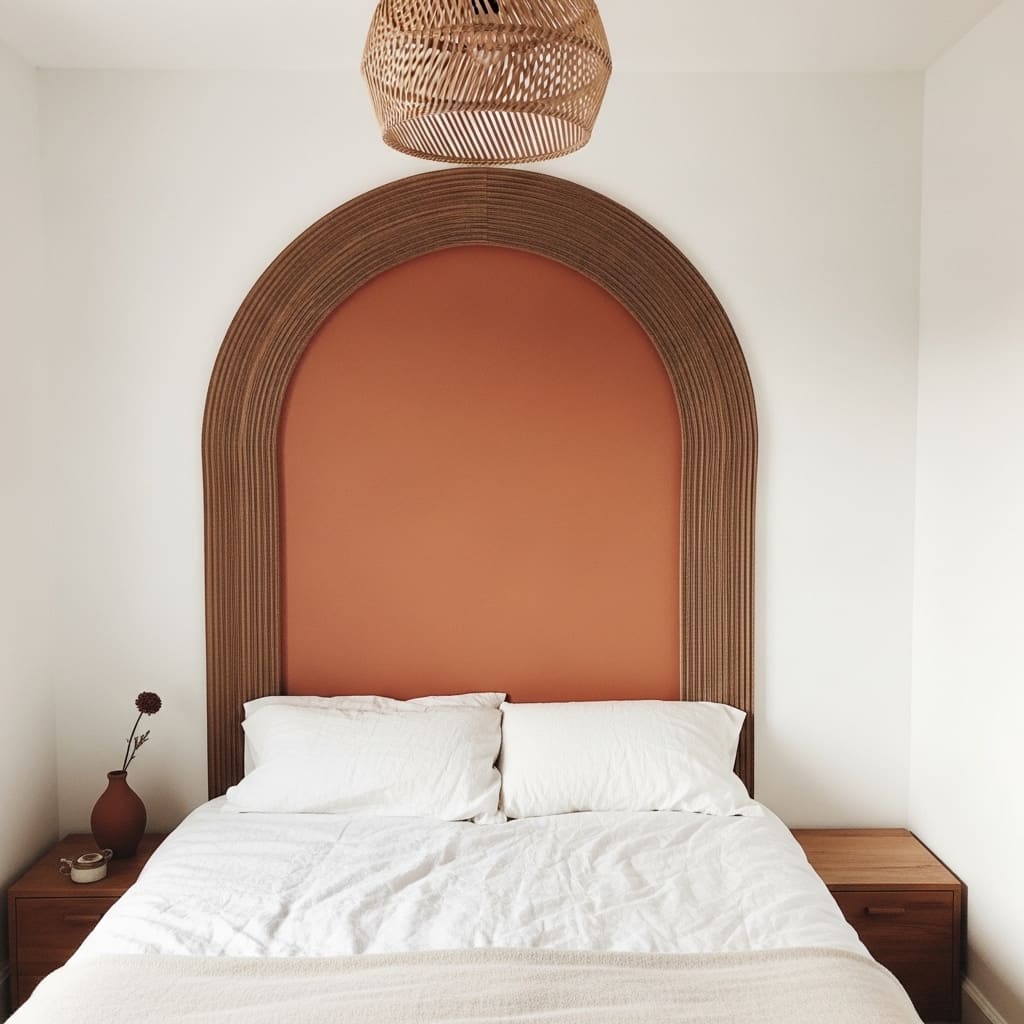
A large cardboard arch panel painted in warm terracotta creates the most dramatic DIY bedroom focal point available at a total cost of approximately $3 to $8 in materials. Cutting a 24×30 inch arch shape from double-layer corrugated cardboard, sanding the edges smooth, and applying two coats of matte wall paint produces a three-dimensional architectural panel that mounts flush to the wall with picture-hanging strips. The cardboard arch casts a slight shadow around its edges, reinforcing the architectural quality and making the painted panel read as a genuine three-dimensional room feature rather than a flat wall treatment.
Terracotta, dusty sage, warm clay, and muted navy all perform exceptionally well as arch panel colors in 2026 because these tones align directly with the year’s dominant warm minimalist interior direction. The muted earthen palette suits linen bedding, rattan furniture, and natural wood accents equally well and connects the bold arch shape to the room’s organic material palette. That’s why many budget home decor creators consistently rank the cardboard arch panel among their top 3 most cost-effective dramatic room upgrades for small bedrooms on extremely tight decorating budgets.
- Under $8 total in cardboard and paint
- Painted arch creates an architectural bedroom focal point
- Terracotta suits warm 2026 minimal bedroom palettes
- Cardboard panel edges cast subtle dramatic shadows
- Renter-safe with picture-hanging strip mounting
Cutting the arch cleanly requires a sharp craft knife and a smooth-edged cardboard template rather than scissors, which tend to crush and compress the corrugated cardboard edges rather than slicing them cleanly. Using a pencil compass or a large bowl as a tracing guide produces a symmetrical, smoothly curved arch top that looks geometrically precise and intentional. The cleanliness of the arch edge is the single most important factor in determining whether the finished panel looks professionally crafted or amateurishly assembled.
Double-coating the cardboard surface with a white gesso primer before applying the final topcoat color prevents the corrugated texture of the cardboard from showing through the painted surface. The gesso fills the surface texture and creates a smoother, flatter painting base that produces a more refined, wall-paint-quality finish in the chosen arch color. Skipping the gesso step results in a slightly bumpy final surface that reveals the cardboard substrate and reduces the architectural, built-in quality of the finished arch panel wall piece.
12. Bathroom Tile Sticker Panel
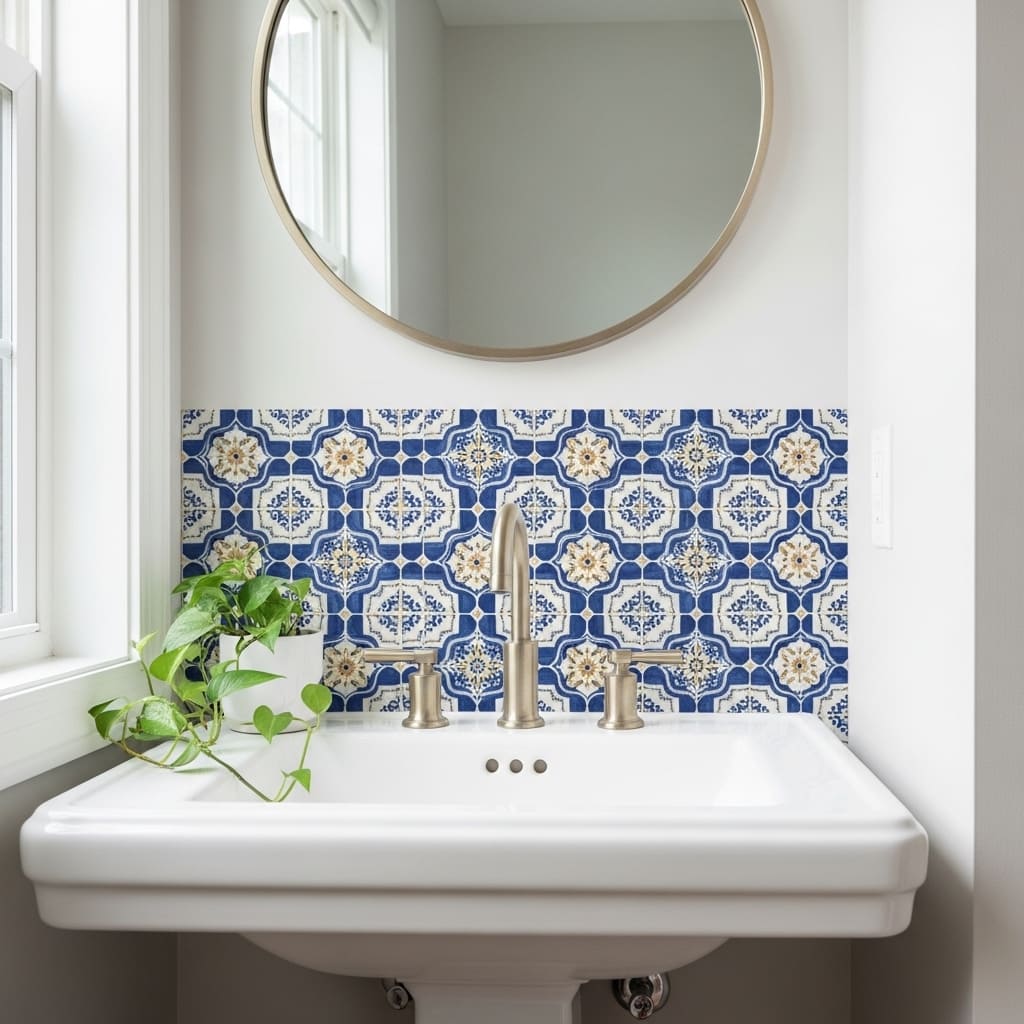
Peel-and-stick tile stickers above a bathroom sink create the visual impact of a full Moroccan tile backsplash installation at a fraction of the cost and with zero installation complexity. A pack of 24 geometric tile stickers in blue, white, and cream tones costs between $8 and $18 on Amazon, and applying a 3×4 grid arrangement above the sink basin takes approximately 20 to 30 minutes with no tools, no grout, and no professional help required. This approach delivers one of the highest visual payoffs per dollar of any cheap wall decor idea in the entire bathroom styling category.
Moroccan and geometric tile sticker patterns in Mediterranean blue, warm white, and cream tones suit rental apartment bathrooms exceptionally well because the pattern scale and color palette add genuine personality and character to a generic white bathroom without overwhelming the small, contained space. The self-contained grid arrangement above the sink provides a clear visual boundary to the patterned zone, which prevents the tile sticker design from making the small bathroom feel visually busy or claustrophobic when applied in a focused, contained panel rather than across multiple full walls.
- $8 to $18 for a full above-sink tile panel
- No tools, grout, or professional help needed
- Mediterranean patterns add bathroom personality
- Peel-and-stick installation suits all renters
- Removes cleanly without adhesive residue damage
Cleaning the wall surface with rubbing alcohol and allowing it to dry completely for at least 30 minutes before applying the first tile sticker is the single most important preparation step for a long-lasting, bubble-free installation. Any moisture, dust, or grease residue on the wall surface prevents the tile sticker adhesive from bonding fully and causes edges to lift within days of installation. The alcohol cleaning step takes less than five minutes and dramatically extends the lifespan and cleanliness of the entire tile sticker application.
Starting the grid installation from the bottom center tile and working outward and upward keeps the arrangement visually grounded and centered above the sink basin. Starting from a corner or edge frequently results in a misaligned grid that appears off-center by the time the last tiles reach the opposite edge of the arrangement. Using a small level to check the horizontal alignment of each tile row as you progress prevents a gradually tilting grid from developing across the full panel width during installation.
13. Corkboard Vision Wall
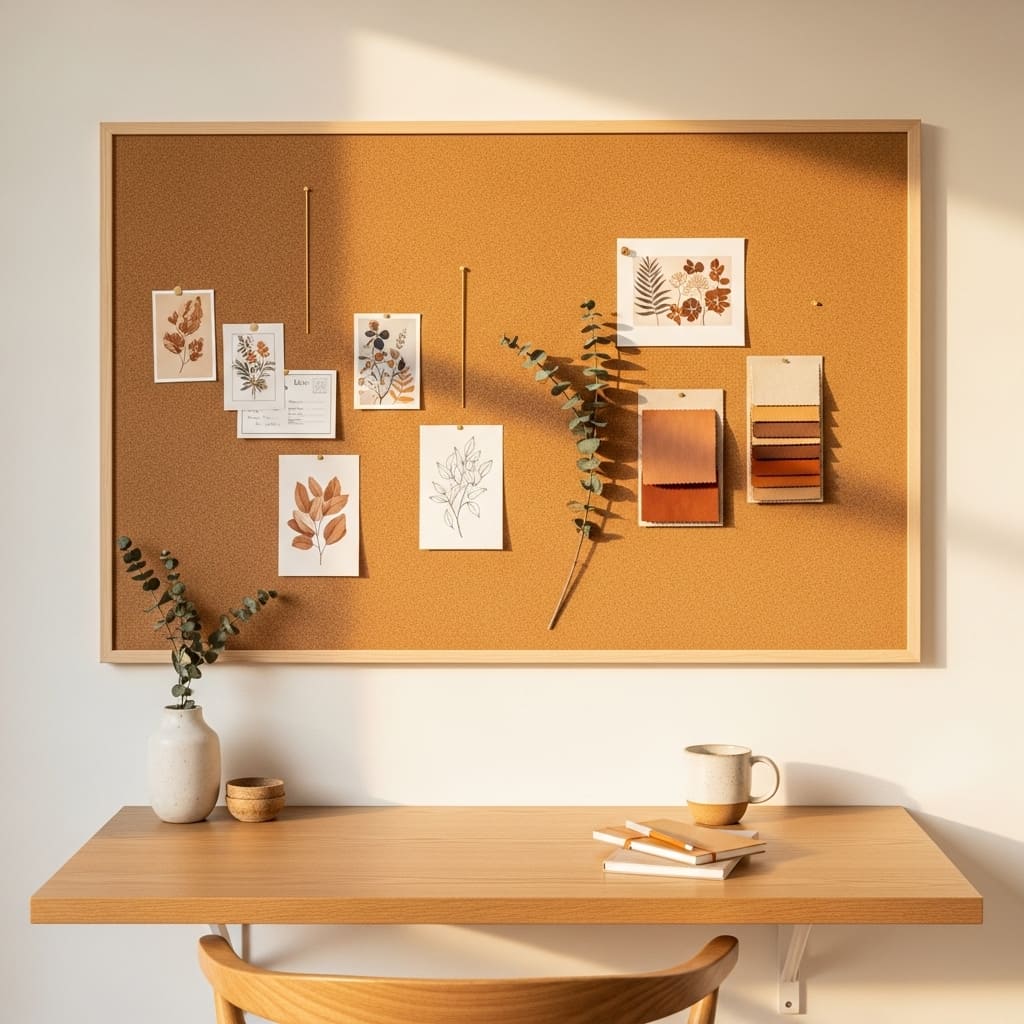
A large natural corkboard styled as a curated vision wall above a desk creates both a functional daily-use surface and a genuinely beautiful, deeply personal wall display simultaneously. Natural cork texture in its warm honey-beige tone adds organic warmth to any wall without paint, hanging hardware, or permanent installation. A standard 24×36 inch corkboard from Amazon or a craft store costs between $12 and $22, making the corkboard one of the most affordable large-format wall decor investments available for a home office or small bedroom wall.
Curating the corkboard display with a consistent color palette, like warm earthy tones in terracotta, cream, sage, and amber, creates a visually cohesive arrangement that reads as a designed, intentional wall feature rather than a cluttered bulletin board filled with random items. Limiting the pinned materials to postcards, small botanical prints, a dried botanical sprig, and one or two hand-drawn sketches keeps the display feeling edited and curated rather than overwhelmingly full and disorganized. That’s why many creative home office stylists describe a well-curated corkboard as their most recommended personalization wall tool for compact work-from-home spaces.
- $12 to $22 for a full large corkboard
- Natural cork texture adds organic warmth to walls
- Curated color palette keeps the display cohesive
- Works beautifully in home office wall styling
- Refreshable and rearrangeable at any time
Using gold or brass push pins rather than standard silver or plastic pins adds a subtle but meaningful visual upgrade to the corkboard display. The warm metallic tone of brass pins complements the honey-beige cork surface and the earthy tone of the pinned materials, creating a cohesive material story across the entire corkboard installation. Standard silver pins introduce a cool, slightly industrial note that subtly undermines the warm, organic quality that makes a natural cork vision wall visually compelling and emotionally inviting.
Rotating the pinned materials on the corkboard every 4 to 6 weeks keeps the vision wall feeling fresh, current, and seasonally responsive throughout the year. Adding a new postcard from a recent trip, swapping a dried summer flower for an autumn leaf, or replacing an old print with a newly downloaded botanical illustration refreshes the entire wall display in under 10 minutes at essentially zero additional cost. This infinite refreshability makes the styled corkboard one of the most dynamically adaptable wall decor investments available for any budget-conscious home decorator.
14. Painted Pebble Wall Art
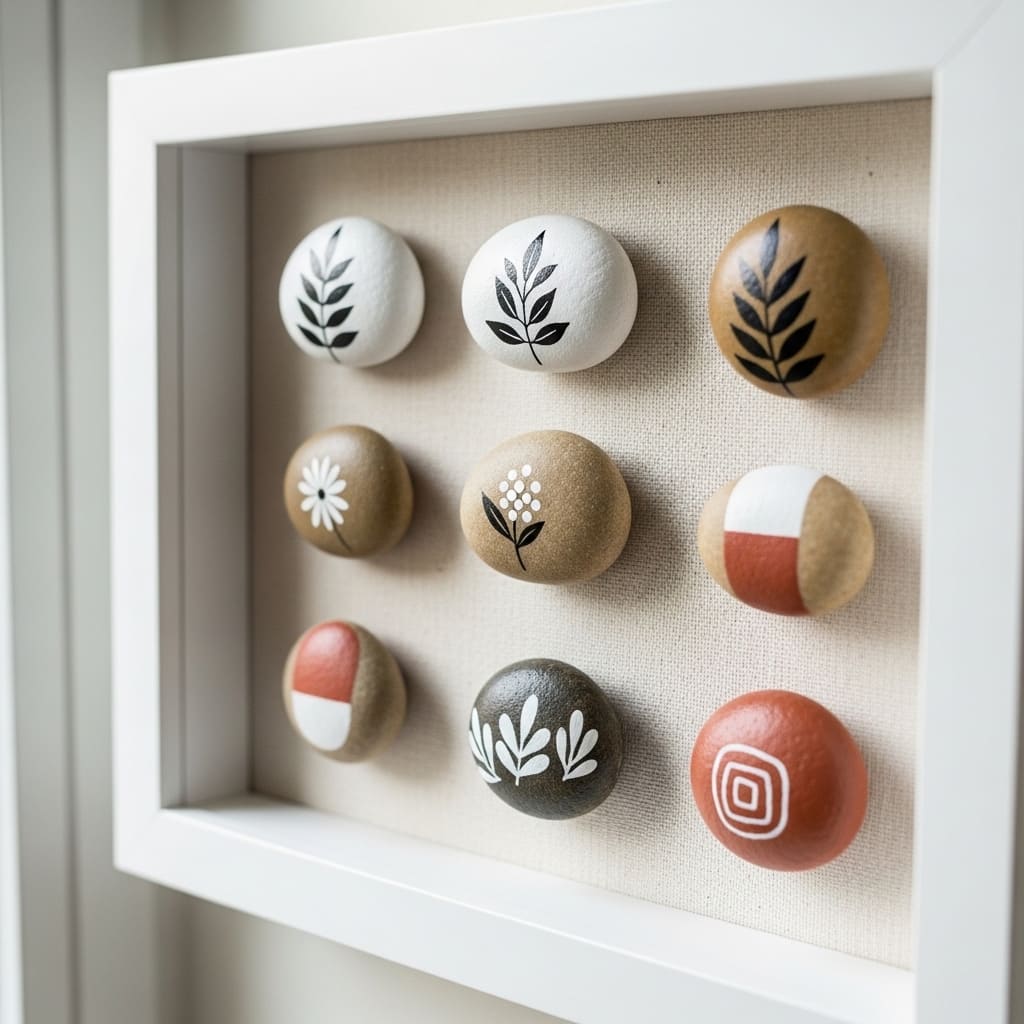
Hand-painted river pebbles arranged and framed in a shadow box create a completely unique, three-dimensional wall art piece that costs virtually nothing beyond a standard shadow box frame and basic craft paint. Collecting smooth river stones from a local stream, beach, or landscaping supply store provides free raw material in varying sizes and shapes that add natural organic variety to the finished arrangement. Painting each pebble with a simple botanical leaf, a tiny flower, or a minimal geometric pattern in black and white craft paint takes about 20 minutes total for a full set of 8 to 12 stones.
The natural stone texture showing between the painted motif areas adds a tactile, earthy quality to the finished wall piece that no printed or painted flat artwork can replicate. Each painted pebble carries its own unique stone shape, grain, and surface character, giving the framed arrangement a genuinely handcrafted uniqueness that mass-produced wall decor fundamentally cannot deliver at any price point. I’ve seen this specific wall art idea consistently generate the most enthusiastic responses from visitors because the combination of natural materials and painted detail work creates an almost irresistible desire to look closely and touch the surface.
- Near-zero cost using collected river pebbles
- Natural stone texture adds three-dimensional depth
- Simple botanical motifs suit any skill level
- Works beautifully in bathroom and entryway wall decor
- Framed shadow box creates gallery-quality presentation
A deep shadow box frame with at least 1.5 inches of internal depth accommodates the rounded profile of river pebbles without pressing them against the glass front. Arranging the painted pebbles on the cream linen backing in a loose, organic cluster rather than rigid geometric rows creates the most naturally composed and visually appealing display. Leaving some linen backing visible between the pebbles gives each painted stone visual breathing room and prevents the arrangement from looking densely packed and difficult to appreciate individually.
Sealing each painted pebble with a clear matte varnish before arranging them in the shadow box protects the painted motifs from scratching and chipping when the stones make occasional contact during normal handling and framing. The matte varnish finish preserves the natural stone appearance and prevents the painted areas from developing an artificial shiny coating that would look out of place against the raw, earthy stone surface. Two thin coats of clear matte varnish applied with a small brush and allowed to dry for one hour between coats provides durable, long-lasting paint protection for the finished display.
15. Stencil Wall Pattern
A repeating stencil pattern painted directly on a bedroom wall creates a custom, designer-quality wallpaper effect using a $6 craft stencil and a small foam roller, for a total project cost of under $15. Reusable plastic stencils in botanical, geometric, and Moroccan designs are widely available at craft stores and Amazon, covering every popular interior style from Scandi botanical to Mediterranean tile-inspired patterns. Choosing a soft sage green, dusty terracotta, or warm taupe stencil color on a white wall creates a pattern that feels genuinely sophisticated rather than obviously DIY at any viewing distance.
The repetitive stencil application process is beginner-friendly and forgiving because minor alignment imperfections between individual stencil repeats add organic, handprinted character to the finished pattern rather than detracting from its quality. Professional wallpaper installations aim for perfect mechanical repetition, but hand-stenciled patterns carry a slight irregularity that actually makes them feel more artisanal and human in the finished room. That’s why many budget home decor creators describe stenciling as one of the most satisfying and confidence-building DIY wall projects for first-time home decorators.
- Under $15 total for full wall stencil coverage
- Reusable stencils suit every interior style
- Minor imperfections add handprinted artisan character
- Works in rental apartments with landlord paint approval
- Sage green and terracotta suit 2026 wall palettes
Loading the foam roller with a thin, dry-brush amount of paint rather than a fully saturated roller prevents paint from bleeding under the stencil edges and producing blurred, indistinct pattern edges. The dry-brush technique, where most of the paint is rolled off the roller onto a paper towel before applying to the stencil, creates crisp, clean motif edges that look intentional and precisely applied. Most stenciling mistakes come from using too much paint rather than too little, so erring on the side of a lighter application and adding a second coat if needed always produces cleaner, more professional results.
Using low-tack painter’s tape to hold the stencil flat against the wall during each repeat application prevents the stencil from shifting mid-stroke and creating double-printed ghost images beside the main motif. Re-positioning the stencil to the next grid position by measuring consistently from the same reference point on the previously painted repeat, like the center of the previous motif, maintains even spacing across the full pattern repeat without requiring a full chalk line grid drawn on the wall surface before starting the project.
16. Vintage Postcard Display
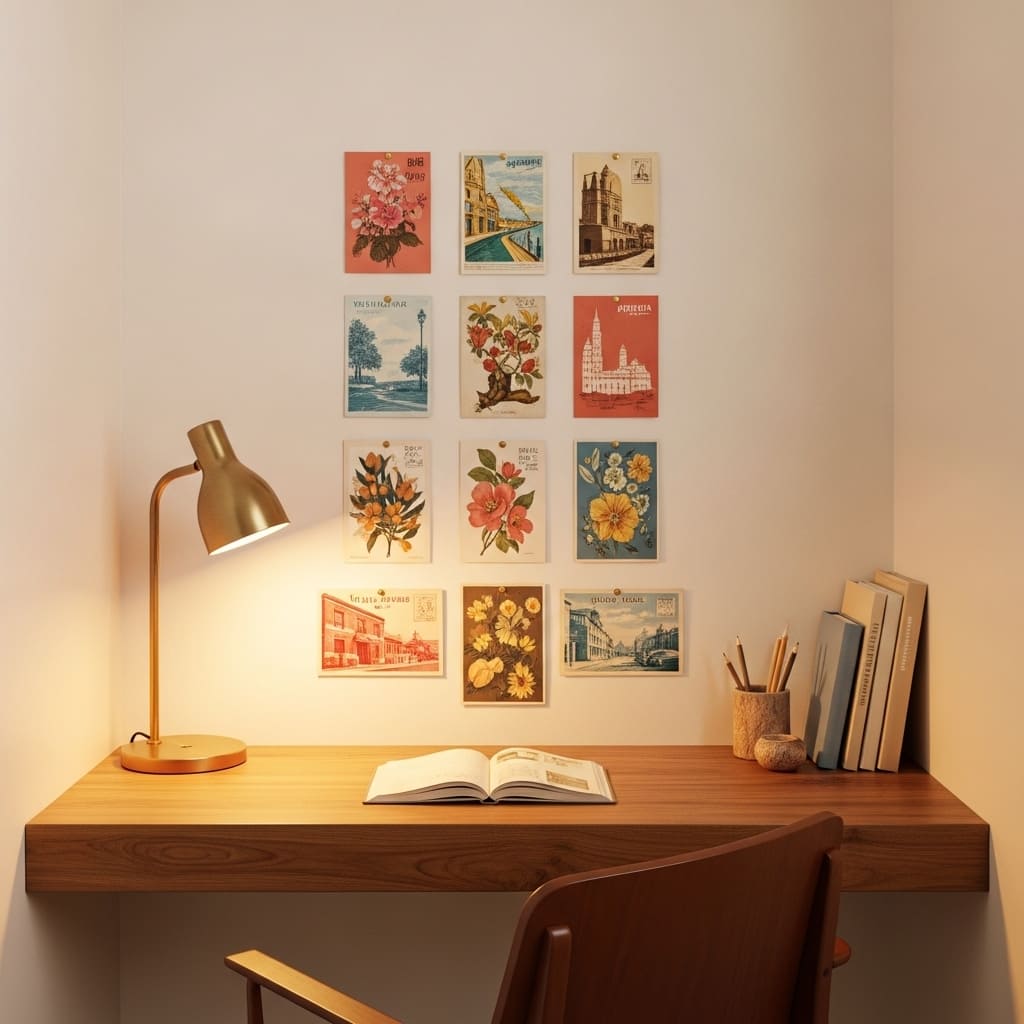
A grid of 12 vintage postcards pinned in a clean 3×4 arrangement above a desk or bed creates a wall display with genuine historical charm, rich visual variety, and personal storytelling quality for almost no financial investment. Vintage postcard collections at thrift stores, antique markets, and estate sales cost between $0.25 and $1.00 per card, making a full 12-postcard display achievable for under $12 total. Selecting cards within a cohesive tonal palette, like warm sepia, muted coral, and dusty blue, creates a unified vintage display that looks deliberately curated rather than randomly assembled.
The varied subjects within a well-curated vintage postcard collection, like retro travel destinations beside botanical illustrations beside architectural sketches, create natural visual variety and a sense of personal taste and collected history that no single-subject wall display can achieve. Each postcard carries its own unique printing texture, aged color quality, and historical character that adds depth and visual interest at close inspection. I’ve noticed that vintage postcard walls generate the most genuine conversation and personal engagement from visitors of virtually any budget wall decor format, because every postcard prompts a natural question, memory, or story connection.
- Under $12 for a 12-postcard curated display
- Vintage sepia tones suit warm neutral rooms
- Mixed subjects create visual variety and depth
- Works beautifully in home office wall styling
- No frames needed, brass push pins suffice
Using brass push pins at the two top corners of each postcard creates the cleanest, most minimal mounting method for a postcard grid display. Centering each pin at the very top corner of the card keeps all eight pins in the grid aligned along the same two horizontal pin lines, creating a neat, organized visual rhythm across the full 3×4 arrangement. The brass pin color complements the warm sepia tones of vintage postcards and adds a subtle metallic accent to the display without introducing a competing visual element.
Leaving the postcards unpinned at the bottom allows the card bottoms to lift very slightly from the wall, creating a gentle three-dimensional quality in the display that adds movement and subtle depth. This soft curling quality is natural to vintage paper card stock and suits the collected, personal character of a postcard wall display far better than rigidly flat-mounted cards pressed tightly against the wall surface on all four corners. The slight paper curl at the bottom corners actually reinforces the authentic vintage, collected quality of the entire display arrangement.
17. Yarn Wrapped Branch Art
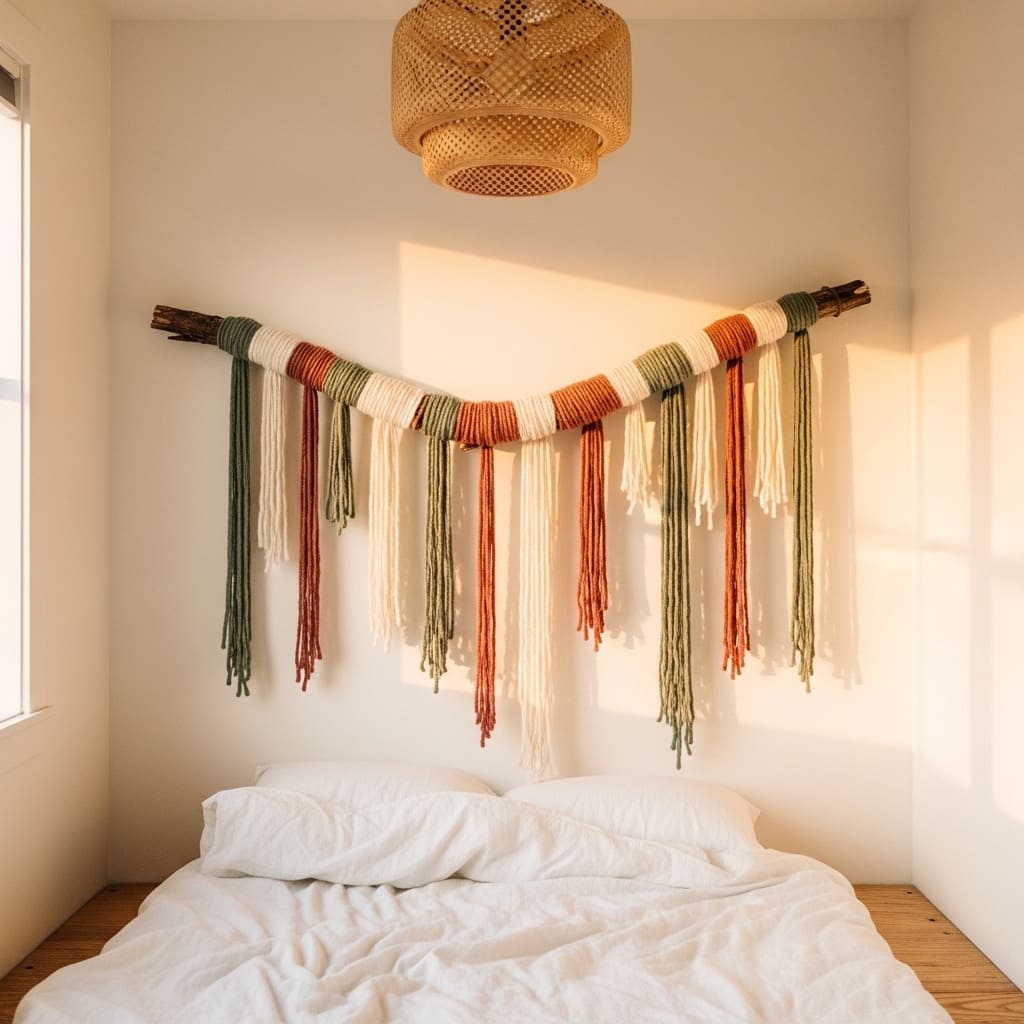
A yarn-wrapped forested branch wall hanging creates a richly textured, completely handmade wall piece using materials that cost between $4 and $8 total. Foraging a naturally fallen branch from a local park or backyard provides the structural base entirely for free, and wrapping sections of the branch with chunky yarn in warm neutral colors produces a wall piece with the same organic, artisan quality as expensive macramé wall hangings that retail for $60 to $120 online. This approach represents one of the most genuinely creative and budget-conscious cheap wall decor ideas available for small bedroom walls in 2026.
Wrapping the branch at irregular intervals, leaving sections of bare natural wood visible between the yarn-covered zones, creates a more organic and sophisticated look than wrapping the full branch length uniformly from end to end. The alternating rhythm of wrapped color and exposed natural wood grain produces a visual composition with natural variation and material contrast that makes the branch hanging look intentionally artistic rather than simply decorated. That’s why many boho home decor creators specifically recommend the interval-wrapping technique over full coverage for yarn branch wall art.
- Under $8 using foraged branch and craft yarn
- Chunky yarn adds rich textile wall texture
- Interval wrapping creates organic artistic rhythm
- Works beautifully in boho bedroom wall decor
- One-hour DIY project, zero special skills needed
Securing the yarn wrapping at both start and finish points by looping the end tightly under several previous wraps and knotting it prevents unwinding without requiring glue or any additional adhesive. Chunky weight yarn in a natural cotton or wool blend drapes most beautifully and adds the most tactile visual weight to the wrapped sections of the branch. Thin yarn wrapping loses the bold, textural quality that makes this type of wall art visually compelling from a normal room viewing distance.
Hanging the finished branch from two small nails or picture hooks on the wall using a length of natural jute cord creates an organic, floating display that suits the handmade character of the piece perfectly. Spacing the two hanging points at roughly one-third and two-thirds of the branch length creates a naturally balanced hang that prevents the branch from tilting or rotating from one heavy end. Adding a few additional yarn fringe pieces of varying lengths hanging down from specific points along the branch below the wrapped sections completes the wall hanging and adds movement and visual depth to the finished display piece.
18. Indigo Fabric Wall Drape
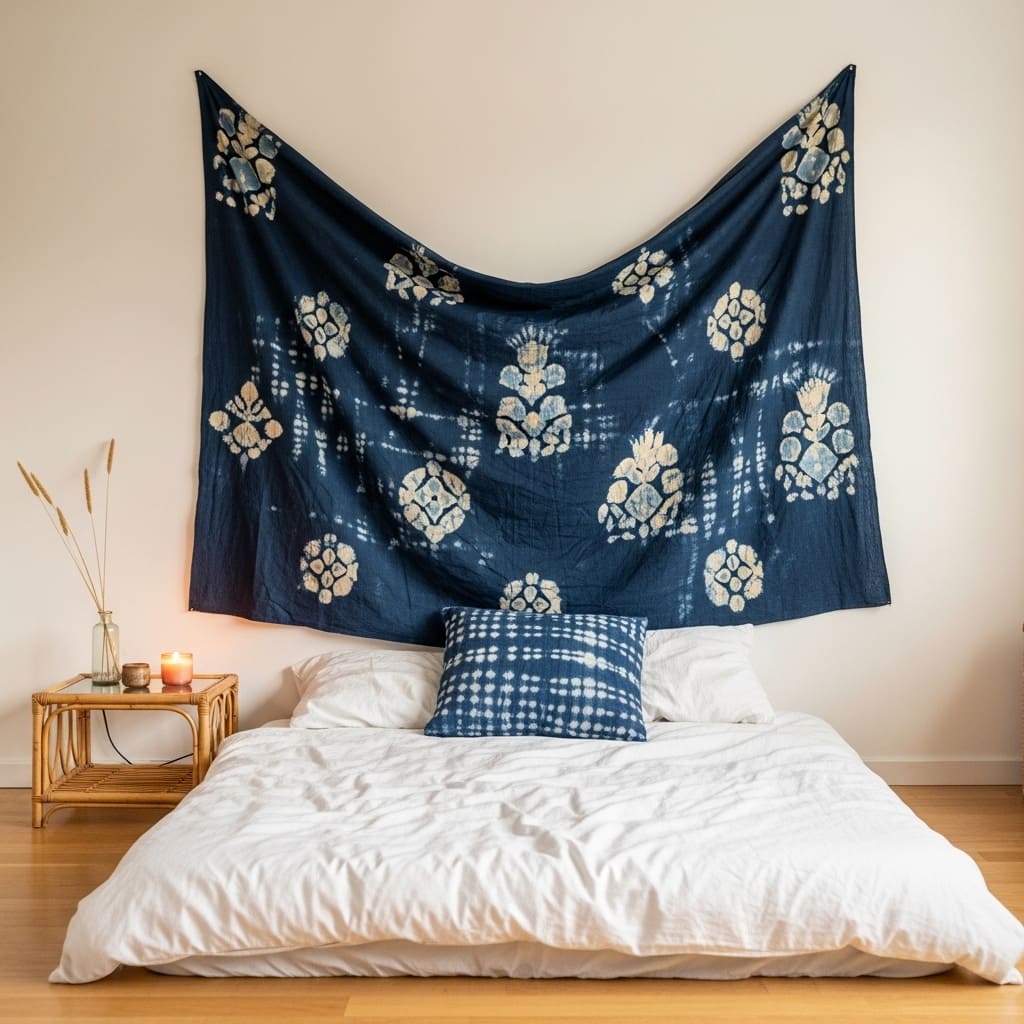
A single length of indigo-dyed batik fabric draped on a bedroom wall creates one of the boldest, most culturally rich wall displays available at a budget price point in 2026. Fabric yardage at $3 to $8 per yard from a craft store or local textile market provides a full bedroom-width wall drape for well under $20 total. Pinterest data shows a 220% surge in searches for Afrohemian and indigo textile decor in 2026, confirming this bold, globally inspired approach as one of the year’s fastest-growing wall styling directions across home decor platforms.
Pinning the fabric loosely along the top edge using decorative brass pins and allowing the lower portion to drape naturally creates a soft, gathered silhouette with organic folds and movement that a flat-mounted framed piece simply cannot deliver. The natural drape of cotton batik fabric creates depth, shadow, and dimensional texture across the wall surface that changes subtly as the room’s light shifts from morning to evening. That’s why many globally inspired home decorators describe fabric wall draping as the highest-impact, lowest-effort budget wall transformation available for a small bedroom.
- Under $20 for a full bedroom wall drape
- Indigo fabric suits 2026 Afrohemian trend direction
- Natural fabric drape adds organic movement and shadow
- Works beautifully in bold boho bedroom wall decor
- Zero tools required, brass pins do all the work
Choosing a fabric width of at least 45 to 54 inches ensures the drape covers the full visual space above a queen bed without looking narrow or undersized. Standard quilting cotton and batik fabric yardage comes in these widths as a default and suits wall draping beautifully because the medium weight of the fabric drapes gracefully rather than sagging limply or holding stiffly upright. Heavier canvas or upholstery fabric holds less gracefully and typically needs more pinning points to maintain an aesthetically pleasing gathered silhouette across the full width.
Washing the fabric before hanging removes any manufacturing sizing that causes new fabric to feel stiff and to drape less naturally. One gentle machine wash in cold water and a low-heat tumble dry softens the fabric fibers and produces the relaxed, organic drape quality that makes fabric wall displays look naturally effortless rather than rigidly installed. The pre-washed quality also prevents color bleeding from the indigo dye onto the wall surface if the fabric ever makes direct, sustained contact with a freshly painted wall.
19. Sunburst Mirror DIY
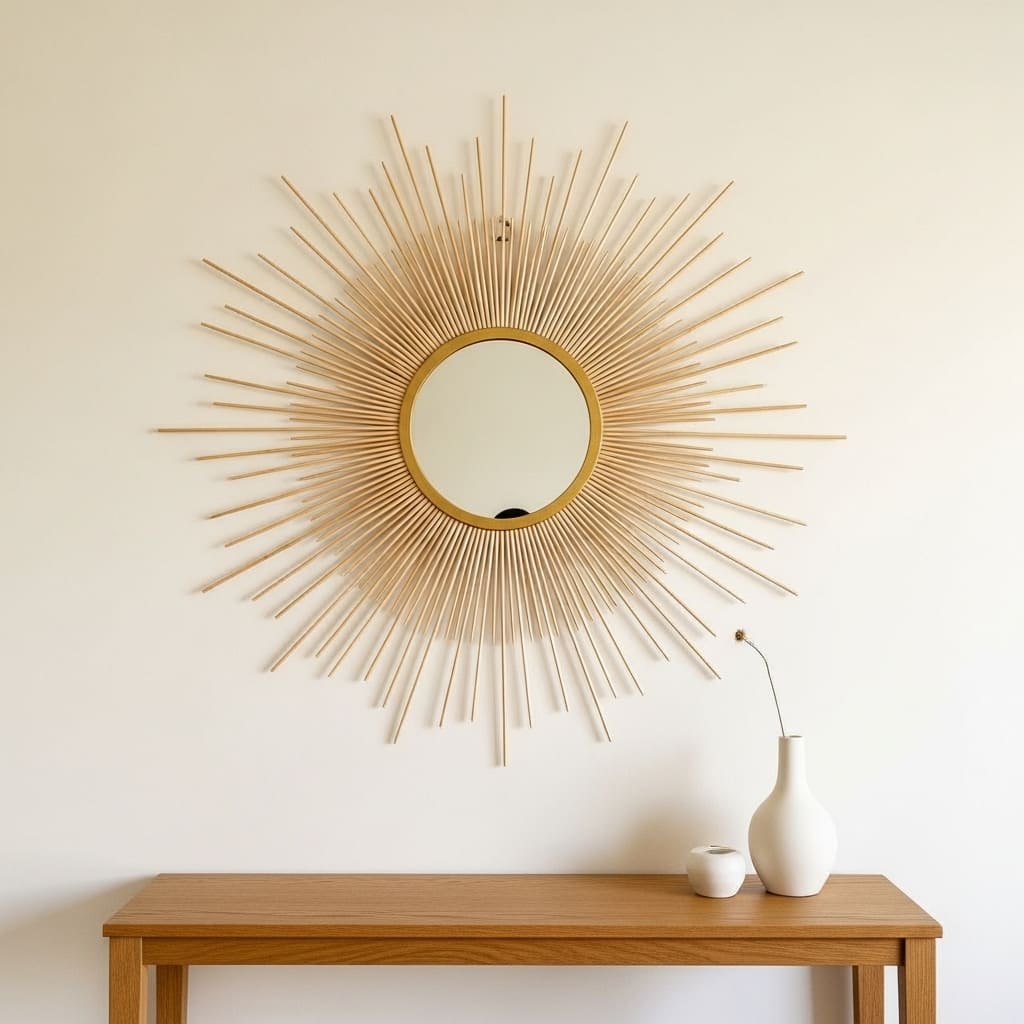
A DIY sunburst mirror using wooden skewer sticks, a small round mirror tile, and gold spray paint creates a genuinely glamorous entryway wall piece for under $12 total. Round mirror tiles at craft stores cost between $2 and $4, and a pack of 100 bamboo skewer sticks at a grocery store costs about $2. Spray painting the assembled skewer-and-mirror combination in antique gold produces a sunburst mirror that looks strikingly similar to versions selling for $80 to $150 at home decor retailers. This is one of the most visually impressive cheap wall art ideas delivering the biggest gap between perceived value and actual cost.
The Neo Deco design direction, featuring geometric sunburst shapes and warm brass or gold metallic accents, saw an 80% Pinterest search increase heading into 2026, confirming this glamorous aesthetic as one of the year’s strongest home decor trends. Creating a budget version of the sunburst mirror specifically taps into this high-demand visual style at a tiny fraction of the retail price. That’s why many DIY home decor creators rank the gold sunburst mirror as their single highest-return DIY project recommendation for anyone decorating an entryway or living room on a strict budget.
- Under $12 total for a gold sunburst mirror
- Neo Deco gold tone suits 2026 glam interiors
- Delivers $80 to $150 retail look for pennies
- Works beautifully in entryway wall decor styling
- Basic craft glue and spray paint are all you need
Arranging the skewer sticks in two layers, a first inner ring of shorter sticks and a second outer ring of longer sticks between the inner rays, creates a more complex, multi-layered sunburst pattern that looks far more dimensional and professionally designed than a single-layer even-length ray arrangement. The alternating long and short ray lengths mimic the classical sunburst mirror design found at premium price points and give the DIY version a genuine design sophistication beyond its basic material origins.
Gluing the first inner ring of skewers to a cardboard backing circle before attaching the mirror tile center keeps all the rays precisely aligned and evenly spaced around the circular center. Using a protractor or dividing a circle template into equal degree segments before gluing each ray ensures the finished sunburst reads as precisely radial from every viewing angle. Precision in the ray spacing is what separates a genuinely impressive DIY sunburst mirror from an amateurish version where uneven ray gaps undermine the geometric clarity of the finished design.
20. Painted Terracotta Pot Wall
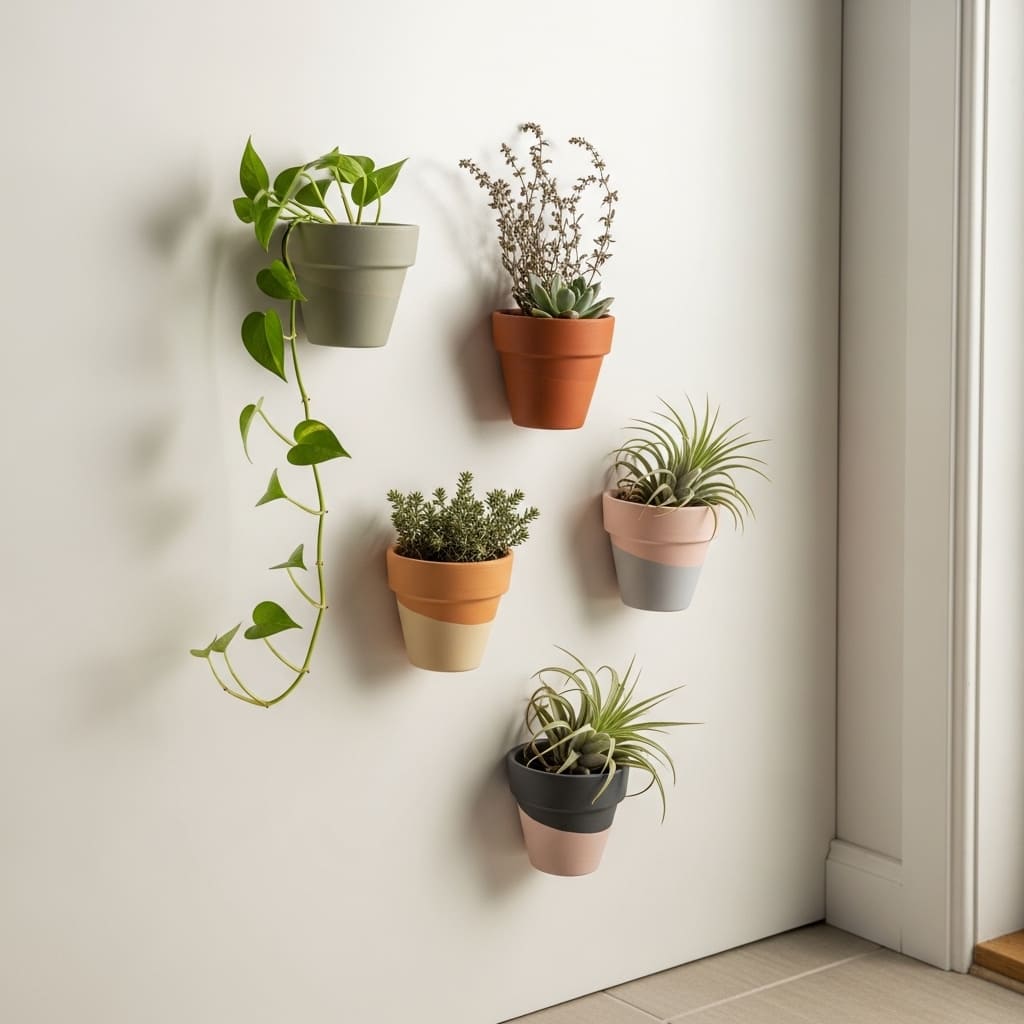
Five small terracotta pots painted in matte coordinating colors and wall-mounted in a diagonal scatter arrangement create a living wall display that is simultaneously decorative art, plant display, and kitchen herb garden in one integrated installation. Standard 3-inch terracotta pots at craft stores and garden centers cost between $0.50 and $1.50 each, and a $5 can of matte spray paint covers all five pots completely. The full five-pot painted wall display costs under $15 total and delivers a fresh, nature-filled wall moment that no flat print or canvas can replicate.
Mounting each pot using a small terracotta pot wall hanger, which clips around the pot rim and mounts on a single screw, keeps the installation clean, secure, and simple with basic tools. Small pot wall hangers in black metal or brass finish cost between $1 and $3 per piece at garden supply stores and Amazon. Choosing all-black or all-brass hangers across all five pots creates a unified hardware finish that reinforces the intentional, designed quality of the overall wall arrangement rather than looking like a collection of randomly installed individual pots.
- Under $15 total for five mounted painted pots
- Living plants add organic life to kitchen walls
- Matte painted pots suit any neutral room palette
- Works beautifully in kitchen and entryway wall decor
- Diagonal scatter arrangement feels naturally organic
Planting different varieties in each pot adds visual variety and a sense of collected abundance to the wall display. A trailing pothos, a compact succulent, a small bunch of fresh thyme, a tiny air plant, and a simple clover or moss cluster each bring different leaf shapes, textures, and growth habits that create natural visual diversity across the five mounted pots. Varying the plant types rather than using identical specimens in every pot prevents the wall display from looking mass-produced and reinforces the organic, individually considered quality of the living plant wall arrangement.
Watering mounted wall pots requires a small squeeze bottle or a narrow-spout watering can to avoid splashing the painted wall surface around each pot during regular watering. Choosing low-water plants like succulents, air plants, and trailing pothos for the wall-mounted pots minimizes watering frequency and reduces the risk of water damage to the wall surface from regular maintenance. These specific plant varieties thrive in indoor environments with minimal direct light and infrequent watering, making them the most practical choice for any living wall plant arrangement.
21. Paper Fan Wall Display
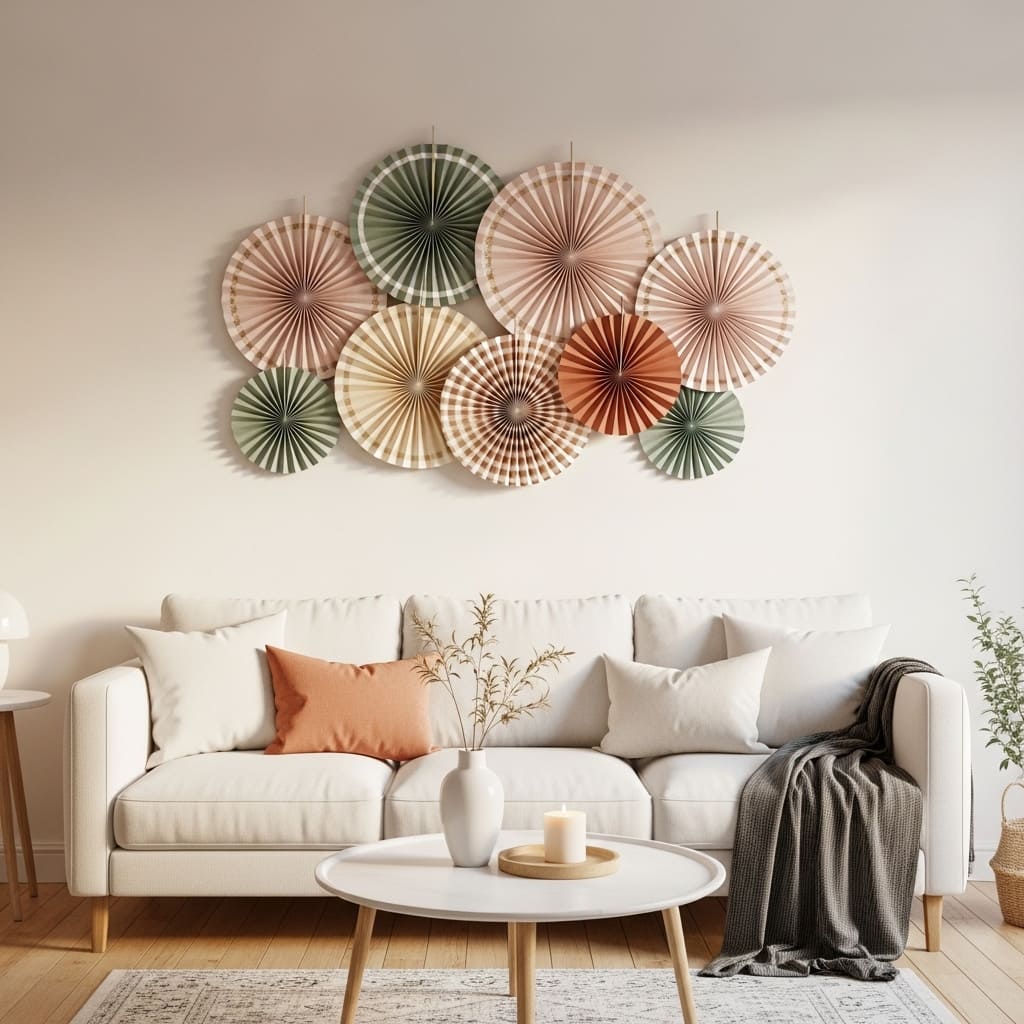
Seven hand-folded or pre-made paper fans mounted in a loose circular arrangement create one of the most festive, visually striking budget wall displays for a living room accent wall. Paper fan sets in coordinating colors at craft stores and Amazon cost between $6 and $12 for a set of 10 to 12 fans in multiple sizes. Arranging the fans in a circular burst pattern with the largest fans at the outer ring and smaller fans filling the inner areas creates a full, dimensional wall display that looks genuinely festive and party-quality in any season, not just for celebrations.
Choosing paper fans in a cohesive palette of warm blush, dusty sage, and muted terracotta keeps the display feeling intentionally styled and interior-design-appropriate rather than purely festive or occasion-specific. Neutral earthy fan tones suit everyday living room wall decor beautifully and hold their visual appeal long after any seasonal occasion has passed. I’ve seen paper fan wall displays remain as permanent living room features for months at a time because the tonal cohesion and dimensional texture of the arrangement gives it a year-round decorative quality that transcends its party-supply material origins.
- $6 to $12 for a full ten-fan display set
- Circular arrangement creates dimensional wall art
- Earthy tones keep the display seasonally versatile
- Works beautifully above sofas in compact living rooms
- Pre-made fans require zero crafting skills to mount
Mounting each paper fan using a single brass push pin through the center fan pivot point keeps each fan fully opened and flat against the wall surface without crushing or deforming the pleated paper folds. The single center pin allows each fan to be repositioned or rotated slightly for final arrangement adjustments without creating multiple pin holes across the wall surface. Starting the circular arrangement from the center outward, placing the largest fan first and working outward with progressively smaller fans, creates the most visually balanced and naturally radiating circular composition.
Staggering the fan depths slightly by folding some fans to their full 180-degree open position and others to only 120 or 150 degrees creates a subtly varied surface depth across the circular arrangement. The slight variation in fan opening angle produces a three-dimensional quality in the overall display that makes the paper fan wall look more sculptural and carefully considered than a flat arrangement of all fully opened, identical-depth fans pinned uniformly to the wall surface. This small adjustment takes under two minutes and significantly improves the visual quality of the finished installation.
22. Floating Book Ledge Display
Two slim floating picture ledges styled with a casual mix of small framed prints, leaning books, a ceramic vase, and a tiny trailing plant create a complete, gallery-quality wall display that costs between $14 and $22 total for both ledges from IKEA or Amazon. Picture ledges, specifically the IKEA Mosslanda at $9.99 each, are among the most widely recommended affordable wall styling tools by interior stylists because they allow framed art to lean rather than hang, making the entire display endlessly rearrangeable without creating new nail holes every time the arrangement changes.
The casual, leaning quality of artwork on a picture ledge looks deliberately relaxed and styled rather than rigidly installed, which suits the 2026 interior direction toward warm, personal, and curated-feeling spaces over precisely symmetrical wall arrangements. Mixing art prints, books with beautiful spines, small ceramics, and a single plant on the ledge creates a wall display with multiple layers of visual interest that rewards both distant viewing and close inspection equally well. That’s why many minimal interior stylists describe the styled picture ledge as their most recommended single wall decor investment for small apartments and rental homes.
- Two IKEA ledges cost under $22 combined
- Leaning art avoids new nail holes every time
- Mixed ledge styling creates a layered wall display
- Works in rental apartments with zero wall damage risk
- Endlessly rearrangeable without additional cost
Choosing ledge lengths that span at least two-thirds of the width of the furniture or wall section below them creates the correct proportional relationship between the floating shelves and their backdrop. A ledge that is too short for the wall section it occupies looks undersized and accidentally placed rather than deliberately positioned. For a standard 72-inch sofa, ledges of at least 48 inches each create the visual presence needed to anchor the sofa wall confidently and make the floating display read as a genuine room design feature.
Styling each ledge with no more than 4 to 5 objects prevents overcrowding that removes the breathing space that makes ledge displays look curated rather than cluttered. Keeping one zone of each ledge completely empty between two styled vignettes creates natural visual pauses that give the eye a resting point and make each individual styled cluster read more clearly and intentionally. The empty ledge space is as important to the overall display quality as the objects arranged on the surface itself.
23. Kraft Paper Poster Art
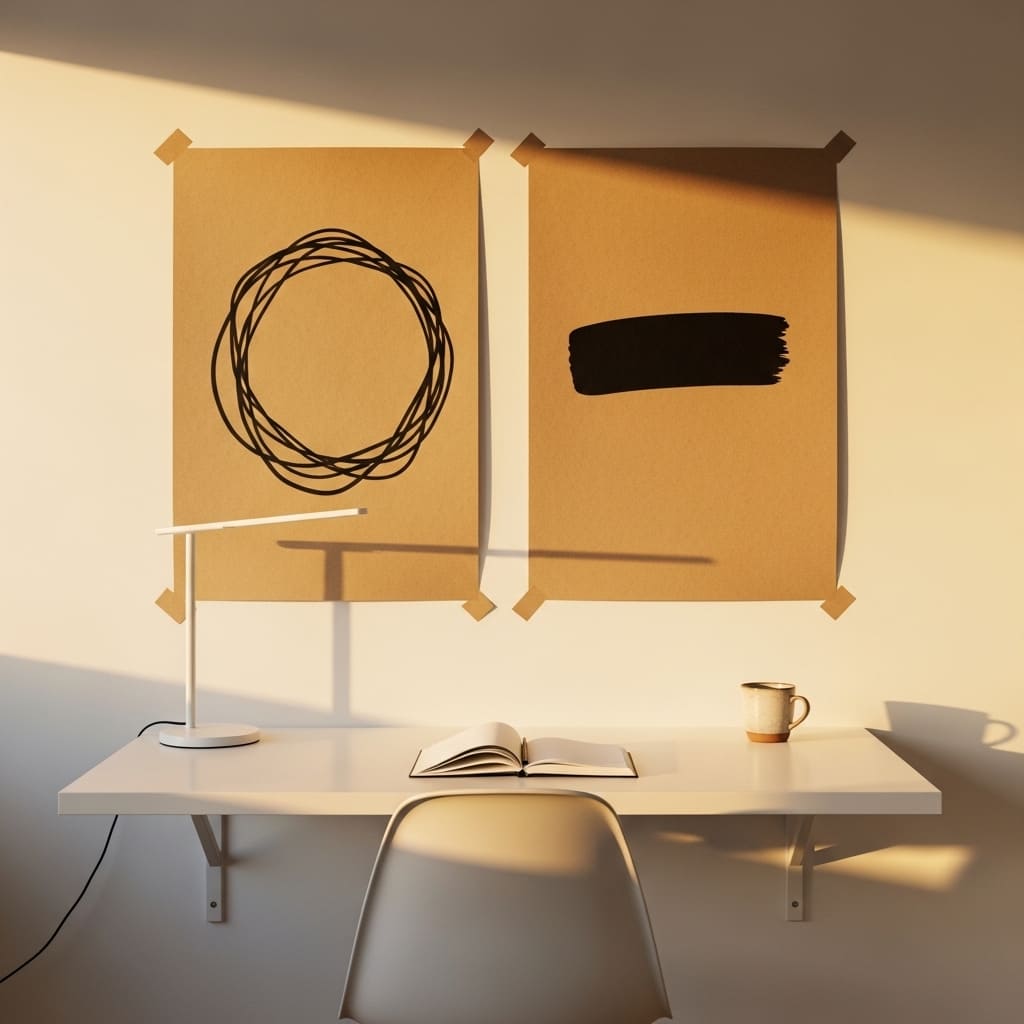
Large sheets of brown kraft paper with simple hand-drawn designs in black marker create genuinely striking abstract wall art for the cost of a $4 craft supply purchase. A 24×30 inch kraft paper poster pinned directly to the wall with four brass push pins looks confidently artistic, editorial, and deliberately unconventional in a home office or bedroom. The warm brown paper tone adds natural earthy warmth to the wall while the black marker drawing provides graphic clarity and visual contrast that reads as a bold creative statement from across the full room.
Drawing a single large organic circle, a bold brushstroke arc, or a simple loose leaf shape in thick black marker on kraft paper requires zero artistic training and produces an abstract result that genuinely looks intentional and modern. Abstract expressionist art consistently sells for hundreds of dollars in galleries, but the underlying visual language of a single mark on a raw surface is accessible to any person holding a black marker in their hand. I’ve noticed that hand-drawn kraft paper wall art consistently surprises people with how genuinely impressive it looks when pinned to the wall despite the near-zero cost and minimal artistic effort it actually requires.
- Under $4 for a full large-scale abstract poster
- Kraft paper warm tone adds earthy wall character
- Black marker abstract shapes look intentionally modern
- Works in home office and creative bedroom wall styling
- Zero artistic skills needed for bold abstract results
Pinning the kraft paper directly to the wall using four brass push pins at each corner, rather than framing it, reinforces the deliberately raw, studio-quality aesthetic that makes this wall art approach feel confidently artistic rather than tentatively budget-constrained. The unframed, pinned presentation communicates a designer-level comfort with raw materials and process-driven aesthetics that is actually more visually sophisticated than a basic frame would suggest. The visible brass pin heads at each corner add minimal metallic accents that connect the kraft paper display to the room’s other brass or gold accessory tones.
Rolling the kraft paper lightly in the opposite direction of its natural curl for 10 minutes before pinning flattens the paper sheet against the wall surface cleanly. Kraft paper rolls retain a natural curl from their packaged state that causes unflattened sheets to pull away from the wall at the corners and edges. The reverse-rolling technique is the single most important preparation step for a clean, flat kraft paper wall installation and takes less than five minutes with no tools beyond the natural paper roll and your own hands.
24. Sheer Curtain Wall Backdrop
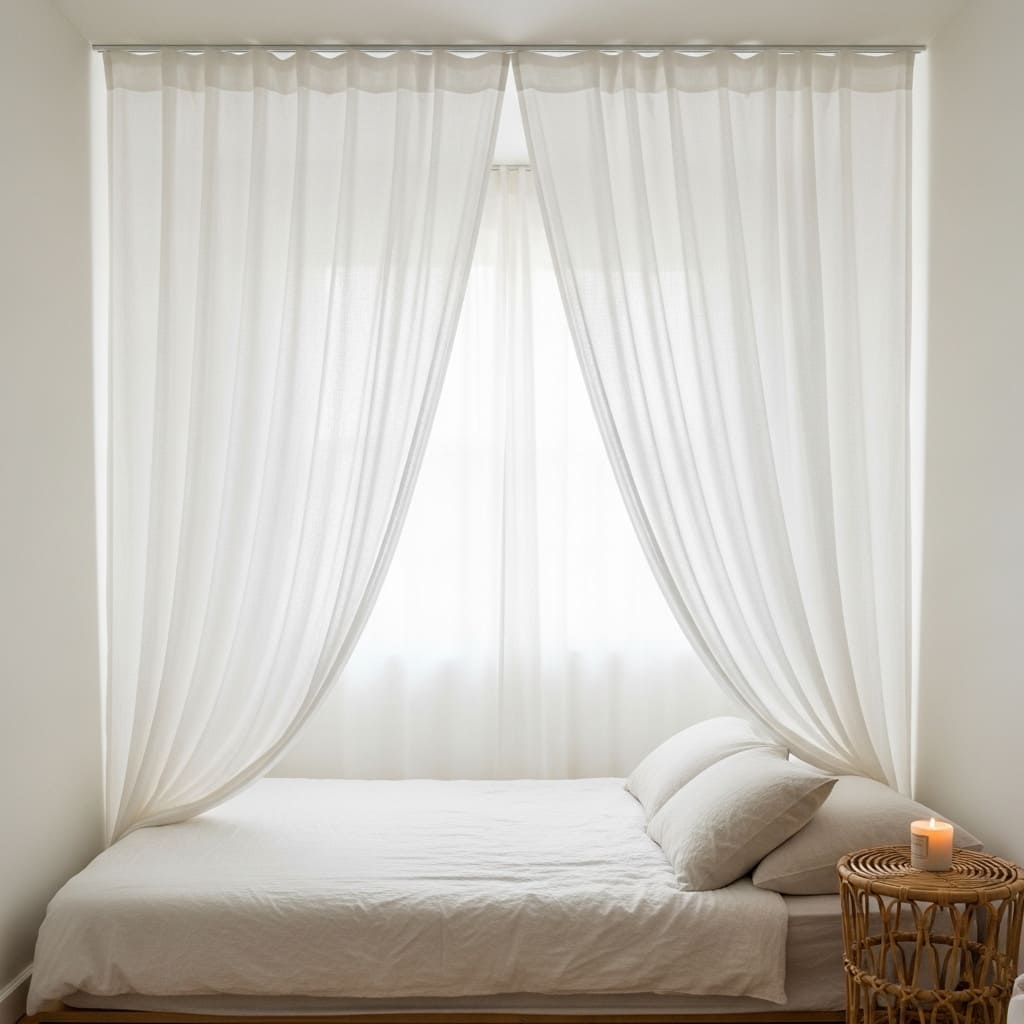
Two panels of budget sheer linen curtains hung from a ceiling rod directly behind the bed create a genuinely dreamy, hotel-quality bedroom backdrop for under $25 total. Sheer white curtain panels at Amazon, IKEA, and Target cost between $8 and $15 per panel, and a basic tension rod or small ceiling-mounted curtain rod adds $6 to $12 to the total project cost. The result is a full-height fabric wall backdrop that diffuses natural light into a soft, warm glow behind the bed and makes even a small, basic bedroom feel intentionally luxurious and genuinely beautiful.
The ceiling-to-floor length of sheer curtain panels creates a strong vertical line that makes low-ceilinged rooms feel significantly taller by drawing the eye upward from the floor to the ceiling. This height-extending visual effect is one of the most valuable layout benefits of fabric wall backdrops in compact apartments with standard 8-foot ceiling heights. That’s why many small-space interior stylists specifically recommend the sheer curtain wall backdrop as one of their top budget solutions for making a compact bedroom feel more spacious, airy, and architecturally interesting.
- Under $25 total for a full ceiling-to-floor backdrop
- Sheer panels diffuse light into dreamy warm glow
- Vertical length visually extends low ceilings upward
- Works in small apartment bedroom wall decor styling
- Creates hotel-quality bedroom backdrop on any budget
Installing the curtain rod as close to the ceiling as possible, ideally within 2 to 4 inches of the ceiling surface, maximizes the height-extending effect of the full-length panels. A rod mounted at standard window height of 7 feet rather than ceiling height loses the ceiling-extending benefit entirely and produces a backdrop that looks like a window treatment installed behind a bed rather than a deliberate, designed fabric wall feature. The ceiling-height installation is the single most important factor in achieving the elevated, intentional look that makes the sheer curtain wall backdrop genuinely impressive.
Choosing sheer panels in pure bright white or warm off-white rather than patterned, embroidered, or bold-colored options keeps the fabric backdrop looking clean, minimal, and serene rather than visually busy. The primary value of the sheer backdrop lies in its light-diffusing translucency and its gentle visual softness, both of which are strongest in plain, unpatterned sheer fabric. Any pattern, texture, or color printed on the fabric surface reduces the ethereal quality of the light diffusion effect and moves the backdrop away from the soft, dreamy aesthetic that makes this budget wall idea so visually compelling.
25. Pegboard Entryway Organizer
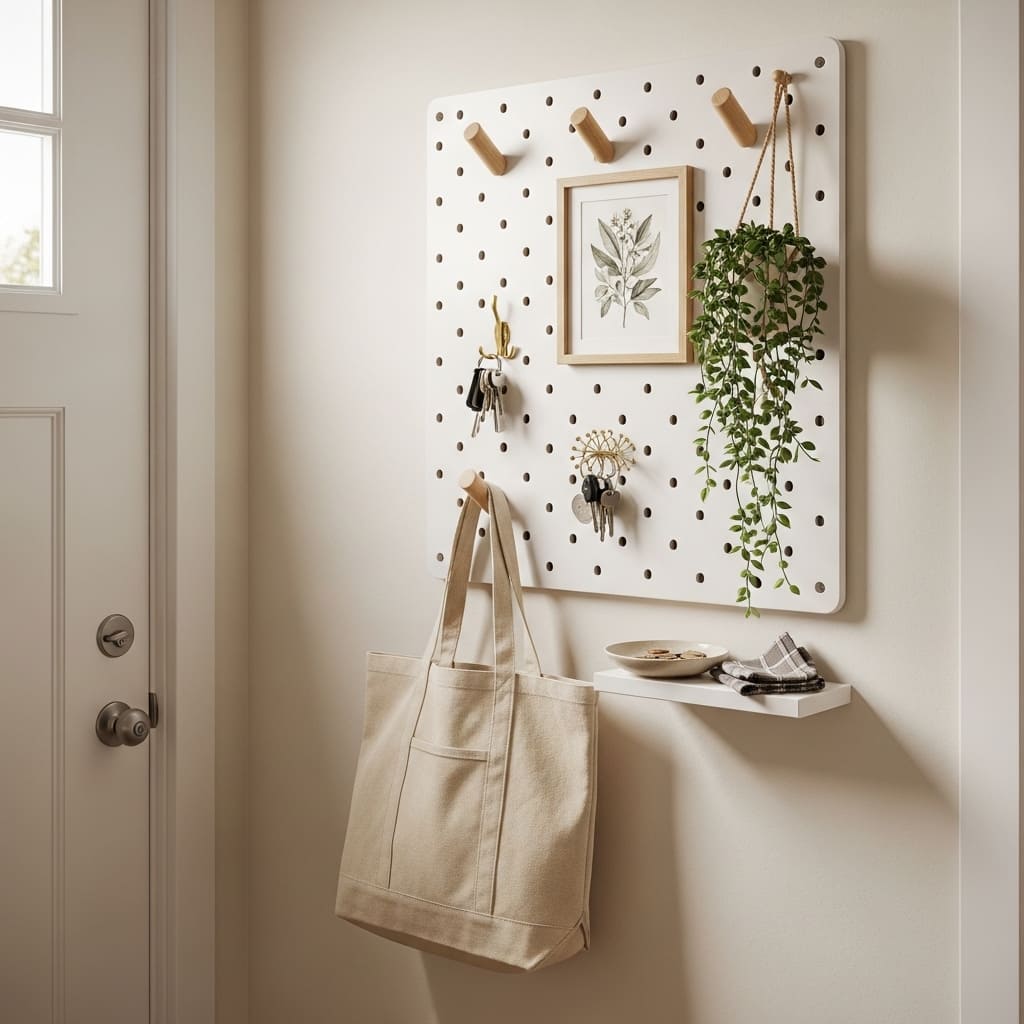
A white-painted square pegboard panel beside the front door creates a fully functional entryway organization system and a genuinely styled wall display in one affordable installation. Standard 24×24 inch pegboard sheets at hardware stores cost between $6 and $12, and a $5 can of matte white spray paint unifies the surface with the wall color for a clean, built-in appearance. Adding natural wood hooks, a small floating shelf, and one small framed botanical print transforms the functional pegboard into a wall display that looks deliberately designed rather than purely practical.
Combining function with decoration on a single wall panel makes the pegboard entryway solution especially valuable in compact apartments where wall space is extremely limited and every surface needs to serve multiple purposes simultaneously. The hooks handle daily essentials like keys and bags while the framed print and small plant pot add visual warmth and personal character that makes the entryway feel genuinely welcoming rather than purely utilitarian. I’ve tried this exact setup in a narrow apartment entryway with only 18 inches of available wall space, and the pegboard turned that tiny zone into the most purposeful and visually satisfying corner in the entire apartment.
- $6 to $12 for a pegboard sheet at hardware stores
- White paint creates a clean built-in wall appearance
- Hooks, plants, and art combine function and style
- Works in narrow apartment entryway wall styling
- Small botanical print adds warmth to functional setup
Spray painting the pegboard the same color as the wall it mounts on creates the visual illusion that the hooks and accessories are floating directly on the wall surface itself. This color-matched approach elevates the pegboard from an obvious functional panel to a subtle, integrated wall feature where the organization elements appear as the primary visual story rather than the board itself. The color match technique works in any paint color and suits both white and warm-toned wall surfaces equally well throughout the full range of neutral and earthy interior palettes.
Mounting the pegboard using four drywall anchors at each corner creates a secure installation that supports the weight of daily-use items like canvas bags and keys without sagging or pulling away from the wall over time. Most pre-packaged pegboard kits include small plastic spacers that hold the board 0.5 to 1 inch away from the wall surface, creating the clearance gap the pegboard hooks require to insert and lock properly. Installing the board flush against the wall without these spacers prevents the hooks from inserting to their full depth and causes them to slip out under the weight of hanging objects.
26. Newspaper Page Wall Collage
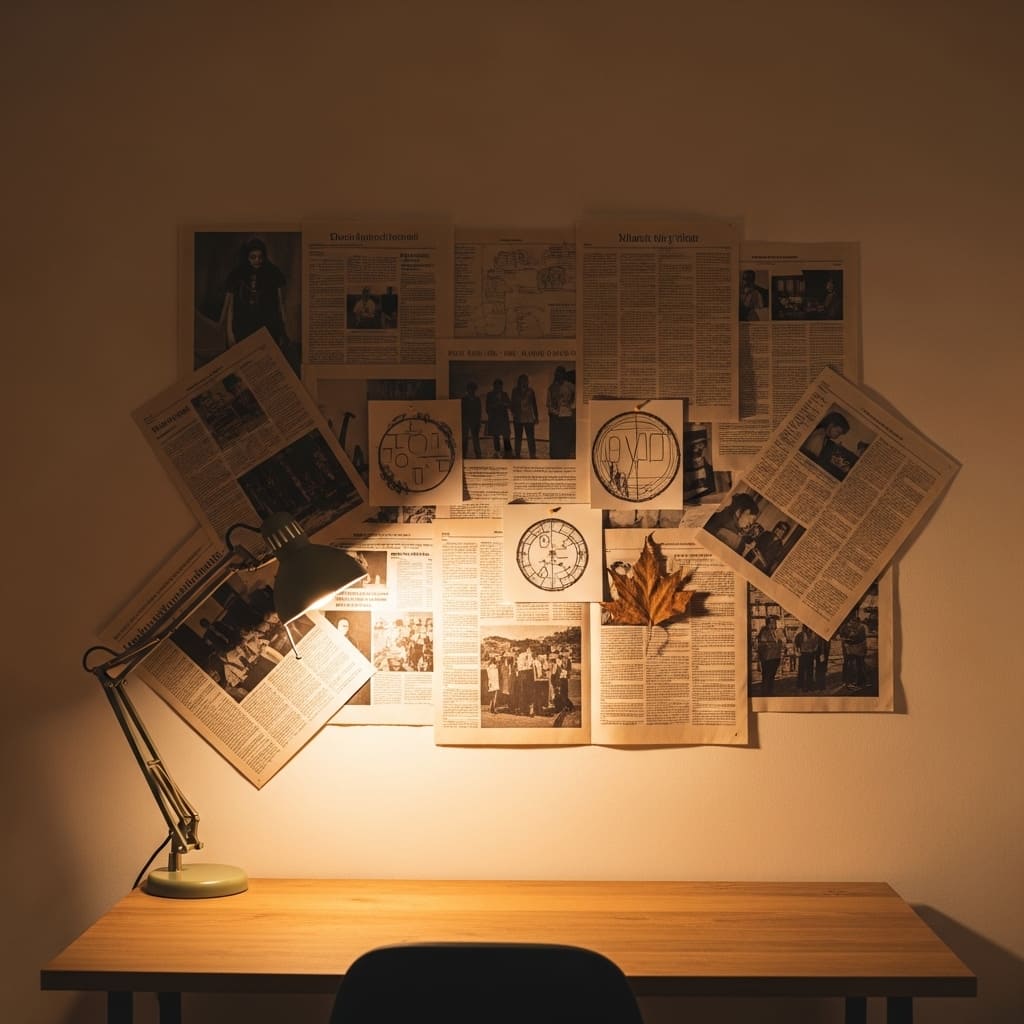
Overlapping newspaper pages in a loosely arranged rectangular collage on a bedroom or studio wall creates one of the most cost-free, texturally rich wall backdrops available to any budget decorator. Torn newspaper pages in natural newsprint tones, layered at slight angles over a defined rectangular zone on the wall using a thin coating of watered-down white school glue, create a papier-mâché-style wall treatment that adds organic texture and a distinctly editorial, intellectual aesthetic. The total cost of this wall idea is genuinely zero if a newspaper is already in the home, making it the ultimate free wall decor solution.
Selecting pages with interesting typographic layouts, photographic content, or bold headline graphics adds visual variety to the newspaper collage surface and creates a display that rewards close reading and visual exploration. Covering the dried collage layer with a single coat of clear matte varnish seals the newspaper pages permanently, prevents yellowing, and creates a smooth, unified surface finish that looks intentionally applied rather than casually assembled. That’s why many art-school-inspired home decorators recommend the sealed newspaper wall collage as one of the most genuinely creative and intellectually expressive zero-budget wall art approaches currently available.
- Completely free using existing newspaper pages
- Papier-mâché layering creates organic wall texture
- Clear varnish seals and unifies the finished surface
- Works in creative studio and dark academic bedroom decor
- Zero-cost solution for a bold, editorial wall display
Tearing the newspaper page edges rather than cutting them cleanly creates the most organic, naturally blended layered collage surface. Torn edges feather and blend into adjacent pages seamlessly, while cut edges create visible hard lines between pages that make the collage look assembled rather than organically grown across the wall surface. The torn-edge technique is the primary visual characteristic that distinguishes a genuinely artful newspaper wall collage from a simply papered surface, and it requires no tools beyond your own hands to execute properly.
Limiting the newspaper collage to a defined rectangular zone rather than covering the full wall prevents the treatment from overwhelming a small room with too much visual texture and typographic content across every surface. A 30×40 inch rectangular collage zone above a desk or bed creates the right scale impact without covering so much wall area that the room feels claustrophobically papered. Clear boundaries on all four sides of the collage zone, achieved by taping off the edges before applying the first newspaper layer and removing the tape cleanly after drying, give the organic collage surface a deliberately framed, composed appearance.
Conclusion
Beautiful walls do not require a big budget — they require the right ideas and a small amount of creative courage. Every idea in this article proves that your home can look genuinely stylish, warm, and intentionally designed without spending more than $20 on any single wall piece. I’ve seen how the right wall decor choice completely shifts the entire mood of a room and gives people a real sense of pride in their home. These cheap wall decor ideas work in real apartments and real lives. Save this post on Pinterest, try your favorite idea this week, and share it with a friend whose walls need exactly this kind of transformation.
Frequently Asked Questions
What is the cheapest way to decorate a blank wall?
The cheapest options are fully free. Collect pressed leaves, tear decorative magazine pages, or draw abstract designs on kraft paper. Pin them directly to the wall with brass push pins.
How do I make cheap wall decor look expensive?
Consistency is the key factor. Use matching frame finishes, stick to a cohesive two or three color palette, and leave breathing space around each display.
What wall decor works best in a rental apartment?
Washi tape designs, peel-and-stick wallpaper strips, picture ledge shelves, and fabric drapes all work without permanent wall damage. Removable adhesive strips handle most lightweight frames safely. These renter-friendly options give you full decorating freedom while keeping your security deposit completely intact when you move out.
How many wall pieces should a room have on a budget?
Start with one strong focal point per wall section. One well-chosen piece in the right scale and placement always outperforms three or four small, scattered items.
Can I make DIY wall art with no artistic skills?
Absolutely yes. Washi tape geometry, yarn-wrapped branches, kraft paper abstract marks, and pressed leaf frames all require zero drawing ability or craft experience.
What size wall art looks best in a small room?
Go bigger than feels instinctively comfortable. Most people choose art that is too small for the wall space, which makes the room feel unresolved.
Where can I find free printable wall art?
Rawpixel, Unsplash, Canva, and the Smithsonian Open Access archive all offer free, high-resolution downloadable art files. The Library of Congress and Europeana provide genuine vintage botanical and architectural prints in the public domain at zero cost. Printing at a local shop costs between $1 and $4 per sheet for a professional-quality result.